
Manual
Page 1
THIS PRODUCT IS INTENDED FOR HOUSEHOLD USE ONLY. IMPORTANT: READ CAREFULLY BEFORE ASSEMBLY AND USE. IF USED COMMERCIALLY WARRANTY IS VOID. ©2010 Techtronic Floor Care Technology Limited. Small parts can present a choking hazard. Questions or concerns? For assistance, please call Customer Service at 1-800-944-9200 Mon-Fri 8am-7pm EST before returning this product to the store. All rights reserved. #960009652 ID101395-R1 Owner's Manual Operating and Servicing Instructions www.hoover.com TM Carpet Cleaner WARNING: Cleaner assembly may include small parts.
THIS PRODUCT IS INTENDED FOR HOUSEHOLD USE ONLY. IMPORTANT: READ CAREFULLY BEFORE ASSEMBLY AND USE. IF USED COMMERCIALLY WARRANTY IS VOID. ©2010 Techtronic Floor Care Technology Limited. Small parts can present a choking hazard. Questions or concerns? For assistance, please call Customer Service at 1-800-944-9200 Mon-Fri 8am-7pm EST before returning this product to the store. All rights reserved. #960009652 ID101395-R1 Owner's Manual Operating and Servicing Instructions www.hoover.com TM Carpet Cleaner WARNING: Cleaner assembly may include small parts.

Manual
Page 2
... sales receipt to register by phone. Model Serial Number Hint: Attach your product online at hoover.com. Contents Important Safeguards 3-4 Assembling Cleaner 5 Carton contents 5 Cleaner Description 6 How To Use Preparing the Carpet 7 Remove and Replace Solution Reservoir 7 Carpet Cleaning 7-8 Dirty Water Tank and Filter: Emptying and Cleaning 8-9 Storage 9 Maintenance Belt or Brushroll: Removal & Replacement 9-10 Service 11 If You Have a Problem 10 Warranty 11 If you or call 1-800-944-9200 to this owner's manual. Follow the authorized dealer locator...
... sales receipt to register by phone. Model Serial Number Hint: Attach your product online at hoover.com. Contents Important Safeguards 3-4 Assembling Cleaner 5 Carton contents 5 Cleaner Description 6 How To Use Preparing the Carpet 7 Remove and Replace Solution Reservoir 7 Carpet Cleaning 7-8 Dirty Water Tank and Filter: Emptying and Cleaning 8-9 Storage 9 Maintenance Belt or Brushroll: Removal & Replacement 9-10 Service 11 If You Have a Problem 10 Warranty 11 If you or call 1-800-944-9200 to this owner's manual. Follow the authorized dealer locator...

Manual
Page 3
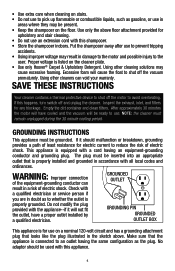
.... • OCCASIONALLY REMOVE BRUSH AND CLEAN DEBRIS FROM END CAPS TO KEEP BRUSH ROTATING SMOOTHLY. • WARNING: FULLY ASSEMBLE CARPET CLEANER BEFORE OPERATING. • WARNING: THIS PRODUCT CONTAINS CHEMICALS KNOWN TO THE STATE OF CALIFORNIA TO CAUSE CANCER, BIRTH DEFECTS OR REPRODUCTIVE HARM. Do not use outdoors. • Do not immerse. IMPORTANT SAFETY INSTRUCTIONS When you use with any object into water, return it...
.... • OCCASIONALLY REMOVE BRUSH AND CLEAN DEBRIS FROM END CAPS TO KEEP BRUSH ROTATING SMOOTHLY. • WARNING: FULLY ASSEMBLE CARPET CLEANER BEFORE OPERATING. • WARNING: THIS PRODUCT CONTAINS CHEMICALS KNOWN TO THE STATE OF CALIFORNIA TO CAUSE CANCER, BIRTH DEFECTS OR REPRODUCTIVE HARM. Do not use outdoors. • Do not immerse. IMPORTANT SAFETY INSTRUCTIONS When you use with any object into water, return it...
Manual
Page 4
... in accordance with this shampooer. • Store the shampooer indoors. Proper voltage is for upholstery and stair cleaning. • Do not use an extension cord with all local codes and ordinances. Using other cleaners can result in a risk of electric shock. Using other cleaning solutions may result in damage to the motor and possible injury to the user. NOTE: the cleaner must be grounded. The...
... in accordance with this shampooer. • Store the shampooer indoors. Proper voltage is for upholstery and stair cleaning. • Do not use an extension cord with all local codes and ordinances. Using other cleaners can result in a risk of electric shock. Using other cleaning solutions may result in damage to the motor and possible injury to the user. NOTE: the cleaner must be grounded. The...

Manual
Page 5
Remove and dispose of midsection and tighten. Assemble the two (2) lower handle screws in the following manner: while holding nut in place, insert screw through front of cardboard packing. 1.2 1.1 A B C Stand base in back of cleaner. 1.4 Place solution reservoir into cleaner and tilt back until it snaps into recess in upright position. Base D. (1) Upper Handle screw E (2) Right and Left Base...
Remove and dispose of midsection and tighten. Assemble the two (2) lower handle screws in the following manner: while holding nut in place, insert screw through front of cardboard packing. 1.2 1.1 A B C Stand base in back of cleaner. 1.4 Place solution reservoir into cleaner and tilt back until it snaps into recess in upright position. Base D. (1) Upper Handle screw E (2) Right and Left Base...

Manual
Page 6
... for commercial use . Dirty Water Tank 9. Handle Release Pedal 13. Not intended for any other commercial purpose. 2.1 9 8 15 13 6 1 2 3 4 56 7 10 14 11 12 Handle 2. Dirty Water Tank Handle 7. Quick Cord Release 12. Power On/Off Switch 14. Brushes 8. Dirty Water Tank Lid 10. 2. How to use Cleaner description Operate cleaner only at voltage specified on data plate on back of cleaner. The assembled cleaner will look like the drawing. 1. Carry Handle 4. Clean Solution Reservoir 5. Dirty Water Tank Latch 6. Upper Handle...
... for commercial use . Dirty Water Tank 9. Handle Release Pedal 13. Not intended for any other commercial purpose. 2.1 9 8 15 13 6 1 2 3 4 56 7 10 14 11 12 Handle 2. Dirty Water Tank Handle 7. Quick Cord Release 12. Power On/Off Switch 14. Brushes 8. Dirty Water Tank Lid 10. 2. How to use Cleaner description Operate cleaner only at voltage specified on data plate on back of cleaner. The assembled cleaner will look like the drawing. 1. Carry Handle 4. Clean Solution Reservoir 5. Dirty Water Tank Latch 6. Upper Handle...

Manual
Page 7
Use a Hoover® vacuum cleaner with a revolving brushroll. 7. Helpful Hints for best results. 2. Allow plenty of dry vacuuming. Remove and Replace Solution Reservoir NOTE: Use only Hoover® brand detergent. Using other cleaners can void your warranty. 2.2 2.3 2.4 A B Press clean solution reservoir latch (Diagram A). Check for Color Fastness: Before cleaning carpet/upholstery, test for color bleeding. Gently rub the cloth over previously cleaned areas. Do not oversaturate carpet with cleaning solution while using a cleaner with a revolving brushroll for ...
Use a Hoover® vacuum cleaner with a revolving brushroll. 7. Helpful Hints for best results. 2. Allow plenty of dry vacuuming. Remove and Replace Solution Reservoir NOTE: Use only Hoover® brand detergent. Using other cleaners can void your warranty. 2.2 2.3 2.4 A B Press clean solution reservoir latch (Diagram A). Check for Color Fastness: Before cleaning carpet/upholstery, test for color bleeding. Gently rub the cloth over previously cleaned areas. Do not oversaturate carpet with cleaning solution while using a cleaner with a revolving brushroll for ...

Manual
Page 8
... nozzle. NOTE: Do not use only Hoover® brand detergent. WARNING: TO REDUCE THE RISK OF INJURY FROM MOVING PARTS - Remove dirty water tank lid. Replace dirt water tank lid. 8 Rinse dirty water tank and filter with the other and empty into sink. IMPORTANT: IF THE SOUND OF THE MOTOR CHANGES TO A HIGH PITCH, THIS INDICATES THE DIRTY WATER TANK IS FULL AND MUST BE EMPTIED. Turn OFF when emptying and filling reservoir. For best...
... nozzle. NOTE: Do not use only Hoover® brand detergent. WARNING: TO REDUCE THE RISK OF INJURY FROM MOVING PARTS - Remove dirty water tank lid. Replace dirt water tank lid. 8 Rinse dirty water tank and filter with the other and empty into sink. IMPORTANT: IF THE SOUND OF THE MOTOR CHANGES TO A HIGH PITCH, THIS INDICATES THE DIRTY WATER TANK IS FULL AND MUST BE EMPTIED. Turn OFF when emptying and filling reservoir. For best...
Manual
Page 9
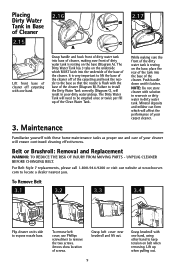
... expose nozzle base. Grasp belt cover near brushroll and lift out. 9 Grasp brushroll with solution in reservoir or dirty water in dirty water tank. Placing Dirty Water 2.16 Tank in Base of Cleaner 2.15 A 2.17 B C Lift front base of cleaner off of the carpeting and hook the nozzle to the base so that the nozzle is flush with the base of the cleaner (Diagram B). UNPLUG CLEANER BEFORE CHANGING BELT. To Remove Belt 3.1 3.2 3.3 3.4 Flip cleaner on belt when removing...
... expose nozzle base. Grasp belt cover near brushroll and lift out. 9 Grasp brushroll with solution in reservoir or dirty water in dirty water tank. Placing Dirty Water 2.16 Tank in Base of Cleaner 2.15 A 2.17 B C Lift front base of cleaner off of the carpeting and hook the nozzle to the base so that the nozzle is flush with the base of the cleaner (Diagram B). UNPLUG CLEANER BEFORE CHANGING BELT. To Remove Belt 3.1 3.2 3.3 3.4 Flip cleaner on belt when removing...

Manual
Page 10
... in place, Replace belt cover by of belt cover into nozzle, mak- Cleaner won 't run Power cord not firmly plugged into outlet. Dirty Water Tank is not installed correctly. Review Emptying & Cleaning the Dirty Water Tank - Solution reservoir not installed properly. Pg. 7. Pg. 7. Needs service. Dispose Place belt on motor With belt in firmly. Blown fuse or tripped breaker. Dirty water passage clogged. Tank - belt. Pg. 8. Review Review Solution Reservoir Installation - Place belt in home. ROTATE BRUSHROLL MANUALLY TO MAKE SURE BELT IS NOT...
... in place, Replace belt cover by of belt cover into nozzle, mak- Cleaner won 't run Power cord not firmly plugged into outlet. Dirty Water Tank is not installed correctly. Review Emptying & Cleaning the Dirty Water Tank - Solution reservoir not installed properly. Pg. 7. Pg. 7. Needs service. Dispose Place belt on motor With belt in firmly. Blown fuse or tripped breaker. Dirty water passage clogged. Tank - belt. Pg. 8. Review Review Solution Reservoir Installation - Place belt in home. ROTATE BRUSHROLL MANUALLY TO MAKE SURE BELT IS NOT...

Manual
Page 11
... any replacement or repair performed under "Vacuum Cleaners" or "Household". • Visit our website at www.hoover.com. However, if you , to misuse, acts of God, nature, vandalism or other acts beyond the control of the product by the original owner. Always identify your vacuum to state. 11 THIS WARRANTY IS THE EXCLUSIVE WARRANTY AND REMEDY PROVIDED BY HOOVER®. Service To...
... any replacement or repair performed under "Vacuum Cleaners" or "Household". • Visit our website at www.hoover.com. However, if you , to misuse, acts of God, nature, vandalism or other acts beyond the control of the product by the original owner. Always identify your vacuum to state. 11 THIS WARRANTY IS THE EXCLUSIVE WARRANTY AND REMEDY PROVIDED BY HOOVER®. Service To...


