Manual
Page 2
... your sales receipt to this product to register your product online at hoover.com. Mon- Manufacturing code (Label located on rear of vacuum) Contents Important Safety Instructions 3-4 Cleaner Assembly 5 Carton Contents 5 Attach Base and Midsection 5 Attach Handle 5 How To Use...6-10 Cleaner Description 6 Preparing The Carpet 7 Remove Clean Water Solution Tank 7 Preparing Clean...
... your sales receipt to this product to register your product online at hoover.com. Mon- Manufacturing code (Label located on rear of vacuum) Contents Important Safety Instructions 3-4 Cleaner Assembly 5 Carton Contents 5 Attach Base and Midsection 5 Attach Handle 5 How To Use...6-10 Cleaner Description 6 Preparing The Carpet 7 Remove Clean Water Solution Tank 7 Preparing Clean...
Manual
Page 3
...Do not allow children to pick up anything that is burning or smoking, such as a handle, close a door on cord. Do not place cleaner on lower back side of dust, lint, hair, and anything that may be followed, including the following: READ ALL INSTRUCTIONS BEFORE USING THIS APPLIANCE...toy. Do not place product on floor. Close supervision is not working as it should always be present. • Connect to prevent the cleaner from heated surfaces. • Do not unplug by children age 12 and under. IMPORTANT SAFETY INSTRUCTIONS SAVE THESE INSTRUCTIONS When using an electrical...
...Do not allow children to pick up anything that is burning or smoking, such as a handle, close a door on cord. Do not place cleaner on lower back side of dust, lint, hair, and anything that may be followed, including the following: READ ALL INSTRUCTIONS BEFORE USING THIS APPLIANCE...toy. Do not place product on floor. Close supervision is not working as it should always be present. • Connect to prevent the cleaner from heated surfaces. • Do not unplug by children age 12 and under. IMPORTANT SAFETY INSTRUCTIONS SAVE THESE INSTRUCTIONS When using an electrical...
Manual
Page 4
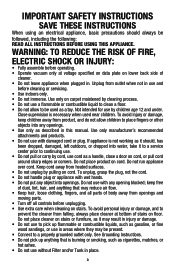
... has been designed into an appropriate outlet that the appliance is properly installed and grounded in the sketch above stepes, your cleaner to cause cancer, birth defects or reproductive harm. GROUNDED OUTLET GROUNDING PIN GROUNDED OUTLET BOX This appliance is properly grounded. When... the threamal protector activates the cleaner will deactivate and cleaning may cause damage. • Store in reducing drying time, be grounded. If this appliance. If it ...
... has been designed into an appropriate outlet that the appliance is properly installed and grounded in the sketch above stepes, your cleaner to cause cancer, birth defects or reproductive harm. GROUNDED OUTLET GROUNDING PIN GROUNDED OUTLET BOX This appliance is properly grounded. When... the threamal protector activates the cleaner will deactivate and cleaning may cause damage. • Store in reducing drying time, be grounded. If this appliance. If it ...
Manual
Page 5
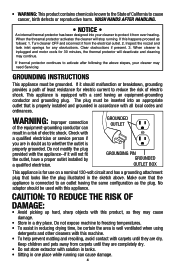
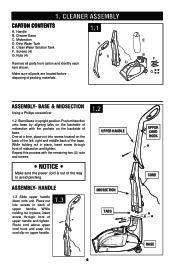
... the remaining two (2) nuts and screws 1.2 UPPER HANDLE • NOTICE • Make sure the power cord is out of the way to avoid pinching. Midsection D. Cleaner Base C. Dirty Water Tank E. Nuts (4) 1.1 A C Remove all parts are located before disposing of upper handle and tighten. E B F G ASSEMBLY- While holding nut in place, insert screw...
... the remaining two (2) nuts and screws 1.2 UPPER HANDLE • NOTICE • Make sure the power cord is out of the way to avoid pinching. Midsection D. Cleaner Base C. Dirty Water Tank E. Nuts (4) 1.1 A C Remove all parts are located before disposing of upper handle and tighten. E B F G ASSEMBLY- While holding nut in place, insert screw...
Manual
Page 6
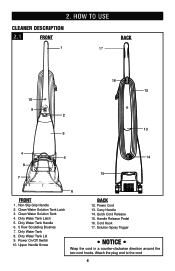
... Solution Tank Latch 3. Dirty Water Tank 8. Power Cord 13. 2. Dirty Water Tank Latch 5. Upper Handle Screw BACK 12. Handle Release Pedal 16. HOW TO USE Cleaner Description 2.1 FRONT BACK 17 FRONT 1. Dirty Water Tank Lid 9. Carry Handle 14. Attach the plug end to the cord 6 Clean Water Solution Tank 4. Power On...
... Solution Tank Latch 3. Dirty Water Tank 8. Power Cord 13. 2. Dirty Water Tank Latch 5. Upper Handle Screw BACK 12. Handle Release Pedal 16. HOW TO USE Cleaner Description 2.1 FRONT BACK 17 FRONT 1. Dirty Water Tank Lid 9. Carry Handle 14. Attach the plug end to the cord 6 Clean Water Solution Tank 4. Power On...

Manual
Page 7
...cushion. Preparing the Carpet Vacuum carpet thoroughly. If the cloth remains clean, it is thoroughly dry, vacuum the carpet using the carpet cleaner. • For heavily soiled areas, additional applications may be safe to dry completely. Gently rub the cloth over previously cleaned areas... each color for Cleaning Carpet: • Do not oversaturate carpet with cleaning solution while using a Hoover® Brand vacuum with hot tap water. Use a Hoover® vacuum cleaner with solution. Remove as a dry vacuum. If unable to remove the furniture, place plastic or foil...
...cushion. Preparing the Carpet Vacuum carpet thoroughly. If the cloth remains clean, it is thoroughly dry, vacuum the carpet using the carpet cleaner. • For heavily soiled areas, additional applications may be safe to dry completely. Gently rub the cloth over previously cleaned areas... each color for Cleaning Carpet: • Do not oversaturate carpet with cleaning solution while using a Hoover® Brand vacuum with hot tap water. Use a Hoover® vacuum cleaner with solution. Remove as a dry vacuum. If unable to remove the furniture, place plastic or foil...
Manual
Page 8
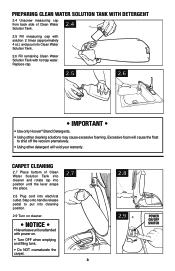
...into electrical outlet. Preparing Clean Water Solution Tank with Detergent 2.4 Unscrew measuring cap from back side of Clean Water Solution Tank into cleaner and rotate top into position until the lever snaps into place. 2.7 2.8 Plug cord into Clean Water Solution Tank. 2.6 Fill...cause excessive foaming. Replace cap. 2.5 2.6 • IMPORTANT • • Use only Hoover® Brand Detergents. • Using other detergent will cause the float to put into cleaning position. 2.9 Turn on cleaner. • NOTICE • • Never leave unit unattended with power on. •...
...into electrical outlet. Preparing Clean Water Solution Tank with Detergent 2.4 Unscrew measuring cap from back side of Clean Water Solution Tank into cleaner and rotate top into position until the lever snaps into place. 2.7 2.8 Plug cord into Clean Water Solution Tank. 2.6 Fill...cause excessive foaming. Replace cap. 2.5 2.6 • IMPORTANT • • Use only Hoover® Brand Detergents. • Using other detergent will cause the float to put into cleaning position. 2.9 Turn on cleaner. • NOTICE • • Never leave unit unattended with power on. •...
Manual
Page 9
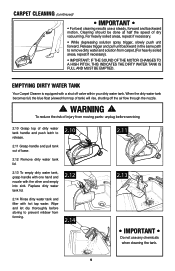
... dry vacuuming. For heavily soiled areas, repeat if necessary. • While depressing solution spray trigger, slowly push unit forward. EMPTYING DIRTY WATER TANK Your Carpet Cleaner is equipped with hot tap water. Release trigger and pull unit backward in the same path to remove dirty water and solution from moving parts...
... dry vacuuming. For heavily soiled areas, repeat if necessary. • While depressing solution spray trigger, slowly push unit forward. EMPTYING DIRTY WATER TANK Your Carpet Cleaner is equipped with hot tap water. Release trigger and pull unit backward in the same path to remove dirty water and solution from moving parts...

Manual
Page 10
...when the dirty water tank is full. • For best results, use only Hoover® Brand Carpet & Upholstery Detergents . Mineral deposits and mildew can form which will affect the performance of your Carpet Cleaner is resting on the underside which will cause the float to install the Dirty ...off the suction. • Use two capfuls (4 ounces) of Hoover® Brand Carpet & Upholstery Detergents per fill up of the nozzle and carpeting will cause the float to empty the dirty water tank. • The float in your carpet cleaner. Push handle down until it latches. 10 2.18 •...
...when the dirty water tank is full. • For best results, use only Hoover® Brand Carpet & Upholstery Detergents . Mineral deposits and mildew can form which will affect the performance of your Carpet Cleaner is resting on the underside which will cause the float to install the Dirty ...off the suction. • Use two capfuls (4 ounces) of Hoover® Brand Carpet & Upholstery Detergents per fill up of the nozzle and carpeting will cause the float to empty the dirty water tank. • The float in your carpet cleaner. Push handle down until it latches. 10 2.18 •...
Manual
Page 11
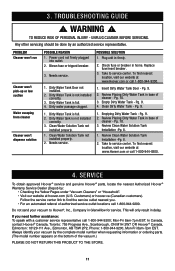
... Tank Installation -Pg. 8. 2. Always identify your vacuum to find nearest location, visit our website at www.Hoover.com or call 1-800-944-9200; PROBLEM Cleaner won't run Cleaner won't pick-up or low suction Water escaping from cleaner Cleaner won't dispense solution POSSIBLE REASON 1. Replace fuse/reset breaker. 3. Clean Dirty Water Tank - Review Clean Water...
... Tank Installation -Pg. 8. 2. Always identify your vacuum to find nearest location, visit our website at www.Hoover.com or call 1-800-944-9200; PROBLEM Cleaner won't run Cleaner won't pick-up or low suction Water escaping from cleaner Cleaner won't dispense solution POSSIBLE REASON 1. Replace fuse/reset breaker. 3. Clean Dirty Water Tank - Review Clean Water...


