Manual
Page 6
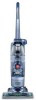
.... Cord Hooks: top hook rotates for household use. 18. Nozzle Release Buttons: release 15 8 18 9 10 11 19 nozzle for drying and vacuuming 5. Clean Water Solution Tank Cap/ 4 Measuring Cup 16 6. Unfold handle 1.8 Raise upper handle (A) to upright position until it locks in place. 1.8 How to fold handle 1.9 Press upper handle release...
.... Cord Hooks: top hook rotates for household use. 18. Nozzle Release Buttons: release 15 8 18 9 10 11 19 nozzle for drying and vacuuming 5. Clean Water Solution Tank Cap/ 4 Measuring Cup 16 6. Unfold handle 1.8 Raise upper handle (A) to upright position until it locks in place. 1.8 How to fold handle 1.9 Press upper handle release...
Manual
Page 8
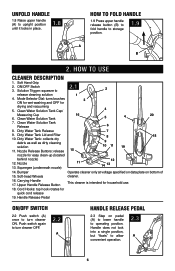
... Tanks: Clean Water Solution Tank (upper tank) Turn cleaner off and disconnect from electrical outlet. Fill tank to prevent leaking. 2.14 Slide tank straight into tank (C). The Clean Water Solution Tank holds detergent and water that is to Fill Place carpet cleaner handle in place for worn spots or joint separations before using water, use one cup (2 oz.) HOOVER®...
... Tanks: Clean Water Solution Tank (upper tank) Turn cleaner off and disconnect from electrical outlet. Fill tank to prevent leaking. 2.14 Slide tank straight into tank (C). The Clean Water Solution Tank holds detergent and water that is to Fill Place carpet cleaner handle in place for worn spots or joint separations before using water, use one cup (2 oz.) HOOVER®...

Manual
Page 9
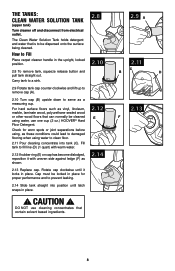
...need to Empty Turn cleaner off and disconnect from the lid. Remove loose debris from overflowing. Press down firmly until snapped in the tank lid. 2.19 To remove debris from screen, remove the pleated filter from electrical outlet. The filter screen may also be emptied after...is locked in lid. How to be cleaned by tapping the filter or gently brushing using your hand. Check the Clean Water Solution Tank also. Empty tank. 2.15 G filters The tank lid contains a washable, reusable filter. Remove filter lid (A), then remove filter (B). Reposition filter. 2.18 Replace filter lid. ...
...need to Empty Turn cleaner off and disconnect from the lid. Remove loose debris from overflowing. Press down firmly until snapped in the tank lid. 2.19 To remove debris from screen, remove the pleated filter from electrical outlet. The filter screen may also be emptied after...is locked in lid. How to be cleaned by tapping the filter or gently brushing using your hand. Check the Clean Water Solution Tank also. Empty tank. 2.15 G filters The tank lid contains a washable, reusable filter. Remove filter lid (A), then remove filter (B). Reposition filter. 2.18 Replace filter lid. ...
Manual
Page 10
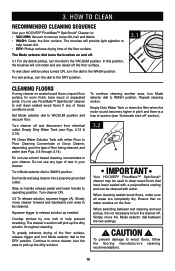
... based cleaning concentrates in your HOOVER® FloorMate™ SpinScrub® Cleaner to: • VACUUM: Vacuum to clean wood floors that no water remains on handle release pedal and lower handle to VACUUM position and vacuum floor. Fill Clean Water Solution Tank with water. Turn cleaner ON.... 3.2 To release solution, squeeze trigger (A). To prevent damage to wet clean sealed wood floors if any type of floor being...
... based cleaning concentrates in your HOOVER® FloorMate™ SpinScrub® Cleaner to: • VACUUM: Vacuum to clean wood floors that no water remains on handle release pedal and lower handle to VACUUM position and vacuum floor. Fill Clean Water Solution Tank with water. Turn cleaner ON.... 3.2 To release solution, squeeze trigger (A). To prevent damage to wet clean sealed wood floors if any type of floor being...
Manual
Page 12
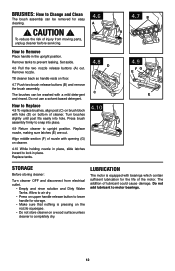
...detergent. Press brush assembly firmly to snap into hole. The addition of injury from electrical outlet. • Empty and rinse solution and Dirty Water Tanks. How to Remove Place handle in place. Tilt cleaner back so handle rests on a wood surface unless cleaner is equipped ...(G) on cleaner. 4.10 While holding nozzle in place, slide latches inward to lock in the upright position. Align middle section (F) of the motor. Replace tanks. 4.8 D C 4.10 4.7 B A 4.9 FG E E StorAGE Before storing cleaner: Turn cleaner OFF and disconnect from moving parts, unplug cleaner before ...
...detergent. Press brush assembly firmly to snap into hole. The addition of injury from electrical outlet. • Empty and rinse solution and Dirty Water Tanks. How to Remove Place handle in place. Tilt cleaner back so handle rests on a wood surface unless cleaner is equipped ...(G) on cleaner. 4.10 While holding nozzle in place, slide latches inward to lock in the upright position. Align middle section (F) of the motor. Replace tanks. 4.8 D C 4.10 4.7 B A 4.9 FG E E StorAGE Before storing cleaner: Turn cleaner OFF and disconnect from moving parts, unplug cleaner before ...
Manual
Page 13
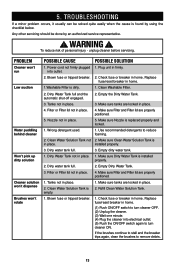
.... 2. Make sure Nozzle is installed properly. 2. Won't pick up dirty solution 1. Cleaner solution won't dispense Brushes won 't run 1. Tanks not in home. Clean Water Solution Tank is dirty. 1. Wrong detergent used. 1. installed properly. 3. Make sure tanks are locked in place. 4. Empty the Dirty Water Tank. 3. Dirty water tank full. 3. 5. TROUBLESHOOTING If a minor problem occurs, it usually can be...
.... 2. Make sure Nozzle is installed properly. 2. Won't pick up dirty solution 1. Cleaner solution won't dispense Brushes won 't run 1. Tanks not in home. Clean Water Solution Tank is dirty. 1. Wrong detergent used. 1. installed properly. 3. Make sure tanks are locked in place. 4. Empty the Dirty Water Tank. 3. Dirty water tank full. 3. 5. TROUBLESHOOTING If a minor problem occurs, it usually can be...


