
Product Manual
Page 2
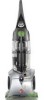
™ CARPET CLEANER OWNER'S MANUAL OPERATING AND SERVICING INSTRUCTIONS Please read these instructions carefully before using your vacuum.
™ CARPET CLEANER OWNER'S MANUAL OPERATING AND SERVICING INSTRUCTIONS Please read these instructions carefully before using your vacuum.

Product Manual
Page 3
... Cleaning Stairs Upholstery and Other Small Areas 17 After Cleaning 19 5. TROUBLESHOOTING GUIDE .......... 21 6. SERVICE 22 7. WAR R ANT Y 2 3 OWNER'S INSTRUCTIONS English pp. 1-23 Español pàg. E1-E23 2 TABLE OF CONTENTS TABLE OF CONTENTS Safety Instructions 3 1. FEAT URES 5 2. HOW TO OPERATE 8 Grounding Instructions 10 ON / OFF Button 10 Handle Release Pedal 10 Transporting 10 Carrying Handle 10 Tank Status 11 Emptying the Dirty Water Recovery Tank 11 Preparing the Machine...
... Cleaning Stairs Upholstery and Other Small Areas 17 After Cleaning 19 5. TROUBLESHOOTING GUIDE .......... 21 6. SERVICE 22 7. WAR R ANT Y 2 3 OWNER'S INSTRUCTIONS English pp. 1-23 Español pàg. E1-E23 2 TABLE OF CONTENTS TABLE OF CONTENTS Safety Instructions 3 1. FEAT URES 5 2. HOW TO OPERATE 8 Grounding Instructions 10 ON / OFF Button 10 Handle Release Pedal 10 Transporting 10 Carrying Handle 10 Tank Status 11 Emptying the Dirty Water Recovery Tank 11 Preparing the Machine...
Product Manual
Page 4
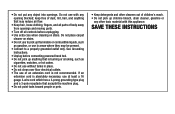
... use with wet hands. THIS PRODUCT IS INTENDED FOR HOUSEHOLD USE ONLY. Close attention is not working as it should always be used by cord, use and before cleaning or servicing. • Use indoors only. • Do not immerse. If appliance is necessary when used as a handle, close a door on carpet moistened by cleaning process or small spills. • Use only commercially available floor cleaners and waxes intended for machine...
... use with wet hands. THIS PRODUCT IS INTENDED FOR HOUSEHOLD USE ONLY. Close attention is not working as it should always be used by cord, use and before cleaning or servicing. • Use indoors only. • Do not immerse. If appliance is necessary when used as a handle, close a door on carpet moistened by cleaning process or small spills. • Use only commercially available floor cleaners and waxes intended for machine...
Product Manual
Page 5
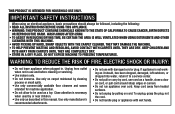
... clean over floor electrical outlets. • The use of body away from openings and moving parts. • Turn off all controls before connecting powered hand tool. • Do not pick up chlorine bleach, drain cleaner, gasoline or any other toxic material with any object into openings. SAVE THESE INSTRUCTIONS • Do not put any opening blocked; Do not place carpet cleaner on stairs. keep free...
... clean over floor electrical outlets. • The use of body away from openings and moving parts. • Turn off all controls before connecting powered hand tool. • Do not pick up chlorine bleach, drain cleaner, gasoline or any other toxic material with any object into openings. SAVE THESE INSTRUCTIONS • Do not put any opening blocked; Do not place carpet cleaner on stairs. keep free...
Product Manual
Page 6
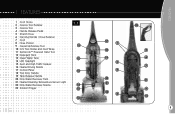
FEATURES 1 Cord Hooks 2 Crevice Tool Retainer 3 Crevice Tool 4 Handle Release Pedal 5 Stretch Hose 6 Carrying Handle / Hose Retainer 7 Cord 8 Hose Pocket 9 Carpet/Upholstery Tool 10 C/U Tool Holder and Cord Wrap 11 SpinScrubTM Powered Hand Tool 12 Detergent Tank 13 Clean Water Tank 14 LED Headlight 15 Spot and High Traffic Sprayer 16 Heated Drying Nozzle 17 Control Panel 18 Tool Door Handle 19 Tank Release Handle 20 Dirty Water Recovery Tank 21 Heated Cleaning Temperature Sensor Light 22 Dirty Water Recovery Nozzle 23 Solution Trigger 1.1 11 12 13 14 15 16 23...
FEATURES 1 Cord Hooks 2 Crevice Tool Retainer 3 Crevice Tool 4 Handle Release Pedal 5 Stretch Hose 6 Carrying Handle / Hose Retainer 7 Cord 8 Hose Pocket 9 Carpet/Upholstery Tool 10 C/U Tool Holder and Cord Wrap 11 SpinScrubTM Powered Hand Tool 12 Detergent Tank 13 Clean Water Tank 14 LED Headlight 15 Spot and High Traffic Sprayer 16 Heated Drying Nozzle 17 Control Panel 18 Tool Door Handle 19 Tank Release Handle 20 Dirty Water Recovery Tank 21 Heated Cleaning Temperature Sensor Light 22 Dirty Water Recovery Nozzle 23 Solution Trigger 1.1 11 12 13 14 15 16 23...

Product Manual
Page 7
FEATURES Control Panel 24 Detergent Tank is Empty 1.2 25 Clean Water Tank is Empty 26 Recovery Tank is Full 27 Cleaning Selector 28 Power Button 29 Surface Selector 30 Wash Indicator 31 Rinse Indicator 24 25 26 27 28 29 31 30 6 FEATURES 1.
FEATURES Control Panel 24 Detergent Tank is Empty 1.2 25 Clean Water Tank is Empty 26 Recovery Tank is Full 27 Cleaning Selector 28 Power Button 29 Surface Selector 30 Wash Indicator 31 Rinse Indicator 24 25 26 27 28 29 31 30 6 FEATURES 1.
Product Manual
Page 8
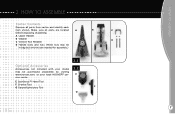
HOW TO ASSEMBLE 2. A Upper Handle B Cleaner C Crevice Tool Retainer D D Handle bolts and nuts (Three nuts may be purchased separately by visiting www.hoover.com, or your local HOOVER® service center. 2.2 E E SpinScrub™ Hand Tool F Crevice Tool G Carpet/Upholstery Tool F G 7 Make sure all parts from carton and identify each item shown. HOW TO ASSEMBLE Carton Contents Remove all parts are needed for assembly.) 2.1 Optional Accessories Accessories not included with your model may be in bag but only two are located A B C before disposing of packing.
HOW TO ASSEMBLE 2. A Upper Handle B Cleaner C Crevice Tool Retainer D D Handle bolts and nuts (Three nuts may be purchased separately by visiting www.hoover.com, or your local HOOVER® service center. 2.2 E E SpinScrub™ Hand Tool F Crevice Tool G Carpet/Upholstery Tool F G 7 Make sure all parts from carton and identify each item shown. HOW TO ASSEMBLE Carton Contents Remove all parts are needed for assembly.) 2.1 Optional Accessories Accessories not included with your model may be in bag but only two are located A B C before disposing of packing.
Product Manual
Page 9
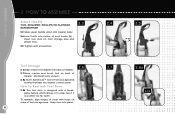
.... Snap door into back of cleaner. 2.7 Store crevice and brush tool on front storage area and attach nuts. 2.5 Tighten with screwdriver. 2.3 Tool Storage 2 . 6 Snap crevice tool retainer into place. 2.6 8 2.4 2.5 H 2.7 2.8a 2.8b How To Reattach Tool Door 2.8b The tool door is pushed too far open. Open tool door on back of cord hooks (H) - HOW TO ASSEMBLE Attach Handle TOOL REQUIRED: PHILLIPS OR FLATHEAD SCREWDRIVER...
.... Snap door into back of cleaner. 2.7 Store crevice and brush tool on front storage area and attach nuts. 2.5 Tighten with screwdriver. 2.3 Tool Storage 2 . 6 Snap crevice tool retainer into place. 2.6 8 2.4 2.5 H 2.7 2.8a 2.8b How To Reattach Tool Door 2.8b The tool door is pushed too far open. Open tool door on back of cord hooks (H) - HOW TO ASSEMBLE Attach Handle TOOL REQUIRED: PHILLIPS OR FLATHEAD SCREWDRIVER...
Product Manual
Page 13
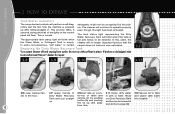
... the machine is normal. Do not use without float in sink or toilet. Dirty Water Recovery ter-top or table and in place. button (A) and pivoting and be emptied. Emptying the Dirty Water Recovery Tank Turn carpet cleaner off and unplug from screen (B). 12 and dirt from outlet. This process takes 5 seconds during which all of 3.10 Set tank on the control panel will no longer dispense liquid...
... the machine is normal. Do not use without float in sink or toilet. Dirty Water Recovery ter-top or table and in place. button (A) and pivoting and be emptied. Emptying the Dirty Water Recovery Tank Turn carpet cleaner off and unplug from screen (B). 12 and dirt from outlet. This process takes 5 seconds during which all of 3.10 Set tank on the control panel will no longer dispense liquid...
Product Manual
Page 14
... Clean Water Tank (A) with hot tap water (under 140˙f/60˙c) to ensure optimum water pick up. 3.14 Remove Clean Water and Detergent Tanks by sliding straight into place. 3.13 3.15 3.16 3.14 B A 3.17 13 This ensures the tank is locked into cleaner. Use only Hoover® brand detergents and carpet cleaners; HOW TO OPERATE 3. HOW TO OPERATE Preparing the Machine for Cleaning Filling the Tanks 3.13 Make sure Dirty Water Recovery Tank lid and tool hose...
... Clean Water Tank (A) with hot tap water (under 140˙f/60˙c) to ensure optimum water pick up. 3.14 Remove Clean Water and Detergent Tanks by sliding straight into place. 3.13 3.15 3.16 3.14 B A 3.17 13 This ensures the tank is locked into cleaner. Use only Hoover® brand detergents and carpet cleaners; HOW TO OPERATE 3. HOW TO OPERATE Preparing the Machine for Cleaning Filling the Tanks 3.13 Make sure Dirty Water Recovery Tank lid and tool hose...
Product Manual
Page 15
... detergent. Do not use a HOOVER® vacuum cleaner with the dampened cloth. In a small, hidden area, gently rub the surface with an agitator for best results. Test for color removal or bleed with white paper towel or cloth. HOW TO CLEAN 4. When cleaning entire floor, move , place aluminum foil or wax paper under legs. plastic) underneath them before cleaning. 14 For carpet, use the carpet cleaner...
... detergent. Do not use a HOOVER® vacuum cleaner with the dampened cloth. In a small, hidden area, gently rub the surface with an agitator for best results. Test for color removal or bleed with white paper towel or cloth. HOW TO CLEAN 4. When cleaning entire floor, move , place aluminum foil or wax paper under legs. plastic) underneath them before cleaning. 14 For carpet, use the carpet cleaner...
Product Manual
Page 16
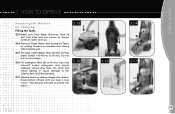
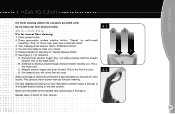
HOW TO CLEAN 4. Do not clean over the width of the machine and repeat steps A through D. Press power button. 2. Pull and hold solution trigger (Fig. 4.2) while pushing machine straight forward. Continue to "Wash/Auto Rinse". 4. Move over floor electrical outlets. Turn cleaning mode selector dial to depress solution trigger and pull cleaner towards you . See Figure 4.1 for best results. This is much slower than dry vacuum cleaning. B. For best cleaning and...
HOW TO CLEAN 4. Do not clean over the width of the machine and repeat steps A through D. Press power button. 2. Pull and hold solution trigger (Fig. 4.2) while pushing machine straight forward. Continue to "Wash/Auto Rinse". 4. Move over floor electrical outlets. Turn cleaning mode selector dial to depress solution trigger and pull cleaner towards you . See Figure 4.1 for best results. This is much slower than dry vacuum cleaning. B. For best cleaning and...

Product Manual
Page 17
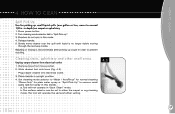
... surface button. "Rug" for more than 30 seconds. Release Handle. 5. B. Release solution trigger and push forward. Repeat steps C and D for throw rugs, area rugs or delicate carpet. 4. Pull solution trigger to remove soap residue or liquid spills 1. This will work the solution into the fibers, releasing the soils. A B Rinse Only Function Use to spray solution. A. Continue to wall carpeting. This is turned off in Spot Clean mode. NOTE: The vacuum motor is...
... surface button. "Rug" for more than 30 seconds. Release Handle. 5. B. Release solution trigger and push forward. Repeat steps C and D for throw rugs, area rugs or delicate carpet. 4. Pull solution trigger to remove soap residue or liquid spills 1. This will work the solution into the fibers, releasing the soils. A B Rinse Only Function Use to spray solution. A. Continue to wall carpeting. This is turned off in Spot Clean mode. NOTE: The vacuum motor is...
Product Manual
Page 18
... longer visible moving through the recovery nozzle. b.The surface selector can be set to remove small spills (will operate the same at either setting. 4.3 17 in this mode). Brushes do not spin in depth) on carpet or upholstery 1. Place handle in this mode. 4. a. HOW TO CLEAN Spill Pick-Up Use for plain water spray or "Spill Pick-Up" to either the carpet or rug cleaning mode, the tool will not spray in upright position 4.
... longer visible moving through the recovery nozzle. b.The surface selector can be set to remove small spills (will operate the same at either setting. 4.3 17 in this mode). Brushes do not spin in depth) on carpet or upholstery 1. Place handle in this mode. 4. a. HOW TO CLEAN Spill Pick-Up Use for plain water spray or "Spill Pick-Up" to either the carpet or rug cleaning mode, the tool will not spray in upright position 4.
Product Manual
Page 19
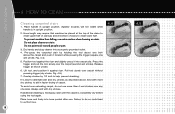
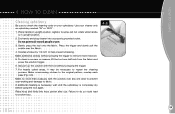
... stroke. 6. Pull tool slowly over the carpet (second wet stroke). Do not place cleaner on stairs. Lift tool, and position it against the riser and slightly press it forward while pressing the trigger (equals one area. Failure to do not use . Agitator brushes will not rotate while handle is completely dry before using the tool again. Hose length may require that machine be placed at...
... stroke. 6. Pull tool slowly over the carpet (second wet stroke). Do not place cleaner on stairs. Lift tool, and position it against the riser and slightly press it forward while pressing the trigger (equals one area. Failure to do not use . Agitator brushes will not rotate while handle is completely dry before using the tool again. Hose length may require that machine be placed at...
Product Manual
Page 20
... -wetting and damage to check the cleaning code on upholstery marked "W" or "W/S". 1. For heavily soiled areas, it may be necessary to suction loss. 4.6 19 Make no more moisture. 5. If additional cleaning is necessary, wait until the upholstery is in upright position. Failure to do so could lead to repeat the cleaning process. Agitator brushes will not rotate while handle is completely dry before using...
... -wetting and damage to check the cleaning code on upholstery marked "W" or "W/S". 1. For heavily soiled areas, it may be necessary to suction loss. 4.6 19 Make no more moisture. 5. If additional cleaning is necessary, wait until the upholstery is in upright position. Failure to do so could lead to repeat the cleaning process. Agitator brushes will not rotate while handle is completely dry before using...
Product Manual
Page 21
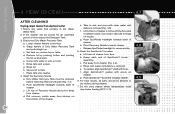
... SpinScrubTM brush assembly. h. Clean the SpinScrubTM brushes. Pull away from cleaner. Align SpinScrubTM guides with clean water until debris is removed (Fig. 4.8). b. h. d. Take to dry before removing Recovery Nozzle (Fig. 4.7). g. Grasp each end of cleaner 2 inches off the floor and re-attach nozzle. To replace, align SpinScrubTM shaft with water until debris is removed. For best results, all parts should be stored for an extended period of the cleaner. Empty the Dirty Water Recovery Tank. e. e. c. Clean the Recovery Nozzle a. Use...
... SpinScrubTM brush assembly. h. Clean the SpinScrubTM brushes. Pull away from cleaner. Align SpinScrubTM guides with clean water until debris is removed (Fig. 4.8). b. h. d. Take to dry before removing Recovery Nozzle (Fig. 4.7). g. Grasp each end of cleaner 2 inches off the floor and re-attach nozzle. To replace, align SpinScrubTM shaft with water until debris is removed. For best results, all parts should be stored for an extended period of the cleaner. Empty the Dirty Water Recovery Tank. e. e. c. Clean the Recovery Nozzle a. Use...
Product Manual
Page 22
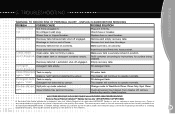
... identify your Yellow Pages for surface being cleaned. UNPLUG CLEANER BEFORE SERVICING PROBLEM Cleaner won 't dispense. POSSIBLE SOLUTION Plug unit in . light is empty. Recovery tank full/automatic shut off engaged. won't dispense. Detergent not detected by sensor. Change mode to Wash/Auto Rinse, Rinse Only, Spot Clean. Recovery tank full / automatic shut-off engaged. Recovery tank lid not on the bottom of repair are to operate normally. Detergent Detergent tank empty. Clean water Clean water tank not firmly in this unit are...
... identify your Yellow Pages for surface being cleaned. UNPLUG CLEANER BEFORE SERVICING PROBLEM Cleaner won 't dispense. POSSIBLE SOLUTION Plug unit in . light is empty. Recovery tank full/automatic shut off engaged. won't dispense. Detergent not detected by sensor. Change mode to Wash/Auto Rinse, Rinse Only, Spot Clean. Recovery tank full / automatic shut-off engaged. Recovery tank lid not on the bottom of repair are to operate normally. Detergent Detergent tank empty. Clean water Clean water tank not firmly in this unit are...
Product Manual
Page 23
... or Authorized Hoover® Warranty Service Dealer (Depot) by the complete model number when requesting information or ordering parts. (The model number appears on -line at www.hoover.com OR • calling 1-800-944-9200 for service, this will only result in delay. Do not send your cleaner by : • checking the Yellow Pages under "Vacuum Cleaners - Always identify your cleaner to Hoover®, in...
... or Authorized Hoover® Warranty Service Dealer (Depot) by the complete model number when requesting information or ordering parts. (The model number appears on -line at www.hoover.com OR • calling 1-800-944-9200 for service, this will only result in delay. Do not send your cleaner by : • checking the Yellow Pages under "Vacuum Cleaners - Always identify your cleaner to Hoover®, in...
Product Manual
Page 24
... mail your Hoover Platinum Collection™ Carpet Cleaner is warranted against original defects in accordance with any replacement or repair performed under the laws of the state of consequential damages, so the above exclusion may not be extended by the original owner. WARRANTY Li mi te d SIX Yea r Wa rra n t y f or Hoover Platinum Collection™ Carpet Cleaner (Domestic Use) WHAT THIS WARRANTY COVERS When used and...
... mail your Hoover Platinum Collection™ Carpet Cleaner is warranted against original defects in accordance with any replacement or repair performed under the laws of the state of consequential damages, so the above exclusion may not be extended by the original owner. WARRANTY Li mi te d SIX Yea r Wa rra n t y f or Hoover Platinum Collection™ Carpet Cleaner (Domestic Use) WHAT THIS WARRANTY COVERS When used and...


