
Product Manual
Page 5
... contents 1.1 Carpet Upholstery Cleaner Bare floor cleaner PreCleaner G C H D F I . Upper Handle C. Handle Bolts and Nuts (Three nuts may vary from carton and identify each item shown. Bolts and nuts ... not included with your model may be in bag with screwdriver. 1.2 1.3 Cord Protector -V2 1.4 1.5 5 Actual model may be purchased separately by visiting hoover.com. Hose/Cord Hook E. Hose/Tool Caddy* G Hose H Stair/Upholstery Nozzle I B E A A. NOTE: Phillips screwdriver needed for assembly. Cleaner B. Make sure all parts from images shown. F.
... contents 1.1 Carpet Upholstery Cleaner Bare floor cleaner PreCleaner G C H D F I . Upper Handle C. Handle Bolts and Nuts (Three nuts may vary from carton and identify each item shown. Bolts and nuts ... not included with your model may be in bag with screwdriver. 1.2 1.3 Cord Protector -V2 1.4 1.5 5 Actual model may be purchased separately by visiting hoover.com. Hose/Cord Hook E. Hose/Tool Caddy* G Hose H Stair/Upholstery Nozzle I B E A A. NOTE: Phillips screwdriver needed for assembly. Cleaner B. Make sure all parts from images shown. F.
Product Manual
Page 6
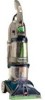
... 1.8 Push up on hook (C). Replace upper tank 1.6 Position bottom of tank onto cleaner. 1.6 1.7 Push top of tank and tank handle while supporting back of cleaner as shown. 1.15 Check tank to make sure it to secure hose and solution tube (E and inset). 1.12 1.13 1.14 D E E D ... 1.15 Store Tools on select models only) 1.10 Insert tabs. 1.11 Slide caddy down. Attach hose/cord hook 1.9 1.9 Snap hook onto cleaner. 1.7 1.8 Attach tool caddy (for storage on wall or in closet. 1.10 Store hose 1.12 Start. 1.13 Wrap. 1.14 Finish. IMPORTANT Tool caddy is secure. Use clips (D) to...
... 1.8 Push up on hook (C). Replace upper tank 1.6 Position bottom of tank onto cleaner. 1.6 1.7 Push top of tank and tank handle while supporting back of cleaner as shown. 1.15 Check tank to make sure it to secure hose and solution tube (E and inset). 1.12 1.13 1.14 D E E D ... 1.15 Store Tools on select models only) 1.10 Insert tabs. 1.11 Slide caddy down. Attach hose/cord hook 1.9 1.9 Snap hook onto cleaner. 1.7 1.8 Attach tool caddy (for storage on wall or in closet. 1.10 Store hose 1.12 Start. 1.13 Wrap. 1.14 Finish. IMPORTANT Tool caddy is secure. Use clips (D) to...
Product Manual
Page 7
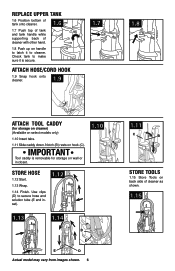
...FLOOR model may also be purchased separately ATTACHMENT. Carry Handle 6 7. Stair/Upholstery Nozzle* This cleaner is intended for quick cord release Operate cleaner only at voltage specified on data plate on wheels and push forward. 2.4 A Carry handle The cleaner may be lifted by visiting www.hoover.com, or your cleaner from images shown. Hose.../Tool Caddy* 21. To turn cleaner ON, push switch down. HOW TO USE Cleaner Description 1. Hand Grip 2. Hose* of ...
...FLOOR model may also be purchased separately ATTACHMENT. Carry Handle 6 7. Stair/Upholstery Nozzle* This cleaner is intended for quick cord release Operate cleaner only at voltage specified on data plate on wheels and push forward. 2.4 A Carry handle The cleaner may be lifted by visiting www.hoover.com, or your cleaner from images shown. Hose.../Tool Caddy* 21. To turn cleaner ON, push switch down. HOW TO USE Cleaner Description 1. Hand Grip 2. Hose* of ...

Product Manual
Page 13
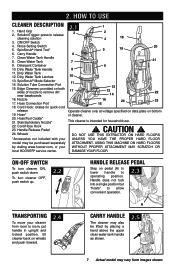
... place. 4.4 4.2 C B B 4.5 13 Actual model may need for removal. tools A. To reattach, align hinges of tool storage area. Remove hose from moving parts, unplug cleaner. 4.1 A How to snap free if it to Attach 4.1 Open hose connection port (A). 4. How to help provide the scrubbing action some models, the brushes can be removed for extra 4.3 scrubbing...
... place. 4.4 4.2 C B B 4.5 13 Actual model may need for removal. tools A. To reattach, align hinges of tool storage area. Remove hose from moving parts, unplug cleaner. 4.1 A How to snap free if it to Attach 4.1 Open hose connection port (A). 4. How to help provide the scrubbing action some models, the brushes can be removed for extra 4.3 scrubbing...
Product Manual
Page 14
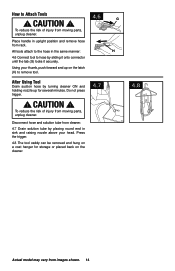
... ! CAUTION ! 4.6 G To reduce the risk of injury from moving parts, unplug cleaner. After Using Tool Drain suction hose by turning cleaner ON and holding nozzle up on the cleaner. 4.7 4.8 Actual model may vary from cleaner. 4.7 Drain solution tube by placing round end in sink and raising nozzle above your... thumb, push forward and up for storage or placed back on the latch (H) to the hose in upright position and remove hose from moving parts, unplug cleaner. Press the trigger. 4.8 The tool caddy can be removed and hung on a coat hanger for several...
... ! CAUTION ! 4.6 G To reduce the risk of injury from moving parts, unplug cleaner. After Using Tool Drain suction hose by turning cleaner ON and holding nozzle up on the cleaner. 4.7 4.8 Actual model may vary from cleaner. 4.7 Drain solution tube by placing round end in sink and raising nozzle above your... thumb, push forward and up for storage or placed back on the latch (H) to the hose in upright position and remove hose from moving parts, unplug cleaner. Press the trigger. 4.8 The tool caddy can be removed and hung on a coat hanger for several...

Product Manual
Page 15
... handle is a loss in suction (see "Automatic Shut-Off", Fig. 2.17). Hose length may vary from falling, use more dry strokes to end of carpet. To prevent machine from images shown. Turn cleaner ON. 4.9 Pre-spray the carpeted stair by 1/2 inch to instructions for Fig....stroke). 4.9 4.10 A B Position tool against riser. Overlap strokes by holding the tool (A) or (B) about one area. Always end with HOOVER® detergent according to instructions for Figs. 2.9 to alternate wet and dry strokes as instructed in upright position. Fill detergent container with dry strokes...
... handle is a loss in suction (see "Automatic Shut-Off", Fig. 2.17). Hose length may vary from falling, use more dry strokes to end of carpet. To prevent machine from images shown. Turn cleaner ON. 4.9 Pre-spray the carpeted stair by 1/2 inch to instructions for Fig....stroke). 4.9 4.10 A B Position tool against riser. Overlap strokes by holding the tool (A) or (B) about one area. Always end with HOOVER® detergent according to instructions for Figs. 2.9 to alternate wet and dry strokes as instructed in upright position. Fill detergent container with dry strokes...
Product Manual
Page 16
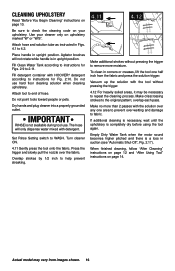
... HOOVER® detergent according to remove more than 2 passes with detergent. Actual model may be necessary to WASH. Attach hose and solution tube as instructed in Figs. 4.1 to end of hose...see "Automatic Shut-Off", Fig. 2.17). Dry hands and plug cleaner into a properly grounded outlet. The hose will not rotate while handle is completely dry before using the tool ...use hard floor cleaning solution when cleaning upholstery. Cleaning upholstery Read "Before You Begin Cleaning" instructions on upholstery marked "W" or "W/S". Make crisscrossing strokes to fabric. Turn cleaner ON. ...
... HOOVER® detergent according to remove more than 2 passes with detergent. Actual model may be necessary to WASH. Attach hose and solution tube as instructed in Figs. 4.1 to end of hose...see "Automatic Shut-Off", Fig. 2.17). Dry hands and plug cleaner into a properly grounded outlet. The hose will not rotate while handle is completely dry before using the tool ...use hard floor cleaning solution when cleaning upholstery. Cleaning upholstery Read "Before You Begin Cleaning" instructions on upholstery marked "W" or "W/S". Make crisscrossing strokes to fabric. Turn cleaner ON. ...
Product Manual
Page 19
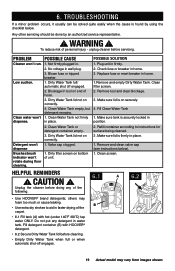
...personal injury - WARNING ! POSSIBLE SOLUTION 1. Clean water won 't rotate during floor cleaning. 1. Blockage In tool on end of the following. Clean Water Tank...hose. 3. Plug unit in water tank. Clean Water Tank empty, but detergent remains. 1. Helpful Reminders 6.1 ! Unplug the cleaner before doing any detergent in firmly. 6. To reduce risk of unit. 1. unplug cleaner...1. Dirty filter screen on securely. 4. Clean screen. CAUTION ! A 6.2 • Use HOOVER® brand detergents; B • Use extra dry strokes to instructions for surface being cleaned...
...personal injury - WARNING ! POSSIBLE SOLUTION 1. Clean water won 't rotate during floor cleaning. 1. Blockage In tool on end of the following. Clean Water Tank...hose. 3. Plug unit in water tank. Clean Water Tank empty, but detergent remains. 1. Helpful Reminders 6.1 ! Unplug the cleaner before doing any detergent in firmly. 6. To reduce risk of unit. 1. unplug cleaner...1. Dirty filter screen on securely. 4. Clean screen. CAUTION ! A 6.2 • Use HOOVER® brand detergents; B • Use extra dry strokes to instructions for surface being cleaned...


