Product Manual
Page 3
..., use cord as described in the instructions. • Use only attachments recommended by or near children. Do not allow carpet cleaner to be used by Hoover®; IMPORTANT SAFETY INSTRUCTIONS SAVE THESE INSTRUCTIONS When using an electrical appliance, basic precautions should , has been dropped, damaged.... (See Cleaning Products section of this appliance. • Do not pick up anything that accepts the machine plug. • Unplug carpet cleaner from outlet when not in use. Do not immerse product. • Connect to a properly grounded outlet only. If appliance is burning...
..., use cord as described in the instructions. • Use only attachments recommended by or near children. Do not allow carpet cleaner to be used by Hoover®; IMPORTANT SAFETY INSTRUCTIONS SAVE THESE INSTRUCTIONS When using an electrical appliance, basic precautions should , has been dropped, damaged.... (See Cleaning Products section of this appliance. • Do not pick up anything that accepts the machine plug. • Unplug carpet cleaner from outlet when not in use. Do not immerse product. • Connect to a properly grounded outlet only. If appliance is burning...
Product Manual
Page 4
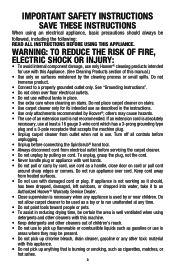
... only. • Do not put any opening blocked; If it should be installed by a qualified electrician. Do not modify the plug provided with carpets until a properly grounded outlet (B) can result in doubt as a properly grounded outlet box cover (Fig. 2). Whenever the adapter is not available ... machine. • Keep hair, loose clothing, fingers, feet and all local codes and ordinances. NOTE: In Canada, the use with the carpet cleaner. • Avoid picking up hard, sharp objects with any object into an appropriate outlet (B) that is properly grounded. if it must be ...
... only. • Do not put any opening blocked; If it should be installed by a qualified electrician. Do not modify the plug provided with carpets until a properly grounded outlet (B) can result in doubt as a properly grounded outlet box cover (Fig. 2). Whenever the adapter is not available ... machine. • Keep hair, loose clothing, fingers, feet and all local codes and ordinances. NOTE: In Canada, the use with the carpet cleaner. • Avoid picking up hard, sharp objects with any object into an appropriate outlet (B) that is properly grounded. if it must be ...

Product Manual
Page 5
Handle Bolts and Nuts (Three nuts may be purchased separately by visiting hoover.com. Cleaner ASSEMBLY Carton contents 1.1 Carpet Upholstery Cleaner Bare floor cleaner PreCleaner G C H D F I . Make sure all parts from images shown. Hose/Tool Caddy* G Hose H Stair/Upholstery Nozzle I B E A A. ...Assembly Remove all parts are located before disposing of packing materials. SpinScrub® Hand Tool* *Available on select models only. Cleaner B. Bolts and nuts located in bag but only two or need for assembly. NOTE: Phillips screwdriver needed for assembly. Hose...
Handle Bolts and Nuts (Three nuts may be purchased separately by visiting hoover.com. Cleaner ASSEMBLY Carton contents 1.1 Carpet Upholstery Cleaner Bare floor cleaner PreCleaner G C H D F I . Make sure all parts from images shown. Hose/Tool Caddy* G Hose H Stair/Upholstery Nozzle I B E A A. ...Assembly Remove all parts are located before disposing of packing materials. SpinScrub® Hand Tool* *Available on select models only. Cleaner B. Bolts and nuts located in bag but only two or need for assembly. NOTE: Phillips screwdriver needed for assembly. Hose...
Product Manual
Page 8
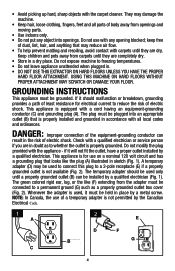
...the water that mixes with detergent for cleaning the carpet or floor, or used to Fill Unplug cleaner from images shown. 8 To remove tank, press down on tank handle and pull forward. 2.9 F 2.10 2.8 Fill tank (E) with Hoover® Carpet/Upholstery Detergent. Do not fill with water above ... the warranty. How to rinse the carpet or floor. IMPORTANT Use only HOOVER® SteamVac® detergents. brushes OFF for use with your SteamVac® cleaner. CAUTION ! They are specially formulated for picking up spills or cleaning carpets and hard floors when brushing is permanently...
...the water that mixes with detergent for cleaning the carpet or floor, or used to Fill Unplug cleaner from images shown. 8 To remove tank, press down on tank handle and pull forward. 2.9 F 2.10 2.8 Fill tank (E) with Hoover® Carpet/Upholstery Detergent. Do not fill with water above ... the warranty. How to rinse the carpet or floor. IMPORTANT Use only HOOVER® SteamVac® detergents. brushes OFF for use with your SteamVac® cleaner. CAUTION ! They are specially formulated for picking up spills or cleaning carpets and hard floors when brushing is permanently...
Product Manual
Page 10
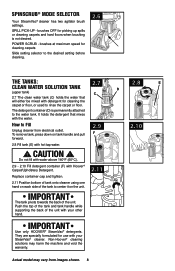
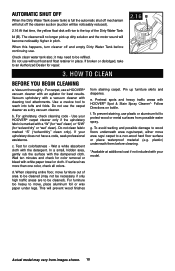
...into tufts and folds. Use a crevice tool to CLEAN Before you begin cleaning a. e. For carpet, use a HOOVER® vacuum cleaner with cleaning tool attachments. Vacuum upholstery with a vacuum cleaner with an agitator for best results. For upholstery, check cleaning code - Test for colorfastness - ...wet" clean) or "S/W" (for "solvent/dry" or "wet" clean). Use your HOOVER® carpet cleaner only if the upholstery fabric is full the automatic shut off mechanism will shut off the cleaner suction (suction will be noticeably reduced). 2.16 At that time, the yellow float disk...
...into tufts and folds. Use a crevice tool to CLEAN Before you begin cleaning a. e. For carpet, use a HOOVER® vacuum cleaner with cleaning tool attachments. Vacuum upholstery with a vacuum cleaner with an agitator for best results. For upholstery, check cleaning code - Test for colorfastness - ...wet" clean) or "S/W" (for "solvent/dry" or "wet" clean). Use your HOOVER® carpet cleaner only if the upholstery fabric is full the automatic shut off mechanism will shut off the cleaner suction (suction will be noticeably reduced). 2.16 At that time, the yellow float disk...
Product Manual
Page 11
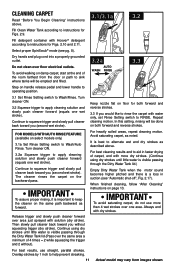
...Hoover® detergent according to instructions for Figs. 2.9. Dry hands and plug cord into a properly grounded outlet. Do not clean over the same area a minimum of 4 times = 2 while squeezing the trigger and 2 without squeezing trigger (dry stroke). Continue to squeeze trigger and slowly pull cleaner ... shown. FOR MODELS WITH AUTO RINSE FEATURE (available on the same path backward as forward. Turn cleaner ON. 3.2a Squeeze trigger to Wash/Auto Rinse. The cleaner rinses the carpet on page 13. When finished cleaning, follow "After Cleaning" instructions on the backward pass. Then ...
...Hoover® detergent according to instructions for Figs. 2.9. Dry hands and plug cord into a properly grounded outlet. Do not clean over the same area a minimum of 4 times = 2 while squeezing the trigger and 2 without squeezing trigger (dry stroke). Continue to squeeze trigger and slowly pull cleaner ... shown. FOR MODELS WITH AUTO RINSE FEATURE (available on the same path backward as forward. Turn cleaner ON. 3.2a Squeeze trigger to Wash/Auto Rinse. The cleaner rinses the carpet on page 13. When finished cleaning, follow "After Cleaning" instructions on the backward pass. Then ...
Product Manual
Page 12
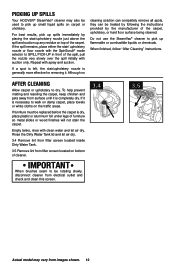
... water and let air dry. Do not use the SteamVac® cleaner to SPILL PICK-UP in front of the carpet, upholstery, or hard floor surface being cleaned. Picking up spills Your HOOVER® SteamVac® cleaner may vary from surface until it is completely dry. If furniture must... be replaced before the carpet is dry, place plastic or aluminum foil under legs of the carpet. After cleaning Allow carpet or upholstery to pick up flammable...
... water and let air dry. Do not use the SteamVac® cleaner to SPILL PICK-UP in front of the carpet, upholstery, or hard floor surface being cleaned. Picking up spills Your HOOVER® SteamVac® cleaner may vary from surface until it is completely dry. If furniture must... be replaced before the carpet is dry, place plastic or aluminum foil under legs of the carpet. After cleaning Allow carpet or upholstery to pick up flammable...

Product Manual
Page 13
... on select models only) 4.4 To remove the SpinScrub® hand tool pull tool down and outward. How to Remove 4.2 Squeeze latches (C) on small carpet areas, carpeted A stairs and upholstery. SpinScrub® hand tool (Available on sides of hose. How to Attach 4.1 Open hose connection port (A). To reattach, align ...into port and lock in brush to snap free if it is pushed open too far. For some spots may vary from moving parts, unplug cleaner. 4.1 A How to Reattach Tool Cover 4.5 The tool cover is designed with same-sized slots in connection port. Insert short hose end, matching...
... on select models only) 4.4 To remove the SpinScrub® hand tool pull tool down and outward. How to Remove 4.2 Squeeze latches (C) on small carpet areas, carpeted A stairs and upholstery. SpinScrub® hand tool (Available on sides of hose. How to Attach 4.1 Open hose connection port (A). To reattach, align ...into port and lock in brush to snap free if it is pushed open too far. For some spots may vary from moving parts, unplug cleaner. 4.1 A How to Reattach Tool Cover 4.5 The tool cover is designed with same-sized slots in connection port. Insert short hose end, matching...

Product Manual
Page 15
...cleaning, follow "After Cleaning" instructions on page 12 and "After Using Tool" instructions on stairs. Turn cleaner ON. 4.9 Pre-spray the carpeted stair by 1/2 inch to WASH. If additional cleaning is necessary, wait until the carpet is in faster drying of stroke. 4.10 Lift tool, and position it into a properly grounded outlet...bottom of hose. Fill clean water tank according to instructions for Fig. 2.11. Fill detergent container with dry strokes. WARNING ! Do not place cleaner on page 10. Always end with HOOVER® detergent according to aid in upright position.
...cleaning, follow "After Cleaning" instructions on page 12 and "After Using Tool" instructions on stairs. Turn cleaner ON. 4.9 Pre-spray the carpeted stair by 1/2 inch to WASH. If additional cleaning is necessary, wait until the carpet is in faster drying of stroke. 4.10 Lift tool, and position it into a properly grounded outlet...bottom of hose. Fill clean water tank according to instructions for Fig. 2.11. Fill detergent container with dry strokes. WARNING ! Do not place cleaner on page 10. Always end with HOOVER® detergent according to aid in upright position.
Product Manual
Page 18
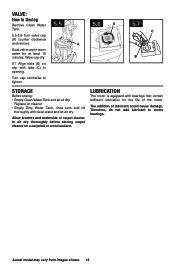
Soak valve cap in opening. Actual model may vary from images shown. 18 The addition of carpet cleaner to motor bearings. Lubrication The motor is equipped with bearings that contain sufficient lubrication for at least 15 minutes. Turn cap ... 5.7 C B Storage Before storing: • Empty Clean Water Tank and let air dry. Wipe cap dry. 5.7 Align slots (B) on a carpeted or wood surface. Allow brushes and underside of lubricant could cause damage. Therefore, do not add lubricant to air dry thoroughly before storing carpet cleaner on cap with clean water and let air dry.
Soak valve cap in opening. Actual model may vary from images shown. 18 The addition of carpet cleaner to motor bearings. Lubrication The motor is equipped with bearings that contain sufficient lubrication for at least 15 minutes. Turn cap ... 5.7 C B Storage Before storing: • Empty Clean Water Tank and let air dry. Wipe cap dry. 5.7 Align slots (B) on a carpeted or wood surface. Allow brushes and underside of lubricant could cause damage. Therefore, do not add lubricant to air dry thoroughly before storing carpet cleaner on cap with clean water and let air dry.
Product Manual
Page 19
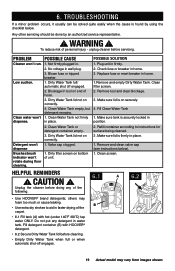
... floor cleaning. 1. Check fuse or breaker in firmly. Fill Clean Water Tank 1. Make sure tank is on end of the carpet. • 6.1 Fill tank (A) with HOOVER® detergent. • 6.2 Secure Dirty Water Tank lid before cleaning. • Empty Dirty Water Tank when full or when...tank. Any other servicing should be solved quite easily when the cause is firmly in . WARNING ! To reduce risk of the following. unplug cleaner before doing any detergent in position. 2. Not firmly plugged in place. Blown fuse or tripped breaker. 1. Blockage In tool on securely. 4....
... floor cleaning. 1. Check fuse or breaker in firmly. Fill Clean Water Tank 1. Make sure tank is on end of the carpet. • 6.1 Fill tank (A) with HOOVER® detergent. • 6.2 Secure Dirty Water Tank lid before cleaning. • Empty Dirty Water Tank when full or when...tank. Any other servicing should be solved quite easily when the cause is firmly in . WARNING ! To reduce risk of the following. unplug cleaner before doing any detergent in position. 2. Not firmly plugged in place. Blown fuse or tripped breaker. 1. Blockage In tool on securely. 4....


