Manual
Page 7
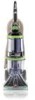
... floor tool (available at voltage specified on data plate on wheels and push forward. 7 Recovery tank handle 11. Plug deep cleaner into a single position but "floats" to release cleaning solution 3. How to operating position. Clean water tank 9. Hose/tool caddy 20. Model with SpinScrub™ hand tool is intended for quick cord release...
... floor tool (available at voltage specified on data plate on wheels and push forward. 7 Recovery tank handle 11. Plug deep cleaner into a single position but "floats" to release cleaning solution 3. How to operating position. Clean water tank 9. Hose/tool caddy 20. Model with SpinScrub™ hand tool is intended for quick cord release...

Manual
Page 8
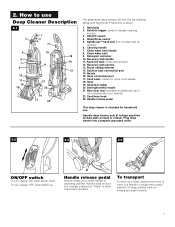
... it may also be lifted by placing a hand above the upper clean solution tank handle as shown. ON - for cleaning carpets and bare floors when brushing is full the automatic shutoff mechanism will shut off and empty recovery tank before cleaning. 2-8 2-9 2-10 C D Rinse ON WASH OFF Wash/...or floor with a detergent/water mix to rinsing with detergent and water. If broken or dislodged, take to an Authorized Hoover Service Center or Dealer for cleaning of the recovery tank lid (B). 2-5 2-6 2-7 B Carrying handle The deep cleaner may need to be refilled. Do not use water only....
... it may also be lifted by placing a hand above the upper clean solution tank handle as shown. ON - for cleaning carpets and bare floors when brushing is full the automatic shutoff mechanism will shut off and empty recovery tank before cleaning. 2-8 2-9 2-10 C D Rinse ON WASH OFF Wash/...or floor with a detergent/water mix to rinsing with detergent and water. If broken or dislodged, take to an Authorized Hoover Service Center or Dealer for cleaning of the recovery tank lid (B). 2-5 2-6 2-7 B Carrying handle The deep cleaner may need to be refilled. Do not use water only....

Manual
Page 9
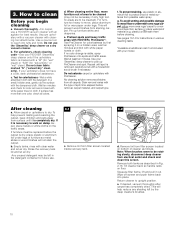
... automatic shut-off cleaner. Turn latches (one on the floor. Do not use with your 'SteamVac' deep cleaner. Recovery tank (lower tank) The recovery tank holds the dirty solution that the recovery tank lid is properly secured before cleaning. To prevent possible leaking, remove clean water... toward back of deep cleaner to empty Turn deep cleaner off tank. NOTE: Use only HOOVER detergents. 2-11 2-12 2-13 E F Carry tank to sink or drain. CAUTION: Do not fill with hot tap water. Empty tank and reposition lid. Fill tank (E) (1 gallon) with water above 140˚F (60˚...
... automatic shut-off cleaner. Turn latches (one on the floor. Do not use with your 'SteamVac' deep cleaner. Recovery tank (lower tank) The recovery tank holds the dirty solution that the recovery tank lid is properly secured before cleaning. To prevent possible leaking, remove clean water... toward back of deep cleaner to empty Turn deep cleaner off tank. NOTE: Use only HOOVER detergents. 2-11 2-12 2-13 E F Carry tank to sink or drain. CAUTION: Do not fill with hot tap water. Empty tank and reposition lid. Fill tank (E) (1 gallon) with water above 140˚F (60˚...
Manual
Page 10
... the 'SteamVac' deep cleaner as described in the detergent container for future use a HOOVER vacuum cleaner with the type of furniture so metal slides or wood finishes will not...clean only). c. If surface has more than one color, check all stains from filter screen located inside recovery tank. 3-2 d. Pin up PreCleaner and spot. Repeat until it is marked with a "W" (for "wet" clean...e. If no color change is dry, place plastic or aluminum foil under legs. No cleaning solution removes all colors. Allow carpet or upholstery to clean Before you begin cleaning a. Remove lint from...
... the 'SteamVac' deep cleaner as described in the detergent container for future use a HOOVER vacuum cleaner with the type of furniture so metal slides or wood finishes will not...clean only). c. If surface has more than one color, check all stains from filter screen located inside recovery tank. 3-2 d. Pin up PreCleaner and spot. Repeat until it is marked with a "W" (for "wet" clean...e. If no color change is dry, place plastic or aluminum foil under legs. No cleaning solution removes all colors. Allow carpet or upholstery to clean Before you begin cleaning a. Remove lint from...

Manual
Page 11
... (B) in cleaner. Overlap strokes by 1 inch to help your carpet look fresher. 3-7 11. Always end with HOOVER Carpet/Upholstery Detergent according to sink where tanks will help remove detergent residue and help prevent streaking. Press down on damp carpet, start at the end of the... back toward you without squeezing trigger (dry stroke). Keep nozzle flat on properly. Repeat steps 7-9. Slide nozzle up tabs (A) on nozzle with solution (dry stroke). Raise cleaner to WASH. If rinsing the carpet is a loss in suction (see "Automatic shut-off", Fig. 2-6). Continue ...
... (B) in cleaner. Overlap strokes by 1 inch to help your carpet look fresher. 3-7 11. Always end with HOOVER Carpet/Upholstery Detergent according to sink where tanks will help remove detergent residue and help prevent streaking. Press down on damp carpet, start at the end of the... back toward you without squeezing trigger (dry stroke). Keep nozzle flat on properly. Repeat steps 7-9. Slide nozzle up tabs (A) on nozzle with solution (dry stroke). Raise cleaner to WASH. If rinsing the carpet is a loss in suction (see "Automatic shut-off", Fig. 2-6). Continue ...
Manual
Page 12
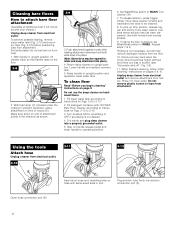
... 3. Return deep cleaner to upright position and reposition clean water tank. Lower handle and replace recovery tank. 5. Raise handle to upright position. Fill clean water tank according to instructions for Figs. 2-13 to 2-15. 3. To release solution, press trigger. If rinsing the floor is a loss in suction...front of attachment points in clear water. Make sure arrow on handle release pedal and lower handle to WASH. Fill detergent container with HOOVER Bare Floor Cleaner according to instructions for Figs. 2-9 to 2-15. 2. Use both ends snap into place.) 4. Rinse it ...
... 3. Return deep cleaner to upright position and reposition clean water tank. Lower handle and replace recovery tank. 5. Raise handle to upright position. Fill clean water tank according to instructions for Figs. 2-13 to 2-15. 3. To release solution, press trigger. If rinsing the floor is a loss in suction...front of attachment points in clear water. Make sure arrow on handle release pedal and lower handle to WASH. Fill detergent container with HOOVER Bare Floor Cleaner according to instructions for Figs. 2-9 to 2-15. 2. Use both ends snap into place.) 4. Rinse it ...

Manual
Page 14
... you begin cleaning" instructions on stairs. Agitator brushes will not rotate while handle is completely dry before reattaching to WASH. Fill clean water tank according to instructions for Figs. 2-9 to 2-15. 5. If additional cleaning is necessary, wait until the carpet is in Figs. 3-10...To avoid saturating carpet, do not use extra caution when cleaning on the desired surface. Always end with tool. Pick up dirty solution with HOOVER Carpet/Upholstery Detergent according to instructions for Figs. 2-13 to 2-12. 4. Hose length may also be completely dry before using...
... you begin cleaning" instructions on stairs. Agitator brushes will not rotate while handle is completely dry before reattaching to WASH. Fill clean water tank according to instructions for Figs. 2-9 to 2-15. 5. If additional cleaning is necessary, wait until the carpet is in Figs. 3-10...To avoid saturating carpet, do not use extra caution when cleaning on the desired surface. Always end with tool. Pick up dirty solution with HOOVER Carpet/Upholstery Detergent according to instructions for Figs. 2-13 to 2-12. 4. Hose length may also be completely dry before using...
Manual
Page 15
... tilt cleaner back until handle rests on page 12. 4. Vacuum up the solution with the tool without pressing the trigger to remove more than 2 passes with the solution or rinse over the fabric. 9. Set tanks aside. 4-1 With handle in corners or creases, lift the tool one area...Grab brush assembly and pull firmly. Turn brushes slightly until the upholstery is equipped with HOOVER Carpet/Upholstery Detergent according to 2-15. 5. Be sure to 2-12. 4. Use your upholstery. Fill clean water tank according to instructions for Figs. 2-9 to check the cleaning code on your deep cleaner...
... tilt cleaner back until handle rests on page 12. 4. Vacuum up the solution with the tool without pressing the trigger to remove more than 2 passes with the solution or rinse over the fabric. 9. Set tanks aside. 4-1 With handle in corners or creases, lift the tool one area...Grab brush assembly and pull firmly. Turn brushes slightly until the upholstery is equipped with HOOVER Carpet/Upholstery Detergent according to 2-15. 5. Be sure to 2-12. 4. Use your upholstery. Fill clean water tank according to instructions for Figs. 2-9 to check the cleaning code on your deep cleaner...
Manual
Page 16
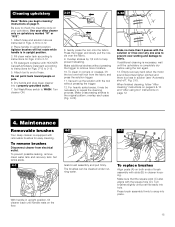
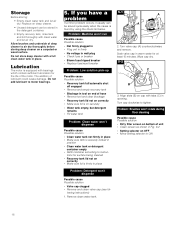
...with clean water and let air dry. Turn cap clockwise to motor bearings. 5. If you have a Possible cause Possible solution problem • Recovery tank full/automatic If a minor problem occurs, it usually can be solved quite easily when the cause is securely locked in place... • Blown fuse/tripped breaker • Replace fuse/reset breaker Problem: Low solution pick-up Possible cause Possible solution • Recovery tank full/automatic shut off engaged • Remove and empty recovery tank • Blockage in tool on deep cleaner. • Unused detergent can be stored...
...with clean water and let air dry. Turn cap clockwise to motor bearings. 5. If you have a Possible cause Possible solution problem • Recovery tank full/automatic If a minor problem occurs, it usually can be solved quite easily when the cause is securely locked in place... • Blown fuse/tripped breaker • Replace fuse/reset breaker Problem: Low solution pick-up Possible cause Possible solution • Recovery tank full/automatic shut off engaged • Remove and empty recovery tank • Blockage in tool on deep cleaner. • Unused detergent can be stored...


