Owners Manual
Page 2
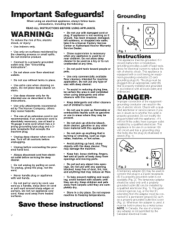
... children and pets away from electri- Grounding © o © Fig. 1 Instructions This appliance must be plugged into water, take it will not fit the outlet, have a proper outlet installed by The Hoover Company; If an extension cord is absolutely necessary, use at any other cleaners out of...cleaners with this machine. • Keep detergents and other toxic material with this plug to be installed by a metal screw. READ ALL INSTRUCTIONS BEFORE USING APPLIANCE. Do not use with the appliance - Use deep cleaner only for machine application. Use indoors only. • Do ...
... children and pets away from electri- Grounding © o © Fig. 1 Instructions This appliance must be plugged into water, take it will not fit the outlet, have a proper outlet installed by The Hoover Company; If an extension cord is absolutely necessary, use at any other cleaners out of...cleaners with this machine. • Keep detergents and other toxic material with this plug to be installed by a metal screw. READ ALL INSTRUCTIONS BEFORE USING APPLIANCE. Do not use with the appliance - Use deep cleaner only for machine application. Use indoors only. • Do ...
Owners Manual
Page 9
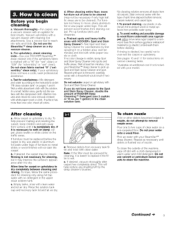
...underneath area rugs/carpet, either move , place aluminum foil or wax paper under legs of spill, time elapsed before cleaning. carefully scrub with HOOVER® Spot and Stain Spray Cleaner*- per 1 gallon) in warm water and mild detergent. No cleaning solution removes all stains from all ...or "wet" clean). Wait at additional cost if not included with white paper towel or cloth. g. c. Wait ten minutes and check for instructions on the traffic areas. To prevent staining, use the SteamVac TM deep cleaner as necessary until it is visible, spray Spot and Stain Spray...
...underneath area rugs/carpet, either move , place aluminum foil or wax paper under legs of spill, time elapsed before cleaning. carefully scrub with HOOVER® Spot and Stain Spray Cleaner*- per 1 gallon) in warm water and mild detergent. No cleaning solution removes all stains from all ...or "wet" clean). Wait at additional cost if not included with white paper towel or cloth. g. c. Wait ten minutes and check for instructions on the traffic areas. To prevent staining, use the SteamVac TM deep cleaner as necessary until it is visible, spray Spot and Stain Spray...
Owners Manual
Page 10
...Continue using dry strokes until both forward and reverse strokes. 7. Always end with more than 4 wet strokes over area just sprayed with HOOVER Deep Cleansing TM Detergent according to exceed 1/4 inch in place. For best cleaning results and to release cleaning solution and slowly push ...deep cleaner forward (equals one area. When finished cleaning, follow "After cleaning" instructions on page 9. For best results, pick up spills immediately by 1 inch to pick up spills on floor for removing it. If the...
...Continue using dry strokes until both forward and reverse strokes. 7. Always end with more than 4 wet strokes over area just sprayed with HOOVER Deep Cleansing TM Detergent according to exceed 1/4 inch in place. For best cleaning results and to release cleaning solution and slowly push ...deep cleaner forward (equals one area. When finished cleaning, follow "After cleaning" instructions on page 9. For best results, pick up spills immediately by 1 inch to pick up spills on floor for removing it. If the...
Owners Manual
Page 11
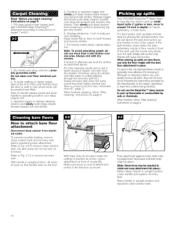
... Step on small carpet areas, carpeted stairs and upholstery. Unlatch back part of wax with converter (F). Fill clean solution tank with HOOVER Bare Floor Cleaner (available at additional cost if not included with your SteamVac TM deep cleaner. Do not use the SteamVac deep cleaner...of recovery tank and remove lid. 3. Do not remove plastic screen or foam from electrical outlet. 1. Slowly move deep cleaner over area to instructions on the floor. Use both forward and reverse strokes. A B A. Replace panel with your model) according to be cleaned. Continued -_ 11 ...
... Step on small carpet areas, carpeted stairs and upholstery. Unlatch back part of wax with converter (F). Fill clean solution tank with HOOVER Bare Floor Cleaner (available at additional cost if not included with your SteamVac TM deep cleaner. Do not use the SteamVac deep cleaner...of recovery tank and remove lid. 3. Do not remove plastic screen or foam from electrical outlet. 1. Slowly move deep cleaner over area to instructions on the floor. Use both forward and reverse strokes. A B A. Replace panel with your model) according to be cleaned. Continued -_ 11 ...
Owners Manual
Page 12
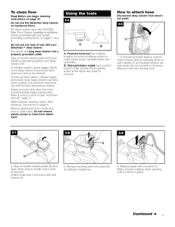
... sliding it onto connector until the tab (I) locks it is properly secured before cleaning. Wait a few seconds (can take up on page 9. 12 Follow the instructions on front of hose by pulling tan collar toward tube. Press round solution tube connector onto round projection inside door. How to attach tool All...
... sliding it onto connector until the tab (I) locks it is properly secured before cleaning. Wait a few seconds (can take up on page 9. 12 Follow the instructions on front of hose by pulling tan collar toward tube. Press round solution tube connector onto round projection inside door. How to attach tool All...

Owners Manual
Page 13
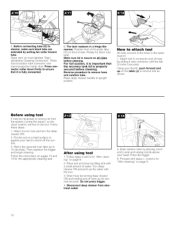
... is necessary, wait until it forward while pressing the trigger (equals one area, Always end with HOOVER Deep Cleansing TM Detergent according to end of hose. Attach tool to instructions on pages 12 and 13. Dry hands and plug deep cleaner into a properly grounded outlet. ... Remove debris as shown. Gently press the tool onto the fabric. If necessary, refer to "Before using tool" instructions on pages 7 and 8. 3. Vacuum up the solution with HOOVER Deep Cleansing TM Detergent according to remove air from falling, use more moisture. 8. Place handle in upright position. ...
... is necessary, wait until it forward while pressing the trigger (equals one area, Always end with HOOVER Deep Cleansing TM Detergent according to end of hose. Attach tool to instructions on pages 12 and 13. Dry hands and plug deep cleaner into a properly grounded outlet. ... Remove debris as shown. Gently press the tool onto the fabric. If necessary, refer to "Before using tool" instructions on pages 7 and 8. 3. Vacuum up the solution with HOOVER Deep Cleansing TM Detergent according to remove air from falling, use more moisture. 8. Place handle in upright position. ...
Owners Manual
Page 14
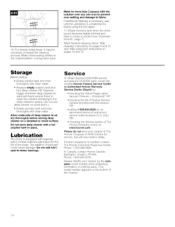
... 13. Allow underside of Factory Service Centers provided with the solution over -wetting and damage to air dry thoroughly before using tool" instructions on wood floors.) • Empty recovery tank and rinse thoroughly with bearings which contain sufficient lubrication for an automated referral of the ...the bottom of authorized service outlet locations (U.S. Always identify your cleaner to the original pattern; 10. Make crisscrossing strokes to The Hoover Company in North Canton for service, this cleaner OR- • calling 1-800-944=9200 for the life of lubricant could cause...
... 13. Allow underside of Factory Service Centers provided with the solution over -wetting and damage to air dry thoroughly before using tool" instructions on wood floors.) • Empty recovery tank and rinse thoroughly with bearings which contain sufficient lubrication for an automated referral of the ...the bottom of authorized service outlet locations (U.S. Always identify your cleaner to the original pattern; 10. Make crisscrossing strokes to The Hoover Company in North Canton for service, this cleaner OR- • calling 1-800-944=9200 for the life of lubricant could cause...
Owners Manual
Page 15
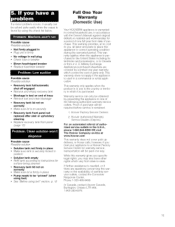
... appliance to one year warranty which vary from date of warranty service outlets, contact the Consumer Response Center, Phone 1-330-499-9499. Hoover Factory Service Centers. 2. however, if you mail your appliance to place this warranty or the availability of purchase. Military Exchange. Appliances... cause Possible solution • Not firmly plugged in • Plug unit in position • Solution tank empty • Refill tank according to instructions for a period of hose • Remove tool and clear blockage • Recovery tank lid not on correctly • Make sure lid is...
... appliance to one year warranty which vary from date of warranty service outlets, contact the Consumer Response Center, Phone 1-330-499-9499. Hoover Factory Service Centers. 2. however, if you mail your appliance to place this warranty or the availability of purchase. Military Exchange. Appliances... cause Possible solution • Not firmly plugged in • Plug unit in position • Solution tank empty • Refill tank according to instructions for a period of hose • Remove tool and clear blockage • Recovery tank lid not on correctly • Make sure lid is...


