Manual
Page 3
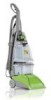
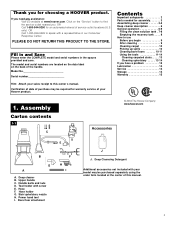
... 1-1 C D E B G A A. Handle bolts and nuts D. Deep Cleansing Detergent Additional accessories not included with your Hoover product. 1. If you OR Call 1-800-944-9200 for choosing a HOOVER product. Model No Serial number Contents Important safeguards 2 Parts needed for warranty service of your model may be required for assembly 3 Assembling deep cleaner 3-5 Deep cleaner description 6 General operation...
... 1-1 C D E B G A A. Handle bolts and nuts D. Deep Cleansing Detergent Additional accessories not included with your Hoover product. 1. If you OR Call 1-800-944-9200 for choosing a HOOVER product. Model No Serial number Contents Important safeguards 2 Parts needed for warranty service of your model may be required for assembly 3 Assembling deep cleaner 3-5 Deep cleaner description 6 General operation...

Manual
Page 4
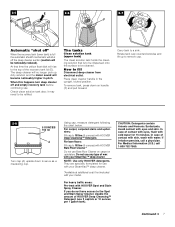
... on back of hose holder. The assembled cleaner will not go through holes. Hold each bolt securely (from holder. If bolts will look like this model. Replace clean solution tank (upper tank) by matching tabs on rack with a Phillips screwdriver. The extra nut is not pushed completely down into slots on...
... on back of hose holder. The assembled cleaner will not go through holes. Hold each bolt securely (from holder. If bolts will look like this model. Replace clean solution tank (upper tank) by matching tabs on rack with a Phillips screwdriver. The extra nut is not pushed completely down into slots on...
Manual
Page 7
...) The clean solution tank holds the cleaning solution that time the yellow float disk will rise to fill line (5 ounces) with your model. To remove tank, press down to serve as a measuring cup. Rotate tank cap counterclockwise and lift up dirty solution and the motor... sound will be noticeably reduced). Using cap, measure detergent following the chart below. NOTE: Use only HOOVER detergents. CAUTION: Detergents contain Anionic and Nonionic Surfactants. If Irritation persists, call 1-800-752-7869. They are specially formulated for 15 minutes...
...) The clean solution tank holds the cleaning solution that time the yellow float disk will rise to fill line (5 ounces) with your model. To remove tank, press down to serve as a measuring cup. Rotate tank cap counterclockwise and lift up dirty solution and the motor... sound will be noticeably reduced). Using cap, measure detergent following the chart below. NOTE: Use only HOOVER detergents. CAUTION: Detergents contain Anionic and Nonionic Surfactants. If Irritation persists, call 1-800-752-7869. They are specially formulated for 15 minutes...

Manual
Page 9
... spot is desired, be cleaned). Allow time for cleaning, but it may be replaced before cleaning. Continued § 9 b. Use your model. Rinsing is marked with clean water. Pour one color, check all carpets. To clean the outside of spill, time elapsed before removal, ...Spray Cleaner for colorfastness - f. To avoid wetting and possible damage to wood floors underneath area rugs/carpet, either move furniture out of HOOVER Deep Cleansing™ Detergent (use plastic or aluminum foil pads under legs. Remove debris from all colors. After cleaning a. To help...
... spot is desired, be cleaned). Allow time for cleaning, but it may be replaced before cleaning. Continued § 9 b. Use your model. Rinsing is marked with clean water. Pour one color, check all carpets. To clean the outside of spill, time elapsed before removal, ...Spray Cleaner for colorfastness - f. To avoid wetting and possible damage to wood floors underneath area rugs/carpet, either move furniture out of HOOVER Deep Cleansing™ Detergent (use plastic or aluminum foil pads under legs. Remove debris from all colors. After cleaning a. To help...
Manual
Page 11
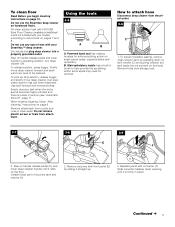
.... 3-6 C 1. How to be cleaned. To pick up . 4. set tank aside (do not set tank on tank handle (C) and pulling forward; Fill clean solution tank with HOOVER Bare Floor Cleaner (available at additional cost if not included with your SteamVac™ deep cleaner. To release solution, press trigger. Use both forward and.../upholstery nozzle has a built-in place. Remove recovery tank front panel (E) by pressing down opening until it rests on page 10. Replace panel with your model) according to operating position;
.... 3-6 C 1. How to be cleaned. To pick up . 4. set tank aside (do not set tank on tank handle (C) and pulling forward; Fill clean solution tank with HOOVER Bare Floor Cleaner (available at additional cost if not included with your SteamVac™ deep cleaner. To release solution, press trigger. Use both forward and.../upholstery nozzle has a built-in place. Remove recovery tank front panel (E) by pressing down opening until it rests on page 10. Replace panel with your model) according to operating position;

Manual
Page 14
... authorized service outlet locations (U.S. Service To obtain approved HOOVER service and genuine HOOVER parts, locate the nearest Hoover Factory Service Center or Authorized Hoover Warranty Service Dealer (Depot) by the complete model number when requesting information or ordering parts. (The model number appears on -line at www.hoover.com Please do not send your cleaner to The...
... authorized service outlet locations (U.S. Service To obtain approved HOOVER service and genuine HOOVER parts, locate the nearest Hoover Factory Service Center or Authorized Hoover Warranty Service Dealer (Depot) by the complete model number when requesting information or ordering parts. (The model number appears on -line at www.hoover.com Please do not send your cleaner to The...


