Manual
Page 3
... automated referral of your sales receipt to this product to register your product online at hoover.com. Verification of date of purchase may be required for choosing a HOOVER® product. Please do not return this owner's manual. Please enter the complete ...model and Manufacturing Code in the spaces provided. CODE Hint: Attach your HOOVER® product. Manufacturing code (Label located under vacuum) Contents Important Safeguards...3 Cleaner Assembly...5 How To Use...6 Cleaner Description 6 Cleaning Tools...9 Maintenance...10 Filter Bag...
... automated referral of your sales receipt to this product to register your product online at hoover.com. Verification of date of purchase may be required for choosing a HOOVER® product. Please do not return this owner's manual. Please enter the complete ...model and Manufacturing Code in the spaces provided. CODE Hint: Attach your HOOVER® product. Manufacturing code (Label located under vacuum) Contents Important Safeguards...3 Cleaner Assembly...5 How To Use...6 Cleaner Description 6 Cleaning Tools...9 Maintenance...10 Filter Bag...

Manual
Page 6
... wood sandings, or use in areas where they may reduce air flow. • Keep hair, loose clothing, fingers, and all controls before operating. • Operate vacuum only at bottom of California to continuing use. • Do not pull or carry by children age 12 and under. To avoid injury or damage...
... wood sandings, or use in areas where they may reduce air flow. • Keep hair, loose clothing, fingers, and all controls before operating. • Operate vacuum only at bottom of California to continuing use. • Do not pull or carry by children age 12 and under. To avoid injury or damage...
Manual
Page 10
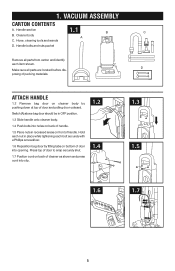
... before dis- Switch (A) above bag door should be in OFF position. 1.3 Slide handle onto cleaner body. 1.4 Push bolts into opening. Hose, cleaning tools and wands D. 1. Vacuum ASSEMBLY Carton contents A. Attach handle 1.2 Remove bag door on bottom of door into holes on back of packing materials.
... before dis- Switch (A) above bag door should be in OFF position. 1.3 Slide handle onto cleaner body. 1.4 Push bolts into opening. Hose, cleaning tools and wands D. 1. Vacuum ASSEMBLY Carton contents A. Attach handle 1.2 Remove bag door on bottom of door into holes on back of packing materials.
Manual
Page 11
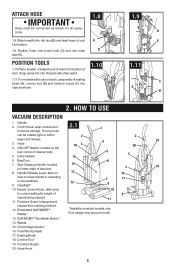
... Release Lever: step on select models only. Attach hose 1.8 IMPORTANT Hose must be rotated right or left rear corner of cleaner body 5 4 5. HOW TO USE Vacuum Description 1. Cord Hooks: wrap cord around 2.1 1 hooks for height of 8 carpet being cleaned 11 11. The top hook can be connected as shown. 1.10 1.9 D E 1.11...
... Release Lever: step on select models only. Attach hose 1.8 IMPORTANT Hose must be rotated right or left rear corner of cleaner body 5 4 5. HOW TO USE Vacuum Description 1. Cord Hooks: wrap cord around 2.1 1 hooks for height of 8 carpet being cleaned 11 11. The top hook can be connected as shown. 1.10 1.9 D E 1.11...

Manual
Page 14
... more AB cleaning attention. upright for storage and when using the carry handle. 2.6 Cord clip To help keep the cord out of the way while vacuuming, position cord down into electrical outlet. ON-OFF switch Plug cord into cord clip (B) located between top cord hook and handle. 2.3 B Transporting cleaner To move...
... more AB cleaning attention. upright for storage and when using the carry handle. 2.6 Cord clip To help keep the cord out of the way while vacuuming, position cord down into electrical outlet. ON-OFF switch Plug cord into cord clip (B) located between top cord hook and handle. 2.3 B Transporting cleaner To move...
Manual
Page 15
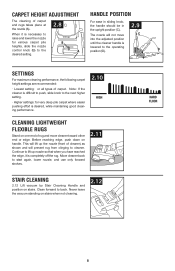
...cleaning. 2.12 HARD FLOOR 8 Continue to start again, lower nozzle, and use only forward strokes. 2.11 Stair Cleaning 2.12 Lift vacuum by Stair Cleaning Handle and position on one end of cleaner) as shown and will not move cleaner toward other end or edge. ... easier pushing effort is desired, while maintaining good cleaning performance. 2.10 HIGH Cleaning lightweight flexible rugs Stand on stairs. Never leave the vacuum standing on handle. Carpet height adjustment Handle position The cleaning of carpet. Clean forward to the operating A position (D). When it is ...
...cleaning. 2.12 HARD FLOOR 8 Continue to start again, lower nozzle, and use only forward strokes. 2.11 Stair Cleaning 2.12 Lift vacuum by Stair Cleaning Handle and position on one end of cleaner) as shown and will not move cleaner toward other end or edge. ... easier pushing effort is desired, while maintaining good cleaning performance. 2.10 HIGH Cleaning lightweight flexible rugs Stand on stairs. Never leave the vacuum standing on handle. Carpet height adjustment Handle position The cleaning of carpet. Clean forward to the operating A position (D). When it is ...

Manual
Page 18
... (I) can be in a mild detergent. Rinse and air dry before disconnecting and connecting hose to the hose (H) by pushing it on select models only. The vacuum is ready for reaching hard to the crevice tool*. *Available on and handle is turned on select models only. 3.3 H I How to carpet, rugs, furniture and...
... (I) can be in a mild detergent. Rinse and air dry before disconnecting and connecting hose to the hose (H) by pushing it on select models only. The vacuum is ready for reaching hard to the crevice tool*. *Available on and handle is turned on select models only. 3.3 H I How to carpet, rugs, furniture and...
Manual
Page 19
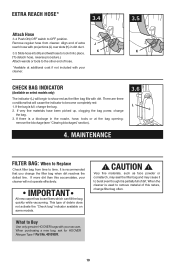
... end of extra J reach hose with projections (J) over slots (K) in the nozzle, hose, tools or at additional cost if not included with your vacuum. remove the blockage (see "Clearing blockages" section). 3.6 L 4. MAINTENANCE Filter bag: When to Replace Check filter bag from cleaner. Align end of...some models. change the bag. 2. When purchasing a new bag, ask for HOOVER® Allergen Type Y Part No. 4010100Y. ! IMPORTANT All new carpet has loose fibers which can fill the bag quickly while vacuuming. There are three conditions that you change filter bag often. 10 If very ...
... end of extra J reach hose with projections (J) over slots (K) in the nozzle, hose, tools or at additional cost if not included with your vacuum. remove the blockage (see "Clearing blockages" section). 3.6 L 4. MAINTENANCE Filter bag: When to Replace Check filter bag from cleaner. Align end of...some models. change the bag. 2. When purchasing a new bag, ask for HOOVER® Allergen Type Y Part No. 4010100Y. ! IMPORTANT All new carpet has loose fibers which can fill the bag quickly while vacuuming. There are three conditions that you change filter bag often. 10 If very ...

Manual
Page 22
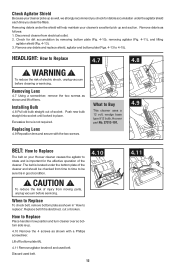
...and hand wash it on bottom of door to snap securely shut. 4.3 C filters: How to Replace ! When purchasing a new Final Filter, ask for Hoover® Part No. 38765-019. 4.4 A 4.5 Final Filter The final filter assists in filter bag with (B). A 4.2 Grasp filter bag collar (A) and... pull collar from moving parts, unplug vacuum before servicing. Hold new filter bag as shown. filter bag: How to Clean ! CAUTION ! What to Buy Use only genuine HOOVER® Secondary Filter with mild detergent, then air dry. Align opening (C). Press...
...and hand wash it on bottom of door to snap securely shut. 4.3 C filters: How to Replace ! When purchasing a new Final Filter, ask for Hoover® Part No. 38765-019. 4.4 A 4.5 Final Filter The final filter assists in filter bag with (B). A 4.2 Grasp filter bag collar (A) and... pull collar from moving parts, unplug vacuum before servicing. Hold new filter bag as shown. filter bag: How to Clean ! CAUTION ! What to Buy Use only genuine HOOVER® Secondary Filter with mild detergent, then air dry. Align opening (C). Press...
Manual
Page 23
... servicing. CAUTION ! To reduce the risk of injury from electrical outlet. 2. Disconnect cleaner from moving parts, unplug vacuum before cleaning or servicing. Removing Lens 4.7 Using a screwdriver, remove the two screws as shown in place. Lift off lens. Remove any debris ...10), removing agitator (Fig. 4-11), and lifting agitator shield (Fig. 4-13). 3. What to Buy This cleaner uses a 12 volt, wedge base type 912 bulb, Hoover® part No. 27313-101. 4.9 Belt: How to Replace The belt on your cleaner's excellent pick up so well, we strongly recommend you clean the...
... servicing. CAUTION ! To reduce the risk of injury from electrical outlet. 2. Disconnect cleaner from moving parts, unplug vacuum before cleaning or servicing. Removing Lens 4.7 Using a screwdriver, remove the two screws as shown in place. Lift off lens. Remove any debris ...10), removing agitator (Fig. 4-11), and lifting agitator shield (Fig. 4-13). 3. What to Buy This cleaner uses a 12 volt, wedge base type 912 bulb, Hoover® part No. 27313-101. 4.9 Belt: How to Replace The belt on your cleaner's excellent pick up so well, we strongly recommend you clean the...
Manual
Page 26
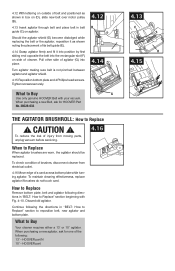
..."BELT: How to Replace" section beginning with your vacuum. To check condition of brushes, disconnect cleaner from moving parts, unplug vacuum before servicing. 4.16 When to Buy G Use only genuine HOOVER® Belt with Fig. 4-10. Continue following : 13" - HOOVER part 4.13 C D 4.15 Tighten screws securely.... of a card across bottom plate while turning agitator. Discard old agitator. What to Replace ! When purchasing a new agitator, ask for HOOVER® Part No. 38528-033. The Agitator Brushroll: How to Buy Your cleaner requires either a 13' or 15" agitator. To ...
..."BELT: How to Replace" section beginning with your vacuum. To check condition of brushes, disconnect cleaner from moving parts, unplug vacuum before servicing. 4.16 When to Buy G Use only genuine HOOVER® Belt with Fig. 4-10. Continue following : 13" - HOOVER part 4.13 C D 4.15 Tighten screws securely.... of a card across bottom plate while turning agitator. Discard old agitator. What to Replace ! When purchasing a new agitator, ask for HOOVER® Part No. 38528-033. The Agitator Brushroll: How to Buy Your cleaner requires either a 13' or 15" agitator. To ...
Manual
Page 27
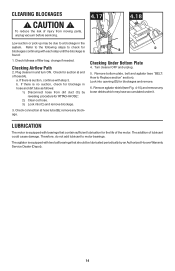
... add lubricant to check for the life of injury from dirt duct (C) by an Authorized Hoover Warranty Service Dealer (Depot). 14 Plug cleaner in hose and dirt tube as follows: 1) Disconnect hose from moving parts, unplug vacuum before servicing. 4.17 4.18 Low suction or pick up may have accumulated under it. B D Checking...
... add lubricant to check for the life of injury from dirt duct (C) by an Authorized Hoover Warranty Service Dealer (Depot). 14 Plug cleaner in hose and dirt tube as follows: 1) Disconnect hose from moving parts, unplug vacuum before servicing. 4.17 4.18 Low suction or pick up may have accumulated under it. B D Checking...

Manual
Page 30
... voltage in POSSIBLE SOLUTION 1. Agitator brushroll worn 3. Move nozzle control knob to a higher setting 1. Do not send your vacuum by : • Checking the Yellow Pages under "Vacuum Cleaners" or "Household". • Visit our website at hoover.com (U.S. Mon-Fri 8am-7pm EST. WARNING ! PROBLEM Cleaner won 't pick up 1. Belt broken or stretched 2. Replace...
... voltage in POSSIBLE SOLUTION 1. Agitator brushroll worn 3. Move nozzle control knob to a higher setting 1. Do not send your vacuum by : • Checking the Yellow Pages under "Vacuum Cleaners" or "Household". • Visit our website at hoover.com (U.S. Mon-Fri 8am-7pm EST. WARNING ! PROBLEM Cleaner won 't pick up 1. Belt broken or stretched 2. Replace...


