Manual
Page 1
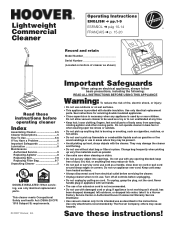
...that may damage the cleaner and the bag. • Do not use . Save these instructions before unplugging. • Do not unplug by cord, use only identical replacement parts. Do not allow vacuum cleaner to a Hoover Factory Service Center or Authorized Hoover Commercial Warranty Service Distributor. • Use vacuum... edges or corners. Do not operate cleaner in areas where they may cause hazards. Do not run unattended at any opening blocked; Lightweight Commercial Cleaner Operating Instructions ENGLISH § pp.1-9 ESPAÑOL § pág 10-14 FRANÇAIS § p. 15-20...
...that may damage the cleaner and the bag. • Do not use . Save these instructions before unplugging. • Do not unplug by cord, use only identical replacement parts. Do not allow vacuum cleaner to a Hoover Factory Service Center or Authorized Hoover Commercial Warranty Service Distributor. • Use vacuum... edges or corners. Do not operate cleaner in areas where they may cause hazards. Do not run unattended at any opening blocked; Lightweight Commercial Cleaner Operating Instructions ENGLISH § pp.1-9 ESPAÑOL § pág 10-14 FRANÇAIS § p. 15-20...
Manual
Page 2
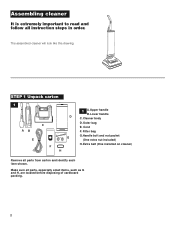
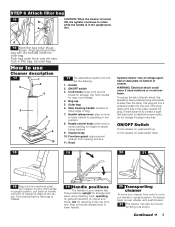
Assembling cleaner It is extremely important to read and follow all parts from carton and identify each item shown. Extra belt (One installed on cleaner) H Remove all instruction steps in order. Filter bag G.Handle bolt and nut packet G (One extra nut included) H. Make sure all parts, especially small items, such as G and H, are located before disposing of cardboard packing. 2 Cord FRONT F. STEP 1 Unpack carton 1 AB E C F 1 A.Upper handle B.Lower handle D C. Outer bag E. The assembled cleaner will look like this drawing. Cleaner body D.
Assembling cleaner It is extremely important to read and follow all parts from carton and identify each item shown. Extra belt (One installed on cleaner) H Remove all instruction steps in order. Filter bag G.Handle bolt and nut packet G (One extra nut included) H. Make sure all parts, especially small items, such as G and H, are located before disposing of cardboard packing. 2 Cord FRONT F. STEP 1 Unpack carton 1 AB E C F 1 A.Upper handle B.Lower handle D C. Outer bag E. The assembled cleaner will look like this drawing. Cleaner body D.
Manual
Page 4
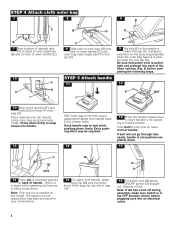
... handle to side while pushing down . 15 L M N O NUT 13 Place nut in recessed area (L) at back of handle. Hook bag clip into handle. 13 With outer bag to the front, place assembled handle onto handle base (J) of cleaner body. ing or middle position. Dispose of lock. Note: If tab...is not pushed completely down firmly. STEP 5 Attach handle 11 D 9 The hole (E) in the handle is visible through hole easily, handle is in bag cap. 15 Pull switch lock (N) above ON/OFF switch (O) straight out. If bolt will not go through the U-shaped extension on lower front of handle...
... handle to side while pushing down . 15 L M N O NUT 13 Place nut in recessed area (L) at back of handle. Hook bag clip into handle. 13 With outer bag to the front, place assembled handle onto handle base (J) of cleaner body. ing or middle position. Dispose of lock. Note: If tab...is not pushed completely down firmly. STEP 5 Attach handle 11 D 9 The hole (E) in the handle is visible through hole easily, handle is in bag cap. 15 Pull switch lock (N) above ON/OFF switch (O) straight out. If bolt will not go through the U-shaped extension on lower front of handle...
Manual
Page 5
... , push switch up. Handle release lever: step on wet surfaces. do not change the plug in filter bag with handle in upright position, tilt cleaner back on handle until front of bag. 7. upright for storage. zip outer bag. Bag cap 5. WARNING: Electrical shock could occur if used outdoors or on lever to lower handle to operating...
... , push switch up. Handle release lever: step on wet surfaces. do not change the plug in filter bag with handle in upright position, tilt cleaner back on handle until front of bag. 7. upright for storage. zip outer bag. Bag cap 5. WARNING: Electrical shock could occur if used outdoors or on lever to lower handle to operating...
Manual
Page 6
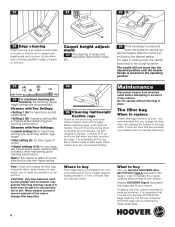
... types. • Setting 2 (B): if easier pushing effort is difficult to push, slide knob to remove dirt in the upright position. Do not operate without filter bag in order to raise and lower the nozzle for very deep pile carpet where easier pushing effort is lowered to start again...performance, it is recommended that when you have reached the edge, it in sliding knob, the handle should be identified by The Hoover Company. HOOVER bags can be in carpet near baseboards and furniture. Carpet height adjustment 23 The cleaning of carpet fluff. Note: Check and change the...
... types. • Setting 2 (B): if easier pushing effort is difficult to push, slide knob to remove dirt in the upright position. Do not operate without filter bag in order to raise and lower the nozzle for very deep pile carpet where easier pushing effort is lowered to start again...performance, it is recommended that when you have reached the edge, it in sliding knob, the handle should be identified by The Hoover Company. HOOVER bags can be in carpet near baseboards and furniture. Carpet height adjustment 23 The cleaning of carpet fluff. Note: Check and change the...
Manual
Page 7
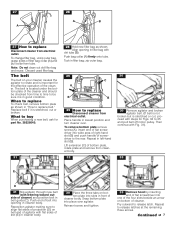
.... Place handle in left-hand slot (B). To remove bottom plate remove screw (A), insert end of the cleaner and should be sure it is in filter bag with dirt tube (B). Repeat in lowest position and turn cleaner over agitator. Push end of belt into wide area of right-hand slot (B) and push... in "How to replace belt." What to buy When purchasing a new belt, ask for Figs. 33 to 35 and pull belt off motor pulley. Push bag collar (A) firmly onto tube. Snap bottom plate into slots in cleaner body. Repeat to release latches at the remaining three arrows. Replace belt if it...
.... Place handle in left-hand slot (B). To remove bottom plate remove screw (A), insert end of the cleaner and should be sure it is in filter bag with dirt tube (B). Repeat in lowest position and turn cleaner over agitator. Push end of belt into wide area of right-hand slot (B) and push... in "How to replace belt." What to buy When purchasing a new belt, ask for Figs. 33 to 35 and pull belt off motor pulley. Push bag collar (A) firmly onto tube. Snap bottom plate into slots in cleaner body. Repeat to release latches at the remaining three arrows. Replace belt if it...

Manual
Page 8
... Possible cause Possible solution • Broken or worn belt • Replace belt • Brush roll brushes worn • Replace brush roll • Filter bag full • Change filter bag 38 G 38 Pull belt off hood. When agitator brushes are secured. 37 What to buy The agitator may be solved quite easily when.... F 35 Stretch new belt onto motor pulley (F). To check condition of brushes, move edge of lubricant could cause damage. Reposition belt and new agitator by a Hoover Factory Service Center or an Authorized...
... Possible cause Possible solution • Broken or worn belt • Replace belt • Brush roll brushes worn • Replace brush roll • Filter bag full • Change filter bag 38 G 38 Pull belt off hood. When agitator brushes are secured. 37 What to buy The agitator may be solved quite easily when.... F 35 Stretch new belt onto motor pulley (F). To check condition of brushes, move edge of lubricant could cause damage. Reposition belt and new agitator by a Hoover Factory Service Center or an Authorized...


