

Owner's Manual
Page 14
Advanced Installation System setup 13 Wiring 21 Troubleshooting 24 Customer assistance 26 Limited warranty 27
Advanced Installation System setup 13 Wiring 21 Troubleshooting 24 Customer assistance 26 Limited warranty 27
Owner's Manual
Page 15
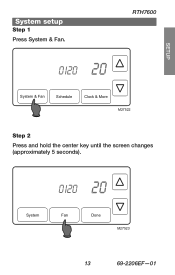
SETUP WIRING ASybsotuetmyosuertunpew thermostat Step 1 Press System & Fan. RTH7600 0120 20 System & Fan Schedule Clock & More M27522 Step 2 Press and hold the center key until the screen changes (approximately 5 seconds). 0120 20 System Fan Done M27523 ASSISTANCE TROUBLESHOOTING 13 69-2206EF-01
SETUP WIRING ASybsotuetmyosuertunpew thermostat Step 1 Press System & Fan. RTH7600 0120 20 System & Fan Schedule Clock & More M27522 Step 2 Press and hold the center key until the screen changes (approximately 5 seconds). 0120 20 System Fan Done M27523 ASSISTANCE TROUBLESHOOTING 13 69-2206EF-01
Owner's Manual
Page 16
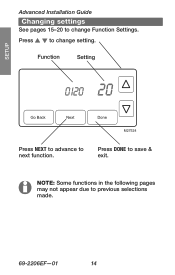
Press DONE to previous selections made. NOTE: Some functions in the following pages may not appear due to save & exit. Press s t to change Function Settings. Function Setting 0120 20 Go Back Next Done M27524 Press NEXT to advance to next function. ASSISTANCE TROUBLESHOOTING 69-2206EF-01 14 SETUP WIRING Advanced Installation Guide ACbhoauntgiynogursentetwingthsermostat See pages 15-20 to change setting.
Press DONE to previous selections made. NOTE: Some functions in the following pages may not appear due to save & exit. Press s t to change Function Settings. Function Setting 0120 20 Go Back Next Done M27524 Press NEXT to advance to next function. ASSISTANCE TROUBLESHOOTING 69-2206EF-01 14 SETUP WIRING Advanced Installation Guide ACbhoauntgiynogursentetwingthsermostat See pages 15-20 to change setting.
Owner's Manual
Page 17
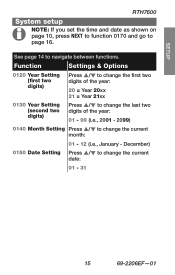
... s/t to change the last two digits of the year: 01 - 99 (i.e., 2001 - 2099) 0140 Month Setting Press s/t to change the current month: 01 - 12 (i.e., January - SETUP WIRING RTH7600 ASybsotuetmyosuertunpew thermostat NOTE: If you set the time and date as shown on page 10, press NEXT to function 0170 and go to...
... s/t to change the last two digits of the year: 01 - 99 (i.e., 2001 - 2099) 0140 Month Setting Press s/t to change the current month: 01 - 12 (i.e., January - SETUP WIRING RTH7600 ASybsotuetmyosuertunpew thermostat NOTE: If you set the time and date as shown on page 10, press NEXT to function 0170 and go to...
Owner's Manual
Page 18
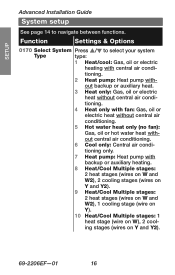
... Press s/t to navigate between functions. tioning. 2 Heat pump: Heat pump with central air condi- ASSISTANCE TROUBLESHOOTING 69-2206EF-01 16 ing stages (wires on W), 2 cool- SETUP WIRING Advanced Installation Guide ASybsotuetmyosuertunpew thermostat See page 14 to select your system Type type: 1 Heat/cool: Gas, oil or electric heating with -
... Press s/t to navigate between functions. tioning. 2 Heat pump: Heat pump with central air condi- ASSISTANCE TROUBLESHOOTING 69-2206EF-01 16 ing stages (wires on W), 2 cool- SETUP WIRING Advanced Installation Guide ASybsotuetmyosuertunpew thermostat See page 14 to select your system Type type: 1 Heat/cool: Gas, oil or electric heating with -
Owner's Manual
Page 19
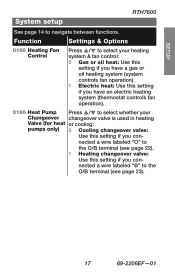
... you connected a wire labeled "O" to the O/B terminal (see page 22). 1 Heating changeover valve: Use this setting if you connected a wire labeled "B" to navigate between functions. SETUP WIRING ASybsotuetmyosuertunpew thermostat RTH7600 See page 14 to the O/B terminal (see page 23). ASSISTANCE TROUBLESHOOTING 17 69-2206EF-01
... you connected a wire labeled "O" to the O/B terminal (see page 22). 1 Heating changeover valve: Use this setting if you connected a wire labeled "B" to navigate between functions. SETUP WIRING ASybsotuetmyosuertunpew thermostat RTH7600 See page 14 to the O/B terminal (see page 23). ASSISTANCE TROUBLESHOOTING 17 69-2206EF-01
Owner's Manual
Page 20
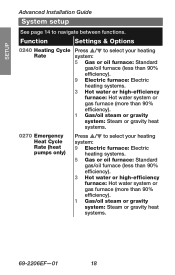
SETUP WIRING Advanced Installation Guide ASybsotuetmyosuertunpew thermostat See page 14 to select your heating Rate system: 5 Gas or oil furnace: Standard gas/oil furnace (less than ...
SETUP WIRING Advanced Installation Guide ASybsotuetmyosuertunpew thermostat See page 14 to select your heating Rate system: 5 Gas or oil furnace: Standard gas/oil furnace (less than ...
Owner's Manual
Page 21
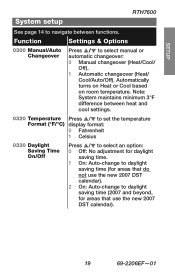
SETUP WIRING ASybsotuetmyosuertunpew thermostat RTH7600 See page 14 to navigate between heat and cool settings. 0320 Temperature Press s/t to set the temperature Format (°F/°C) display ...
SETUP WIRING ASybsotuetmyosuertunpew thermostat RTH7600 See page 14 to navigate between heat and cool settings. 0320 Temperature Press s/t to set the temperature Format (°F/°C) display ...

Owner's Manual
Page 22
... Press s/t to set the clock display format: 12 12-hour clock (i.e., "3:30 pm") 24 24-hour clock (i.e., "15:30") Press DONE to navigate between functions. SETUP WIRING Advanced Installation Guide ASybsotuetmyosuertunpew thermostat See page 14 to save and exit...
... Press s/t to set the clock display format: 12 12-hour clock (i.e., "3:30 pm") 24 24-hour clock (i.e., "15:30") Press DONE to navigate between functions. SETUP WIRING Advanced Installation Guide ASybsotuetmyosuertunpew thermostat See page 14 to save and exit...
Owner's Manual
Page 23
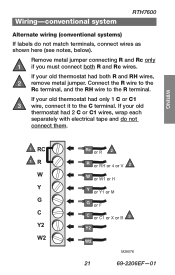
... if you must connect both R and RH wires, remove metal jumper. Connect the R wire to the Rc terminal, and the RH wire to the C terminal. SETUP AWbiroiuntg-yocuornnveewnttiohnearml soyssttaetm RTH7600 Alternate wiring (conventional systems) If labels do not connect them. If your old thermostat had only 1 C or C1 wire, connect it...
... if you must connect both R and RH wires, remove metal jumper. Connect the R wire to the Rc terminal, and the RH wire to the C terminal. SETUP AWbiroiuntg-yocuornnveewnttiohnearml soyssttaetm RTH7600 Alternate wiring (conventional systems) If labels do not connect them. If your old thermostat had only 1 C or C1 wire, connect it...
Owner's Manual
Page 24
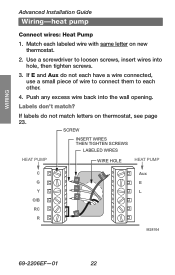
...? If labels do not each have a wire connected, use a small piece of wire to connect them to loosen screws, insert wires into the wall opening. SETUP WIRING Advanced Installation Guide AWbiroiuntg-yohuerantepwumthpermostat Connect wires: Heat Pump 1. Push any excess wire back into hole, then tighten screws. 3. SCREW INSERT WIRES THEN TIGHTEN...
...? If labels do not each have a wire connected, use a small piece of wire to connect them to loosen screws, insert wires into the wall opening. SETUP WIRING Advanced Installation Guide AWbiroiuntg-yohuerantepwumthpermostat Connect wires: Heat Pump 1. Push any excess wire back into hole, then tighten screws. 3. SCREW INSERT WIRES THEN TIGHTEN...

Owner's Manual
Page 25
... thermostat had Y1, W1 and W2 wires, stop now and contact a qualified contractor for heat pumps only) Leave metal jumper in place, connecting R & Rc terminals. SETUP WIRING Wiring-heat pump RTH7600 Alternate wiring (for help . If L terminal is used, C terminal wire must be 5 connected (contact a contractor if there is attached to...
... thermostat had Y1, W1 and W2 wires, stop now and contact a qualified contractor for heat pumps only) Leave metal jumper in place, connecting R & Rc terminals. SETUP WIRING Wiring-heat pump RTH7600 Alternate wiring (for help . If L terminal is used, C terminal wire must be 5 connected (contact a contractor if there is attached to...
Owner's Manual
Page 26
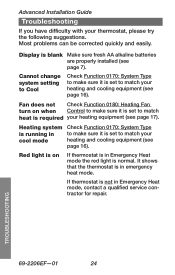
... thermostat is in cool mode Check Function 0170: System Type to make sure it is set to match heat is not in emergency heat mode. SETUP WIRING Advanced Installation Guide Troubleshooting If you have difficulty with your heating and cooling equipment (see page 16). Most problems can be corrected quickly and...
... thermostat is in cool mode Check Function 0170: System Type to make sure it is set to match heat is not in emergency heat mode. SETUP WIRING Advanced Installation Guide Troubleshooting If you have difficulty with your heating and cooling equipment (see page 16). Most problems can be corrected quickly and...
Owner's Manual
Page 27
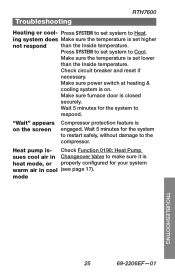
... mode, or properly configured for your system warm air in Changeover Valve to make sure it is engaged. Heat pump is set system to respond. SETUP WIRING Troubleshooting RTH7600 Heating or cool- "Wait" appears on . mode ASSISTANCE TROUBLESHOOTING 25 69-2206EF-01 Press SYSTEM to set higher not respond than the...
... mode, or properly configured for your system warm air in Changeover Valve to make sure it is engaged. Heat pump is set system to respond. SETUP WIRING Troubleshooting RTH7600 Heating or cool- "Wait" appears on . mode ASSISTANCE TROUBLESHOOTING 25 69-2206EF-01 Press SYSTEM to set higher not respond than the...
Owner's Manual
Page 28
SETUP WIRING ASSISTANCE TROUBLESHOOTING 69-2206EF-01 26 Advanced Installation Guide Customer assistance For assistance with this product, please visit http://DIYthermostats.honeywell.com or call Honeywell Customer Care toll-free at 1-800-468-1502.
SETUP WIRING ASSISTANCE TROUBLESHOOTING 69-2206EF-01 26 Advanced Installation Guide Customer assistance For assistance with this product, please visit http://DIYthermostats.honeywell.com or call Honeywell Customer Care toll-free at 1-800-468-1502.


