
Owner's Manual
Page 2
Contents Prepare for Installation 3 Follow Important Instructions 5 Remove Old Thermostat 6 Follow Special Instructions 7 Label Old Thermostat Wires 10 Mount New Wallplate to Wall 11 Connect Wires to New Wallplate 15 Install Batteries 20 Attach New Thermostat to Wallplate 21 Configure Installer Setup 22 Customer Assistance 28 Limited One-Year Warranty 29 69-1716 2
Contents Prepare for Installation 3 Follow Important Instructions 5 Remove Old Thermostat 6 Follow Special Instructions 7 Label Old Thermostat Wires 10 Mount New Wallplate to Wall 11 Connect Wires to New Wallplate 15 Install Batteries 20 Attach New Thermostat to Wallplate 21 Configure Installer Setup 22 Customer Assistance 28 Limited One-Year Warranty 29 69-1716 2
Owner's Manual
Page 4
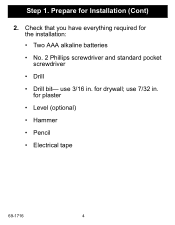
for Installation (Cont) 2. use 7/32 in . use 3/16 in . Prepare for drywall; Step 1. for the installation: • Two AAA alkaline batteries • No. 2 Phillips screwdriver and standard pocket screwdriver • Drill • Drill bit- Check that you have everything required for plaster • Level (optional) • Hammer • Pencil • Electrical tape 69-1716 4
for Installation (Cont) 2. use 7/32 in . use 3/16 in . Prepare for drywall; Step 1. for the installation: • Two AAA alkaline batteries • No. 2 Phillips screwdriver and standard pocket screwdriver • Drill • Drill bit- Check that you have everything required for plaster • Level (optional) • Hammer • Pencil • Electrical tape 69-1716 4
Owner's Manual
Page 20
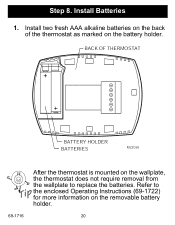
BACK OF THERMOSTAT BATTERY HOLDER BATTERIES M22056 69-1716 After the thermostat is mounted on the removable battery holder. 20 Refer to the enclosed Operating Instructions (69-1722) for more information on the wallplate, the thermostat does not require removal from the wallplate to replace the batteries. Install Batteries 1. Install two fresh AAA alkaline batteries on the back of the thermostat as marked on the battery holder. Step 8.
BACK OF THERMOSTAT BATTERY HOLDER BATTERIES M22056 69-1716 After the thermostat is mounted on the removable battery holder. 20 Refer to the enclosed Operating Instructions (69-1722) for more information on the wallplate, the thermostat does not require removal from the wallplate to replace the batteries. Install Batteries 1. Install two fresh AAA alkaline batteries on the back of the thermostat as marked on the battery holder. Step 8.

Owner's Manual
Page 28
Before calling, please have the thermostat model number and date code available. Customer Assistance For assistance with your Honeywell product please visit www.honeywell.com/yourhome or call Honeywell Customer Care toll free at 1-800-468-1502. MODEL NUMBER xxxxxxxx DATE CODE xxxxxx THERMOSTAT BATTERY HOLDER 69-1716 M22178 28
Before calling, please have the thermostat model number and date code available. Customer Assistance For assistance with your Honeywell product please visit www.honeywell.com/yourhome or call Honeywell Customer Care toll free at 1-800-468-1502. MODEL NUMBER xxxxxxxx DATE CODE xxxxxx THERMOSTAT BATTERY HOLDER 69-1716 M22178 28

Owner's Manual
Page 29
...service, for a period of one (1) year from defects in the possession of incidental or consequential damages, so this product, excluding battery, to be to the following address: Honeywell Return Goods Dock 4 MN10-3860 1885 Douglas Dr N Golden Valley, MN 55422 This warranty does not cover removal or reinstallation ...costs. HONEYWELL SHALL NOT BE LIABLE FOR ANY LOSS OR DAMAGE OF ANY KIND, INCLUDING ANY INCIDENTAL OR CONSEQUENTIAL DAMAGES RESULTING, DIRECTLY OR INDIRECTLY...
...service, for a period of one (1) year from defects in the possession of incidental or consequential damages, so this product, excluding battery, to be to the following address: Honeywell Return Goods Dock 4 MN10-3860 1885 Douglas Dr N Golden Valley, MN 55422 This warranty does not cover removal or reinstallation ...costs. HONEYWELL SHALL NOT BE LIABLE FOR ANY LOSS OR DAMAGE OF ANY KIND, INCLUDING ANY INCIDENTAL OR CONSEQUENTIAL DAMAGES RESULTING, DIRECTLY OR INDIRECTLY...


