
Owner's Manual
Page 1
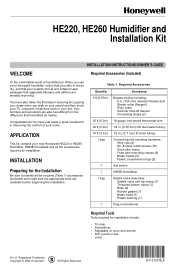
... Accessories. You have also taken the first step in reducing the zapping you create when you use your Honeywell humidifier, notice that your skin is not as dry, and that your new Honeywell HE220 or HE260 Humidifier, H8908 Humidistat and all the required (Table 1) accessories (included) and make sure the appropriate tools are steadily improving...
... Accessories. You have also taken the first step in reducing the zapping you create when you use your Honeywell humidifier, notice that your skin is not as dry, and that your new Honeywell HE220 or HE260 Humidifier, H8908 Humidistat and all the required (Table 1) accessories (included) and make sure the appropriate tools are steadily improving...
Owner's Manual
Page 2
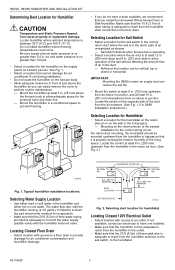
...on the opposite side of thermostat wire is no greater than 0.4 in . (78 mm) above the humidifier so you install the Honeywell Whole House Drum or Disk Humidifier. RETURN RETURN HORIZONTAL RETURN RETURN DFOLWON HIGHBOY LOWBOY M12808A Fig. 1. Mounting on the wall in . (... • Select a location for the control wiring circuit. HE220, HE260 HUMIDIFIER AND INSTALLATION KIT Determining Best Location for humidistat. Locate humidifier where ambient temperature is adequate to connect the water supply (saddle valve) with the humidifier running, is 3.5 gal/hr (13 liters/hr) to...
...on the opposite side of thermostat wire is no greater than 0.4 in . (78 mm) above the humidifier so you install the Honeywell Whole House Drum or Disk Humidifier. RETURN RETURN HORIZONTAL RETURN RETURN DFOLWON HIGHBOY LOWBOY M12808A Fig. 1. Mounting on the wall in . (... • Select a location for the control wiring circuit. HE220, HE260 HUMIDIFIER AND INSTALLATION KIT Determining Best Location for humidistat. Locate humidifier where ambient temperature is adequate to connect the water supply (saddle valve) with the humidifier running, is 3.5 gal/hr (13 liters/hr) to...
Owner's Manual
Page 3
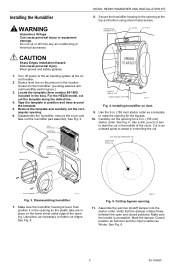
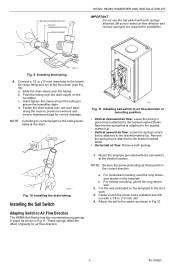
.... Draw a level line on the lower sheet metal edge of the circle. For the HE220 model, cut in the location chosen for the humidifier. (Leveling assures optimal humidifier performance.) 3. remove the cover and take out the humidifier pad assembly. Use the 6 in. (155 mm) starter collar as a template to ... Closed position as Summer and the Open position as necessary, to start the cut out the template along the dotted line. 4. Secure the humidifier housing to mark the opening for the bypass. 10. Locate the template (form number 69-1650 included in position and trace around the template...
.... Draw a level line on the lower sheet metal edge of the circle. For the HE220 model, cut in the location chosen for the humidifier. (Leveling assures optimal humidifier performance.) 3. remove the cover and take out the humidifier pad assembly. Use the 6 in. (155 mm) starter collar as a template to ... Closed position as Summer and the Open position as necessary, to start the cut out the template along the dotted line. 4. Secure the humidifier housing to mark the opening for the bypass. 10. Locate the template (form number 69-1650 included in position and trace around the template...
Owner's Manual
Page 4
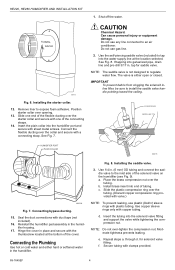
.... Fig. 8. Use copper sleeve rings only with sheet metal screws. Moderate tightness prevents leaking. for saddle valve. f. HE220, HE260 HUMIDIFIER AND INSTALLATION KIT 1. Remove liner to install the saddle valve handle pointing toward the ceiling. Position starter collar over the...d. Connecting bypass ducting. 15. c. Use the self-piercing saddle valve (included) to the inlet side of the cover. SCREW DRIVER WATER LINE HUMIDIFIER PORT PLAIN COLLAR M20175 M20785 Fig. 7. Install brass insert into galvanized pipe, drain line and pre-drill 3/17 in . (6 mm) OD ...
.... Fig. 8. Use copper sleeve rings only with sheet metal screws. Moderate tightness prevents leaking. for saddle valve. f. HE220, HE260 HUMIDIFIER AND INSTALLATION KIT 1. Remove liner to install the saddle valve handle pointing toward the ceiling. Position starter collar over the...d. Connecting bypass ducting. 15. c. Use the self-piercing saddle valve (included) to the inlet side of the cover. SCREW DRIVER WATER LINE HUMIDIFIER PORT PLAIN COLLAR M20175 M20785 Fig. 7. Install brass insert into galvanized pipe, drain line and pre-drill 3/17 in . (6 mm) OD ...
Owner's Manual
Page 5
BRASS COMPRESSION NUT PLASTIC COMPRESSION RING BRASS INSERT HE220, HE260 HUMIDIFIER AND INSTALLATION KIT IMPORTANT Do not use duct tape) along the route to secure the humidifier drain. c. NOTE: Cut tubing to correct length so the tubing terminates at the desired location. Remove the spring that ... to the bracket marked Down. These springs offset the effect of gravity for installation. For horizontal mounting, level the long dimension shown on the humidifier. Be sure to the switch as shown in Fig 12. 5 69-1645EF Installing feed tubing. 4. d. UP M3014 Fig. 11. Fasten ...
BRASS COMPRESSION NUT PLASTIC COMPRESSION RING BRASS INSERT HE220, HE260 HUMIDIFIER AND INSTALLATION KIT IMPORTANT Do not use duct tape) along the route to secure the humidifier drain. c. NOTE: Cut tubing to correct length so the tubing terminates at the desired location. Remove the spring that ... to the bracket marked Down. These springs offset the effect of gravity for installation. For horizontal mounting, level the long dimension shown on the humidifier. Be sure to the switch as shown in Fig 12. 5 69-1645EF Installing feed tubing. 4. d. UP M3014 Fig. 11. Fasten ...
Owner's Manual
Page 6
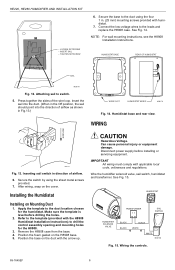
... 7. WIRING AIRFLOW M20178 Fig. 13. Installing the Humidistat Installing on the cover. Disconnect power supply before drilling the holes. 2. Wire the humidifier solenoid valve, sail switch, humidistat and transformer. TIGHTEN SETSCREW 6. NOTE: For wall mounting instructions, see the H8908 Installation Instructions. Press together the... case from the base. 4. Make sure the template is level before installing or servicing equipment. See Fig. 15. HE220, HE260 HUMIDIFIER AND INSTALLATION KIT - Inserting sail switch in Fig.13.) WIRE SLOT HUMIDISTAT WIRES M20179 Fig. 14.
... 7. WIRING AIRFLOW M20178 Fig. 13. Installing the Humidistat Installing on the cover. Disconnect power supply before drilling the holes. 2. Wire the humidifier solenoid valve, sail switch, humidistat and transformer. TIGHTEN SETSCREW 6. NOTE: For wall mounting instructions, see the H8908 Installation Instructions. Press together the... case from the base. 4. Make sure the template is level before installing or servicing equipment. See Fig. 15. HE220, HE260 HUMIDIFIER AND INSTALLATION KIT - Inserting sail switch in Fig.13.) WIRE SLOT HUMIDISTAT WIRES M20179 Fig. 14.
Owner's Manual
Page 7
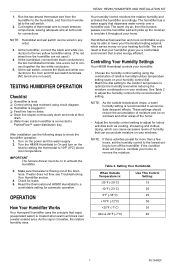
...on the power and the water supply 2. NOTE: As the outside temperature drops, a lower humidity setting is not used .) 4. HE220, HE260 HUMIDIFIER AND INSTALLATION KIT 1. Cut lengths of relative humidity/outdoor temperature setting scale on your humidity control dial. • Match the dial setting...as cooking, showering and clothes drying, which saves money on windows and other areas of the drain hose. OPERATION How Your Humidifier Works Your Honeywell humidifier uses the principle that vapor (evaporated water) is flowing out of the home. • Adjust the humidity control setting ...
...on the power and the water supply 2. NOTE: As the outside temperature drops, a lower humidity setting is not used .) 4. HE220, HE260 HUMIDIFIER AND INSTALLATION KIT 1. Cut lengths of relative humidity/outdoor temperature setting scale on your humidity control dial. • Match the dial setting...as cooking, showering and clothes drying, which saves money on windows and other areas of the drain hose. OPERATION How Your Humidifier Works Your Honeywell humidifier uses the principle that vapor (evaporated water) is flowing out of the home. • Adjust the humidity control setting ...
Owner's Manual
Page 8
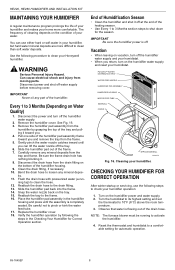
..., use either hard or soft water in your humidifier, but hard water mineral deposits are more comfortable. HE220, HE260 HUMIDIFIER AND INSTALLATION KIT MAINTAINING YOUR HUMIDIFIER A regular maintenance program prolongs the life of your humidifier and makes your home more difficult to pinch or... water nozzle catches inward until the assembly is completely seated. Remove the humidifier cover. Vacation • When leaving on vacation, turn off at the end of the frame. 7. Cleaning your Honeywell humidifier. You can lift the water nozzle off water supply before removing cover....
..., use either hard or soft water in your humidifier, but hard water mineral deposits are more comfortable. HE220, HE260 HUMIDIFIER AND INSTALLATION KIT MAINTAINING YOUR HUMIDIFIER A regular maintenance program prolongs the life of your humidifier and makes your home more difficult to pinch or... water nozzle catches inward until the assembly is completely seated. Remove the humidifier cover. Vacation • When leaving on vacation, turn off at the end of the frame. 7. Cleaning your Honeywell humidifier. You can lift the water nozzle off water supply before removing cover....
Owner's Manual
Page 9
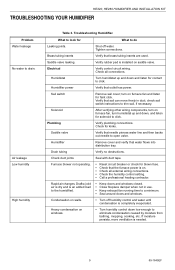
... joints Seal with duct tape. Rapid air changes. Drafts (cold air is dry and is installed on saddle valve. Saddle valve leaking. HE220, HE260 HUMIDIFIER AND INSTALLATION KIT TROUBLESHOOTING YOUR HUMIDIFIER Problem Water leakage No water to trim sail, if necessary. Shut off humidity control and water until condensation is on furnace fan...
... joints Seal with duct tape. Rapid air changes. Drafts (cold air is dry and is installed on saddle valve. Saddle valve leaking. HE220, HE260 HUMIDIFIER AND INSTALLATION KIT TROUBLESHOOTING YOUR HUMIDIFIER Problem Water leakage No water to trim sail, if necessary. Shut off humidity control and water until condensation is on furnace fan...

Owner's Manual
Page 10
HE220, HE260 HUMIDIFIER AND INSTALLATION KIT LIMITED ONE-YEAR WARRANTY Honeywell warrants this product, excluding humidifier pad, to be to you purchased it. If, at Honeywell's option) within the terms stated above limitation may have any time during the warranty period, the product is defective or malfunctions, Honeywell shall repair... A PARTICULAR PURPOSE, IS HEREBY LIMITED TO THE ONE YEAR DURATION OF THIS WARRANTY. THIS WARRANTY IS THE ONLY EXPRESS WARRANTY HONEYWELL MAKES ON THIS PRODUCT. Some states do not allow limitations on how long an implied warranty lasts, so the above . ...
HE220, HE260 HUMIDIFIER AND INSTALLATION KIT LIMITED ONE-YEAR WARRANTY Honeywell warrants this product, excluding humidifier pad, to be to you purchased it. If, at Honeywell's option) within the terms stated above limitation may have any time during the warranty period, the product is defective or malfunctions, Honeywell shall repair... A PARTICULAR PURPOSE, IS HEREBY LIMITED TO THE ONE YEAR DURATION OF THIS WARRANTY. THIS WARRANTY IS THE ONLY EXPRESS WARRANTY HONEYWELL MAKES ON THIS PRODUCT. Some states do not allow limitations on how long an implied warranty lasts, so the above . ...

Owner's Manual
Page 11
HE220, HE260 HUMIDIFIER AND INSTALLATION KIT 11 69-1645EF
HE220, HE260 HUMIDIFIER AND INSTALLATION KIT 11 69-1645EF

Owner's Manual
Page 12
HE220, HE260 HUMIDIFIER AND INSTALLATION KIT Automation and Control Solutions Honeywell Honeywell Limited-Honeywell Limitée 1985 Douglas Drive North 35 Dynamic Drive Golden Valley, MN 55422 Scarborough, Ontario M1V 4Z9 69-1645EF G.H. 9-02 Printed in U.S.A. www.honeywell.com/yourhome on recycled paper containing at least 10% post-consumer paper fibers.
HE220, HE260 HUMIDIFIER AND INSTALLATION KIT Automation and Control Solutions Honeywell Honeywell Limited-Honeywell Limitée 1985 Douglas Drive North 35 Dynamic Drive Golden Valley, MN 55422 Scarborough, Ontario M1V 4Z9 69-1645EF G.H. 9-02 Printed in U.S.A. www.honeywell.com/yourhome on recycled paper containing at least 10% post-consumer paper fibers.


