User Guide
Page 1
... to replace a loose or worn outlet. 9. Before using electrical appliances, basic precautions should not be supervised to two-slot receptacles. Contact a qualified e ectrician to the CLEANING instructions provided. For proper humidity reading use a hygrometer, which is available. 7. under the warranty agreement for how long this Kaz product is operating or filled with the appliance. Honeywell HYDRAPURE® AIR WASHER MODELS HAW-500, HAW-501 SERIES ii...
... to replace a loose or worn outlet. 9. Before using electrical appliances, basic precautions should not be supervised to two-slot receptacles. Contact a qualified e ectrician to the CLEANING instructions provided. For proper humidity reading use a hygrometer, which is available. 7. under the warranty agreement for how long this Kaz product is operating or filled with the appliance. Honeywell HYDRAPURE® AIR WASHER MODELS HAW-500, HAW-501 SERIES ii...
User Guide
Page 2
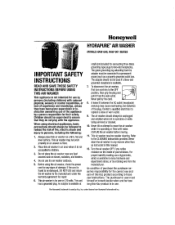
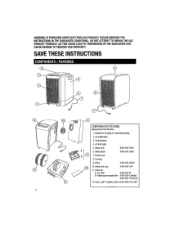
... TO TERMINATION OF THE GUARANTEE AND CAUSE DAMAGE TO PERSONS AND PROPERTY. Water tank cap HAW-500-CAP 11. WARNING: IF PROBLEMS ARISE WITH THIS KAZ PRODUCT, PLEASE OBSERVE THE INSTRUCTIONS IN THE GUARANTEE CONDITIONS. Control panel 4. SAVE THESE INSTRUCTIONS COMPONENTS/FEATURES 0 0 0 0 0 0 0 0 8 O COMPONENTS/FEATURES Replacement Part Number 1. Pre-filter HAW-500-PF B. Handle for carrying or removing housing 2. Odor-LockTm optional odor control filter CZF-500 2 Power cord B. Air inlet grille 5.
... TO TERMINATION OF THE GUARANTEE AND CAUSE DAMAGE TO PERSONS AND PROPERTY. Water tank cap HAW-500-CAP 11. WARNING: IF PROBLEMS ARISE WITH THIS KAZ PRODUCT, PLEASE OBSERVE THE INSTRUCTIONS IN THE GUARANTEE CONDITIONS. Control panel 4. SAVE THESE INSTRUCTIONS COMPONENTS/FEATURES 0 0 0 0 0 0 0 0 8 O COMPONENTS/FEATURES Replacement Part Number 1. Pre-filter HAW-500-PF B. Handle for carrying or removing housing 2. Odor-LockTm optional odor control filter CZF-500 2 Power cord B. Air inlet grille 5.
User Guide
Page 3
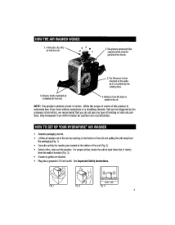
... THE AIR WASHER WORKS 1. Cleaner, fresher hydrated air is added to the room. 4. The primary permanent filter captures small, harmful particles from the wall or furniture (Fig. 3). • Ensure no grilles are recommended. I t. 3. Moisture from the basin is returned to the air. Only Honeywell True HEPA filtration air purifiers are blocked. • Plug into the unit. 0 2. HOW TO SET UP YOUR HYDRAPURE® AIR WASHER • Remove packaging inserts. • Lift the air washer...
... THE AIR WASHER WORKS 1. Cleaner, fresher hydrated air is added to the room. 4. The primary permanent filter captures small, harmful particles from the wall or furniture (Fig. 3). • Ensure no grilles are recommended. I t. 3. Moisture from the basin is returned to the air. Only Honeywell True HEPA filtration air purifiers are blocked. • Plug into the unit. 0 2. HOW TO SET UP YOUR HYDRAPURE® AIR WASHER • Remove packaging inserts. • Lift the air washer...
User Guide
Page 4
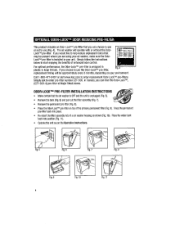
... to order replacement Odor-LockTM pre-filters. Place the water tank back into th e air washer housing as per the Operation Instructions. If you would like to help reduce unpleasant odors that may be approximately every 3 months, depending on top of enhanced odor control. ODOR-LOCKTM PRE-FILTER INSTALLATION INSTRUCTIONS • • Make certain that the air washer is OFF and the unit is installed in Fig. 4 plastic to keep it fresh. Snap the permanent pre-filter back...
... to order replacement Odor-LockTM pre-filters. Place the water tank back into th e air washer housing as per the Operation Instructions. If you would like to help reduce unpleasant odors that may be approximately every 3 months, depending on top of enhanced odor control. ODOR-LOCKTM PRE-FILTER INSTALLATION INSTRUCTIONS • • Make certain that the air washer is OFF and the unit is installed in Fig. 4 plastic to keep it fresh. Snap the permanent pre-filter back...
User Guide
Page 5
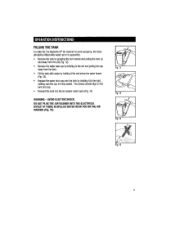
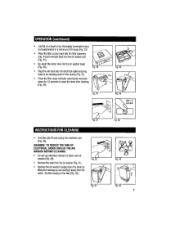
...away from the unit (Fig. 12). • Remove the water tank cap by twisting to the left and pulling the cap away from the tank. • Fill the tank with water by holding it flat and below the water faucet (Fig. 13). • Replace the water tank cap ...OPERATION INSTRUCTIONS FILLING THE TANK In order for the HydraPure) air washer to work properly, the tank should align on the tank and cap. • Reinsert the tank into the air washer water basin (Fig. 14). DO NOT PLUG THE AIR WASHER INTO THE ELECTRICAL OUTLET IF THERE IS SPILLED WATER NEAR YOU OR THE AIR WASHER (Fig. 15). AVOID ELECTRIC ...
...away from the unit (Fig. 12). • Remove the water tank cap by twisting to the left and pulling the cap away from the tank. • Fill the tank with water by holding it flat and below the water faucet (Fig. 13). • Replace the water tank cap ...OPERATION INSTRUCTIONS FILLING THE TANK In order for the HydraPure) air washer to work properly, the tank should align on the tank and cap. • Reinsert the tank into the air washer water basin (Fig. 14). DO NOT PLUG THE AIR WASHER INTO THE ELECTRICAL OUTLET IF THERE IS SPILLED WATER NEAR YOU OR THE AIR WASHER (Fig. 15). AVOID ELECTRIC ...
User Guide
Page 6
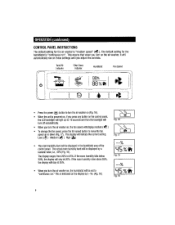
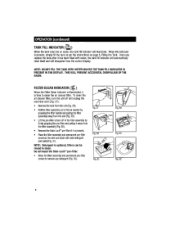
... 6 OPERATION (continued) CONTROL PANEL INSTRUCTIONS The default setting for the humidistat is "continuous run". This is powered on, if you press any button on , the humidistat will be displayed in the humidistat area of the control panel. This means that when you turn on the air washer, it will display medium ( ) • To change the fan speed, press the fan speed button to turn the air washer...
... 6 OPERATION (continued) CONTROL PANEL INSTRUCTIONS The default setting for the humidistat is "continuous run". This is powered on, if you press any button on , the humidistat will be displayed in the humidistat area of the control panel. This means that when you turn on the air washer, it will display medium ( ) • To change the fan speed, press the fan speed button to turn the air washer...
User Guide
Page 7
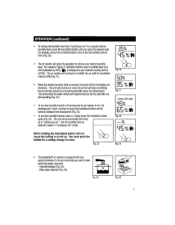
Filter clean indicator (Fig. 26) Fig. 25 Fig. 26 7 The air washer will continue to clean the air but your desired humidity level. Set the humidity level as desired or leave in "continuous run ." You must push the button for proper operation - OPERATION (continued) • To change to occur. The unit will continue to humidify the air until the humidistat reaches 50% (Fig. 21). • When...
Filter clean indicator (Fig. 26) Fig. 25 Fig. 26 7 The air washer will continue to clean the air but your desired humidity level. Set the humidity level as desired or leave in "continuous run ." You must push the button for proper operation - OPERATION (continued) • To change to occur. The unit will continue to humidify the air until the humidistat reaches 50% (Fig. 21). • When...
User Guide
Page 8
Do not wash the Odor-Lock"" pre-filter. • Rinse the filter assembly and permanent pre-filter screen to clean. When this indicator is time to clean the air cleaner filter. FILTER CLEAN INDICATOR ( ) When the Filter Clean Indicator is illuminated, it is present, simply fill the tank as per the instructions on water, the tank fill indicator will disappear from the filter assembly (Fig. 30). • Remove the Odor-Lock'" pre-filter if it is optional, filters can be rinsed to...
Do not wash the Odor-Lock"" pre-filter. • Rinse the filter assembly and permanent pre-filter screen to clean. When this indicator is time to clean the air cleaner filter. FILTER CLEAN INDICATOR ( ) When the Filter Clean Indicator is illuminated, it is present, simply fill the tank as per the instructions on water, the tank fill indicator will disappear from the filter assembly (Fig. 30). • Remove the Odor-Lock'" pre-filter if it is optional, filters can be rinsed to...
User Guide
Page 9
.... 33). • Place the filter screen back into the filter assembly (Fig. 34) and reinsert back into the air washer unit (Fig. 35). • Re-insert the water tank into the air washer basin (Fig. 36). • Plug the unit back into the electrical outlet ensuring there is no standing water in the vicinity (Fig. 37). • Press the filter clean indicator reset button and hold down for...
.... 33). • Place the filter screen back into the filter assembly (Fig. 34) and reinsert back into the air washer unit (Fig. 35). • Re-insert the water tank into the air washer basin (Fig. 36). • Plug the unit back into the electrical outlet ensuring there is no standing water in the vicinity (Fig. 37). • Press the filter clean indicator reset button and hold down for...
User Guide
Page 10
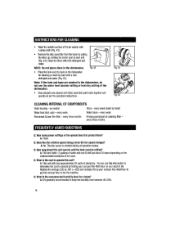
... detergent and water (Fig. 45). NOTE: Do not place discs in the dishwasher for a home? every week Permanent Screen Pre-filter - Q: What is constant during all parts are washed in the dishwasher, do not use this by your cost per the operation instructions. A: Three Q: Does the disc rotation speed change when the fan speed changes? Fig. 45 CLEANING INTERVAL OF COMPONENTS Outer housing - every week (wash by...
... detergent and water (Fig. 45). NOTE: Do not place discs in the dishwasher for a home? every week Permanent Screen Pre-filter - Q: What is constant during all parts are washed in the dishwasher, do not use this by your cost per the operation instructions. A: Three Q: Does the disc rotation speed change when the fan speed changes? Fig. 45 CLEANING INTERVAL OF COMPONENTS Outer housing - every week (wash by...
User Guide
Page 11
...normal wear and tear will repair or replace this warranty. ANY IMPLIED WARRANTY OF MERCHANTABILITY OR FITNESS FOR A PARTICULAR PURPOSE OF THIS PRODUCT IS LIMITED IN DURATION TO THE DURATION OF THIS WARRANTY. C. You must prepay ...number. 3 YEAR LIMITED WARRANTY You should first read all instructions before attempting to use this product from the original date of purchase. Include proof of this product. Please include your product under this product if it is found to be considered manufacturing defects under the Customer Care Center and receive product information updates...
...normal wear and tear will repair or replace this warranty. ANY IMPLIED WARRANTY OF MERCHANTABILITY OR FITNESS FOR A PARTICULAR PURPOSE OF THIS PRODUCT IS LIMITED IN DURATION TO THE DURATION OF THIS WARRANTY. C. You must prepay ...number. 3 YEAR LIMITED WARRANTY You should first read all instructions before attempting to use this product from the original date of purchase. Include proof of this product. Please include your product under this product if it is found to be considered manufacturing defects under the Customer Care Center and receive product information updates...


