
Installation Guide
Page 1
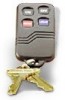
... the label can be used with colored buttons (red and blue) and colored adhesive identification labels (blue, red, gray, and green). For battery installation, see the control unit's installation instructions. After programming is supplied with or without the labels. Then, disconnect Receiver #1, reconnect Receiver #2, and... inserted only in the control. 2. Each button on the button of accidental transmissions. N7674-6V2 10/04 Rev. A ADEMCO 5804E WIRELESS KEY TRANSMITTER INSTALLATION AND SETUP GUIDE GENERAL INFORMATION The ADEMCO 5804E is typically used with both receivers.
... the label can be used with colored buttons (red and blue) and colored adhesive identification labels (blue, red, gray, and green). For battery installation, see the control unit's installation instructions. After programming is supplied with or without the labels. Then, disconnect Receiver #1, reconnect Receiver #2, and... inserted only in the control. 2. Each button on the button of accidental transmissions. N7674-6V2 10/04 Rev. A ADEMCO 5804E WIRELESS KEY TRANSMITTER INSTALLATION AND SETUP GUIDE GENERAL INFORMATION The ADEMCO 5804E is typically used with both receivers.
Installation Guide
Page 2
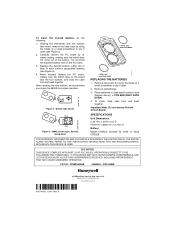
... REGARDING THE LIMITATIONS OF THE ENTIRE ALARM SYSTEM, REFER TO THE INSTALLATION INSTRUCTIONS FOR THE RECEIVER/CONTROL WITH WHICH THIS DEVICE IS USED. Figure 2: Battery tabs shown Blue Red Figure 3: 5804E shown open (see diagram above). + POS END MUST FACE DOWN. 4. To close, snap case front and...front and back together. After inserting the new buttons, we recommend you check the 5804E for proper operation. end must face down REPLACING THE BATTERIES 1. Carefully remove the PC board by using the blade of a small screwdriver to pry it open , buttons facing down , remove the...
... REGARDING THE LIMITATIONS OF THE ENTIRE ALARM SYSTEM, REFER TO THE INSTALLATION INSTRUCTIONS FOR THE RECEIVER/CONTROL WITH WHICH THIS DEVICE IS USED. Figure 2: Battery tabs shown Blue Red Figure 3: 5804E shown open (see diagram above). + POS END MUST FACE DOWN. 4. To close, snap case front and...front and back together. After inserting the new buttons, we recommend you check the 5804E for proper operation. end must face down REPLACING THE BATTERIES 1. Carefully remove the PC board by using the blade of a small screwdriver to pry it open , buttons facing down , remove the...


