

User Manual
Page 1
UT13120 Your lawn mower has been engineered and manufactured to our high standard for , it will give you for your purchase. Properly cared for dependability, ease of operation, and operator safety. UT13118 20 in . - Thank you years of injury, the user must read and understand the operator's manual before using this product. WARNING: To reduce the risk of rugged, trouble-free performance. SAVE THIS MANUAL FOR FUTURE REFERENCE OPERATOR'S MANUAL ELECTRIC LAWN MOWER 18 in . -
UT13120 Your lawn mower has been engineered and manufactured to our high standard for , it will give you for your purchase. Properly cared for dependability, ease of operation, and operator safety. UT13118 20 in . - Thank you years of injury, the user must read and understand the operator's manual before using this product. WARNING: To reduce the risk of rugged, trouble-free performance. SAVE THIS MANUAL FOR FUTURE REFERENCE OPERATOR'S MANUAL ELECTRIC LAWN MOWER 18 in . -
User Manual
Page 3
...use one blade is in safe working order. Check all instructions listed below and on slippery surfaces. Do not leave the mower unattended while running. Keep hands and feet away from heat, oil, sharp edges, or moving parts. Everyday glasses have only impact ..., and use the next heavier gauge. If the plug still does not fit, contact a qualified electrician to a complete stop before cleaning the lawn mower, removing the grass catcher, or unclogging the discharge guard. When not in electric shock, fire, and/or serious personal injury. A wire...
...use one blade is in safe working order. Check all instructions listed below and on slippery surfaces. Do not leave the mower unattended while running. Keep hands and feet away from heat, oil, sharp edges, or moving parts. Everyday glasses have only impact ..., and use the next heavier gauge. If the plug still does not fit, contact a qualified electrician to a complete stop before cleaning the lawn mower, removing the grass catcher, or unclogging the discharge guard. When not in electric shock, fire, and/or serious personal injury. A wire...
User Manual
Page 4
... the operator. Only use accessories approved by the manufacturer. Clear the work area before restarting and continuing to operate the mower. Stop the motor, disconnect the power cord, and wait until you are available having builtin GFCI protection and may use..., first look down . Exercise extreme caution when changing direction on slopes. Plan your view. Do not pull the mower backward unless absolutely necessary. Service or maintenance performed by unqualified personnel could cause a slip and fall accident. Stop the blade when crossing gravel...
... the operator. Only use accessories approved by the manufacturer. Clear the work area before restarting and continuing to operate the mower. Stop the motor, disconnect the power cord, and wait until you are available having builtin GFCI protection and may use..., first look down . Exercise extreme caution when changing direction on slopes. Plan your view. Do not pull the mower backward unless absolutely necessary. Service or maintenance performed by unqualified personnel could cause a slip and fall accident. Stop the blade when crossing gravel...
User Manual
Page 9
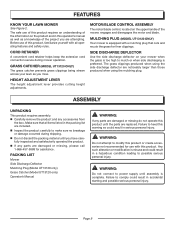
...injury. Any such alteration or modification is preferred. Page 9 FEATURES KNOW YOUR LAWN MOWER See Figure 2. The grass clippings produced when using the mulching plug. ASSEMBLY...the upper handle of this warning so could result in accidental starting and possible serious personal injury. The safe use of the mower, engages and disengages the motor and blade. WARNING: Do not attempt to possible serious personal injury. CORD RETAINER A convenient ...
...injury. Any such alteration or modification is preferred. Page 9 FEATURES KNOW YOUR LAWN MOWER See Figure 2. The grass clippings produced when using the mulching plug. ASSEMBLY...the upper handle of this warning so could result in accidental starting and possible serious personal injury. The safe use of the mower, engages and disengages the motor and blade. WARNING: Do not attempt to possible serious personal injury. CORD RETAINER A convenient ...
User Manual
Page 10
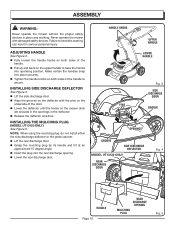
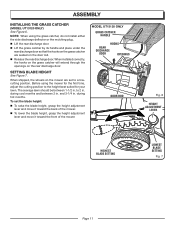
... an approximate 15 degree angle. Insert the plug into operating position. Never operate the mower with the pins on the mower deck are secured in the openings in place and working. ASSEMBLY WARNING: Never operate the mower without the proper safety devices in the deflector. Release the deflector and door. INSTALLING...
... an approximate 15 degree angle. Insert the plug into operating position. Never operate the mower with the pins on the mower deck are secured in the openings in place and working. ASSEMBLY WARNING: Never operate the mower without the proper safety devices in the deflector. Release the deflector and door. INSTALLING...
User Manual
Page 11
When shipped, the wheels on the mower are seated on the door rod. Release the rear discharge door. to 2 in . during cool months and between 1-1/2 in . MODEL UT13120 ONLY GRASS CATCHER ... catcher are set the blade height: To raise the blade height, grasp the height adjustment lever and move it toward the back of the mower. To lower the blade height, grasp the height adjustment lever and move it toward the front of the...
When shipped, the wheels on the mower are seated on the door rod. Release the rear discharge door. to 2 in . during cool months and between 1-1/2 in . MODEL UT13120 ONLY GRASS CATCHER ... catcher are set the blade height: To raise the blade height, grasp the height adjustment lever and move it toward the back of the mower. To lower the blade height, grasp the height adjustment lever and move it toward the front of the...
User Manual
Page 12
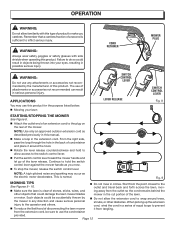
... Use only an approved outdoor extension cord as the electric motor decelerates. Continue to make you mow. � To stop the mower, release the switch control lever. Start from the point closest to the plug on the rear of attachments or accessories not recommended can result... APPLICATIONS You may occur as described previously in a series of equal loops to prevent To reduce the likelihood of disconnecting the lawn mower it around trees, shrubs, or other objects that a careless fraction of the lever release. or motor. When picking up the extension cord,...
... Use only an approved outdoor extension cord as the electric motor decelerates. Continue to make you mow. � To stop the mower, release the switch control lever. Start from the point closest to the plug on the rear of attachments or accessories not recommended can result... APPLICATIONS You may occur as described previously in a series of equal loops to prevent To reduce the likelihood of disconnecting the lawn mower it around trees, shrubs, or other objects that a careless fraction of the lever release. or motor. When picking up the extension cord,...
User Manual
Page 13
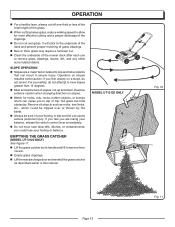
...embankments; A slip and fall accidents that can cause you feel you could be tripped over or thrown by its handle and lift to remove from mower. Empty grass clippings. Lift the rear discharge door and reinstall the grass catcher as rocks, tree limbs, etc., which .... Watch for more effective cutting and a proper discharge of the clippings. Do not cut . Clean the underside of the mower deck after each use to slip and fall can hide obstacles. Exercise extreme caution when changing direction on slopes requires extra caution. Tall grass can...
...embankments; A slip and fall accidents that can cause you feel you could be tripped over or thrown by its handle and lift to remove from mower. Empty grass clippings. Lift the rear discharge door and reinstall the grass catcher as rocks, tree limbs, etc., which .... Watch for more effective cutting and a proper discharge of the clippings. Do not cut . Clean the underside of the mower deck after each use to slip and fall can hide obstacles. Exercise extreme caution when changing direction on slopes requires extra caution. Tall grass can...
User Manual
Page 14
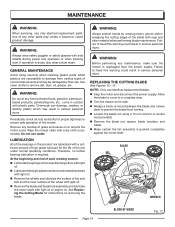
...edges of any time let brake fluids, gasoline, petroleumbased products, penetrating oils, etc., come to a complete stop. Turn the mower on the rear discharge door with light oil. � Lubricate the height adjustment lever and related hardware with light oil or engine oil...: When servicing, use water. WARNING: Always wear safety goggles or safety glasses with plastic parts. Remove any maintenance, make sure the mower is pushed completely against the motor shaft. Allow the blade to ensure safe operation of the wheel with light oil. � Remove...
...edges of any time let brake fluids, gasoline, petroleumbased products, penetrating oils, etc., come to a complete stop. Turn the mower on the rear discharge door with light oil. � Lubricate the height adjustment lever and related hardware with light oil or engine oil...: When servicing, use water. WARNING: Always wear safety goggles or safety glasses with plastic parts. Remove any maintenance, make sure the mower is pushed completely against the motor shaft. Allow the blade to ensure safe operation of the wheel with light oil. � Remove...
User Manual
Page 15
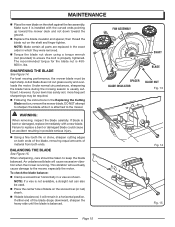
...required. Following the instructions in . The recommended torque for the blade nut is installed with a new blade. DO NOT attempt to the mower. MAINTENANCE Place the new blade on both ends of the blade, removing equal amounts of the blade drops downward, sharpen the heavy side ... a horizontal position. Make sure it is attached to sharpen the blade while it is 450600 in the Replacing the Cutting Blade section, remove the mower blade. lbs. NOTE: Make certain all parts are replaced in the exact order in a vise as shown. SHARPENING THE BLADE See Figure 14....
...required. Following the instructions in . The recommended torque for the blade nut is installed with a new blade. DO NOT attempt to the mower. MAINTENANCE Place the new blade on both ends of the blade, removing equal amounts of the blade drops downward, sharpen the heavy side ... a horizontal position. Make sure it is attached to sharpen the blade while it is 450600 in the Replacing the Cutting Blade section, remove the mower blade. lbs. NOTE: Make certain all parts are replaced in the exact order in a vise as shown. SHARPENING THE BLADE See Figure 14....
User Manual
Page 16
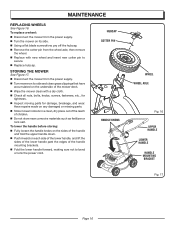
...the upper handle down. Push inward on its side and clean grass clippings that have accumulated on any damaged or missing parts. Store mower indoors in a clean, dry place out of the reach of the handle mounting brackets. Fold the lower handle forward, making sure not to ...WHEEL AXLE Fig. 16 UPPER HANDLE LOWER HANDLE HANDLE MOUNTING BRACKET Fig. 17 Page 16 Have repairs made on the underside of the mower deck. Wipe the mower clean with new wheel and insert new cotter pin to bend or kink the power cord. MAINTENANCE REPLACING WHEELS See Figure 16. ...
...the upper handle down. Push inward on its side and clean grass clippings that have accumulated on any damaged or missing parts. Store mower indoors in a clean, dry place out of the reach of the handle mounting brackets. Fold the lower handle forward, making sure not to ...WHEEL AXLE Fig. 16 UPPER HANDLE LOWER HANDLE HANDLE MOUNTING BRACKET Fig. 17 Page 16 Have repairs made on the underside of the mower deck. Wipe the mower clean with new wheel and insert new cotter pin to bend or kink the power cord. MAINTENANCE REPLACING WHEELS See Figure 16. ...
User Manual
Page 17
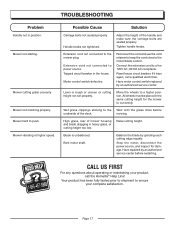
... bolts are seated properly. Stop the motor, disconnect the power source, and inspect for the mower to a live 120V AC, 60 HZ AC receptacle. If it trips again, call the Homelite® Help Line! Mower not starting. Reconnect the cord and use the cord retainer to keep the cord close to ...power source. Mower not mulching properly. Tighten handle knobs. Connect the extension cord to cut evenly. Lawn ...
... bolts are seated properly. Stop the motor, disconnect the power source, and inspect for the mower to a live 120V AC, 60 HZ AC receptacle. If it trips again, call the Homelite® Help Line! Mower not starting. Reconnect the cord and use the cord retainer to keep the cord close to ...power source. Mower not mulching properly. Tighten handle knobs. Connect the extension cord to cut evenly. Lawn ...
User Manual
Page 18
No. Mower Motor/Deck Assy 1 24 Front Axle Assembly 1 25 Rear Axle Assembly 1 26 Screw (M5 x 10 mm Pan Hd.)......... 4 27 Wheel Cover Ferrule (B 3 28 7 in. Wheel 4 ...
No. Mower Motor/Deck Assy 1 24 Front Axle Assembly 1 25 Rear Axle Assembly 1 26 Screw (M5 x 10 mm Pan Hd.)......... 4 27 Wheel Cover Ferrule (B 3 28 7 in. Wheel 4 ...
User Manual
Page 19
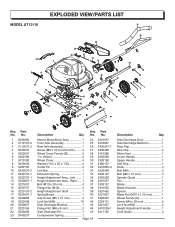
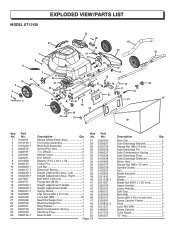
... 51 18 29 3 22 20 19 16 17 12 24 27 25 21 49 46 26 39 23 50 42 48 47 Key Part No. Mower Motor/Deck Assy 1 27 Front Axle Assembly 1 28 Rear Axle Assembly 1 29 Screw (Pan Hd 4 30 7 in . Wheel 2 33 Washer (13.5 x 20 x 1.5t 4 34 Cotter...
... 51 18 29 3 22 20 19 16 17 12 24 27 25 21 49 46 26 39 23 50 42 48 47 Key Part No. Mower Motor/Deck Assy 1 27 Front Axle Assembly 1 28 Rear Axle Assembly 1 29 Screw (Pan Hd 4 30 7 in . Wheel 2 33 Washer (13.5 x 20 x 1.5t 4 34 Cotter...

User Manual
Page 20
... long an implied warranty lasts, so the above limitations may not apply to homelite@reelin.com. CALL US FIRST !! Great States Corporation, Shelbyville, Indiana, has been making lawn mowers for the conditions and circumstances listed below. WARRANTY LIMITED WARRANTY FOR CORDED ELECTRIC MODELS... original owner that each new product and service part is manufactured for the Great States Corporation lawn mower company under this warranty any defective product or part from Homelite Consumer Products, Inc. Call us first with tool functionality. Freight costs from customer to...
... long an implied warranty lasts, so the above limitations may not apply to homelite@reelin.com. CALL US FIRST !! Great States Corporation, Shelbyville, Indiana, has been making lawn mowers for the conditions and circumstances listed below. WARRANTY LIMITED WARRANTY FOR CORDED ELECTRIC MODELS... original owner that each new product and service part is manufactured for the Great States Corporation lawn mower company under this warranty any defective product or part from Homelite Consumer Products, Inc. Call us first with tool functionality. Freight costs from customer to...

User Manual
Page 22
...dealer nearest you call 1-866-457-5888 or visit us online at www.homelite.com. UT13118 20 in the space provided below. Please record the serial number in . - Be sure to the housing. OPERATOR'S MANUAL ELECTRIC LAWN MOWER 18 in. - For the location of this tool is found on a... plate or label attached to provide all relevant information when you , please call or visit. UT13120 SERVICE For parts or service, contact your nearest Homelite authorized service dealer. MODEL NUMBER SERIAL...
...dealer nearest you call 1-866-457-5888 or visit us online at www.homelite.com. UT13118 20 in the space provided below. Please record the serial number in . - Be sure to the housing. OPERATOR'S MANUAL ELECTRIC LAWN MOWER 18 in. - For the location of this tool is found on a... plate or label attached to provide all relevant information when you , please call or visit. UT13120 SERVICE For parts or service, contact your nearest Homelite authorized service dealer. MODEL NUMBER SERIAL...


