
User Manual
Page 2
... Part 8 Display Explanations 9 Installing Batteries 11 Using the AC Adapter 12 Date & Time Set Procedure 13 Using the Cuff 14 Measurement Procedure 17 Risk Category Indicator 20 Using the Memory Function 21 Clearing Values from Memory 24 Important Notes Regarding Your Blood Pressure Measurement 25 Recalibration Service 26 Care, Maintenance & Cleaning 27 Potential for Electromagnetic Interference . .29 Troubleshooting 30 Specifications...
... Part 8 Display Explanations 9 Installing Batteries 11 Using the AC Adapter 12 Date & Time Set Procedure 13 Using the Cuff 14 Measurement Procedure 17 Risk Category Indicator 20 Using the Memory Function 21 Clearing Values from Memory 24 Important Notes Regarding Your Blood Pressure Measurement 25 Recalibration Service 26 Care, Maintenance & Cleaning 27 Potential for Electromagnetic Interference . .29 Troubleshooting 30 Specifications...
User Manual
Page 3
...Contact your blood pressure monitor, basic precautions should not be followed. mobile telephones, microwave ovens). Do not use . • Do not wrap the cuff around body parts other than your physician or healthcare professional. • Proper cuff size is not suitable for checking the...its intended use this monitor or 1.5V AA alkaline batteries for users who cannot express their own consent. Avoid strong electrical or electromagnetic fields in measuring the blood pressure and pulse rate of blood, kidney problems or for power supply. Follow the instructions in this manual and ...
...Contact your blood pressure monitor, basic precautions should not be followed. mobile telephones, microwave ovens). Do not use . • Do not wrap the cuff around body parts other than your physician or healthcare professional. • Proper cuff size is not suitable for checking the...its intended use this monitor or 1.5V AA alkaline batteries for users who cannot express their own consent. Avoid strong electrical or electromagnetic fields in measuring the blood pressure and pulse rate of blood, kidney problems or for power supply. Follow the instructions in this manual and ...

User Manual
Page 4
... 2 Hypertension Stage 1 Hypertension Prehypertension Normal Systolic (mmHg) >_ 160 140~159 120~139 _ 100 90~99 80~89 Among today's various health problems, those at risk. Department of Health and Human Services and the National Institutes of Health have developed a blood pressure standard that identifies areas of the heart is called diastolic (lowest...
... 2 Hypertension Stage 1 Hypertension Prehypertension Normal Systolic (mmHg) >_ 160 140~159 120~139 _ 100 90~99 80~89 Among today's various health problems, those at risk. Department of Health and Human Services and the National Institutes of Health have developed a blood pressure standard that identifies areas of the heart is called diastolic (lowest...
User Manual
Page 5
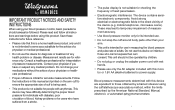
..., the monitor will alert you if your systolic pressure, diastolic pressure, and pulse readings. HOW THIS BLOOD PRESSURE MONITOR WORKS This monitor uses Smart Measure™ Technology to detect your artery. Next, the deflation process starts. See page 20 for more information on the Risk Category.... 7 NAME/FUNCTION OF EACH PART Air Tube and Connector LCD Display Arm Cuffs Battery Cover (Located on bottom of unit) Memory Recall Button START/STOP Button User-Select Button Date/Time Set Buttons (Located on side of a button, the cuff will cause measurement error. With one touch of unit)...
..., the monitor will alert you if your systolic pressure, diastolic pressure, and pulse readings. HOW THIS BLOOD PRESSURE MONITOR WORKS This monitor uses Smart Measure™ Technology to detect your artery. Next, the deflation process starts. See page 20 for more information on the Risk Category.... 7 NAME/FUNCTION OF EACH PART Air Tube and Connector LCD Display Arm Cuffs Battery Cover (Located on bottom of unit) Memory Recall Button START/STOP Button User-Select Button Date/Time Set Buttons (Located on side of a button, the cuff will cause measurement error. With one touch of unit)...
User Manual
Page 6
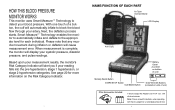
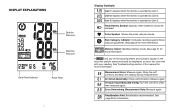
... monitor is operated by User 1. Weak Battery Symbol: Appears when batteries should be replaced. Risk Category Indicator: Compares readings against blood pressure guidelines. Memory Select: Identifies memory mode. See page 21 for more information. Wrap the cuff correctly and keep arm steady during measurement. Air Circuit Abnormality: Check cuff connection. See Troubleshooting section of the...
... monitor is operated by User 1. Weak Battery Symbol: Appears when batteries should be replaced. Risk Category Indicator: Compares readings against blood pressure guidelines. Memory Select: Identifies memory mode. See page 21 for more information. Wrap the cuff correctly and keep arm steady during measurement. Air Circuit Abnormality: Check cuff connection. See Troubleshooting section of the...

User Manual
Page 7
... Input: 100-240V~0.2A 50/60 Hz Output: 6V DC 500mA 3W Max Connect AC adapter here 12 Press down on latch and lift the battery cover towards you buy in the back of time. Nothing appears on the display when the power is switched on the display. 2. ... the AC adapter. 1. INSTALLING BATTERIES Note: It is recommended that you use batteries only for travelling or when it is not in pairs. Replace the battery cover by clicking in the bottom hooks first, then push in the battery compartment according to use the AC adapter. 1. Install or replace 4 "AA" sized batteries in the top end of...
... Input: 100-240V~0.2A 50/60 Hz Output: 6V DC 500mA 3W Max Connect AC adapter here 12 Press down on latch and lift the battery cover towards you buy in the back of time. Nothing appears on the display when the power is switched on the display. 2. ... the AC adapter. 1. INSTALLING BATTERIES Note: It is recommended that you use batteries only for travelling or when it is not in pairs. Replace the battery cover by clicking in the bottom hooks first, then push in the battery compartment according to use the AC adapter. 1. Install or replace 4 "AA" sized batteries in the top end of...
User Manual
Page 8
...Each press will increase the number by pressing the button. Press the Set button again to accurate measurement. frf rr. Press the button blinking month increasing month confirm the entry repeat process to set date and time 13 USING THE ARM CUFF Very Important: Proper cuff size is critical to ...confirm the entry, and the screen will show a blink- s r r fr. r fr ff MODEL# PP-BPCUFF5 Center tube over middle of the cuff ...
...Each press will increase the number by pressing the button. Press the Set button again to accurate measurement. frf rr. Press the button blinking month increasing month confirm the entry repeat process to set date and time 13 USING THE ARM CUFF Very Important: Proper cuff size is critical to ...confirm the entry, and the screen will show a blink- s r r fr. r fr ff MODEL# PP-BPCUFF5 Center tube over middle of the cuff ...

User Manual
Page 9
... here 3. Plug the cuff tube into the left arm, it is not kinked. Position cuff edge 0.8-1.2 inches (2-3cm) above the bend of the unit. To use on a table (palm upward) so the cuff is your heart. This is at the same height as your main artery. 16 Lay your arm on... symbol " " over middle of your arm. FiAttlolcoufwfif and (0.28~"~3 1c.m2") mi Cen Po0s.a8ibt-ioo1v.n2ecienulcfbhfoeewsd(.g2e-3cm) 2. Note: If it can be made using the same arm. Press the hook and loop material together to secure.
... here 3. Plug the cuff tube into the left arm, it is not kinked. Position cuff edge 0.8-1.2 inches (2-3cm) above the bend of the unit. To use on a table (palm upward) so the cuff is your heart. This is at the same height as your main artery. 16 Lay your arm on... symbol " " over middle of your arm. FiAttlolcoufwfif and (0.28~"~3 1c.m2") mi Cen Po0s.a8ibt-ioo1v.n2ecienulcfbhfoeewsd(.g2e-3cm) 2. Note: If it can be made using the same arm. Press the hook and loop material together to secure.

User Manual
Page 10
...first time, please remove the protective film from the screen. 1. Do not inflate the cuff unless it is suggested that you are using this blood pressure monitor for 15 minutes as measurements taken during a relaxed state will automatically inflate the cuff to start measurement. 17 ...18 You should not be affected by the position of the user, his or her physiologic condition and other factors. START STOP 3. MEASUREMENT PROCEDURE Important Notes: • Blood pressure changes with alcohol or ...
...first time, please remove the protective film from the screen. 1. Do not inflate the cuff unless it is suggested that you are using this blood pressure monitor for 15 minutes as measurements taken during a relaxed state will automatically inflate the cuff to start measurement. 17 ...18 You should not be affected by the position of the user, his or her physiologic condition and other factors. START STOP 3. MEASUREMENT PROCEDURE Important Notes: • Blood pressure changes with alcohol or ...

User Manual
Page 11
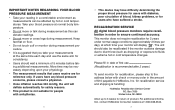
... more pressure for measurement. 5. Department of Health and Human Services and the National Institutes of each reading. You may press the START/STOP (recommended) "MEM", User Select or Date/Time Set buttons. RISK CATEGORY INDICATOR The U.S. The measurement is then ...automatically stored into 4 stages. This monitor automatically turns off . 2. This unit is pressed. 4. Symbols are described below and classifications follow the guidelines as described earlier in this manual ...
... more pressure for measurement. 5. Department of Health and Human Services and the National Institutes of each reading. You may press the START/STOP (recommended) "MEM", User Select or Date/Time Set buttons. RISK CATEGORY INDICATOR The U.S. The measurement is then ...automatically stored into 4 stages. This monitor automatically turns off . 2. This unit is pressed. 4. Symbols are described below and classifications follow the guidelines as described earlier in this manual ...

User Manual
Page 12
... PM - 2:00 AM). Displays average of all nighttime readings from the last 7 days (PM is defined as 4:00 AM - 12:00 PM). Allows user to provide you with the most recent. Displays average of options for reviewing your blood pressure changes throughout the day. 21 Memory Modes Displays average... of all morning readings from the last 7 days (AM is defined as 6:00 PM - 2:00 AM). 22 USING THE MEMORY FUNCTION This monitor features an advanced memory mode to toggle through all readings stored in memory, beginning with a variety of all nighttime readings...
... PM - 2:00 AM). Displays average of all nighttime readings from the last 7 days (PM is defined as 4:00 AM - 12:00 PM). Allows user to provide you with the most recent. Displays average of options for reviewing your blood pressure changes throughout the day. 21 Memory Modes Displays average... of all morning readings from the last 7 days (AM is defined as 6:00 PM - 2:00 AM). 22 USING THE MEMORY FUNCTION This monitor features an advanced memory mode to toggle through all readings stored in memory, beginning with a variety of all nighttime readings...
User Manual
Page 13
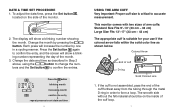
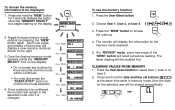
...button again. Each new press and release of the "MEM" button will be erased automatically. 24 Press the User-Select button. / 2. Choose User 1, User 2, or User 3. 3. Press and hold the date and time set buttons( ) at the same time while in memory mode, then the data for the memory mode selected....Press "MEM" Press "MEM" Press "MEM" Press "MEM" Press "MEM" Press "MEM" 23 To use the memory function: 1. Press the "MEM" button to confirm the mode selection 4. Press the User-Select button to the right. 3. Press and hold the "MEM" button MEM for three seconds and the...
...button again. Each new press and release of the "MEM" button will be erased automatically. 24 Press the User-Select button. / 2. Choose User 1, User 2, or User 3. 3. Press and hold the date and time set buttons( ) at the same time while in memory mode, then the data for the memory mode selected....Press "MEM" Press "MEM" Press "MEM" Press "MEM" Press "MEM" Press "MEM" 23 To use the memory function: 1. Press the "MEM" button to confirm the mode selection 4. Press the User-Select button to the right. 3. Press and hold the "MEM" button MEM for three seconds and the...
User Manual
Page 14
... the proper blood pressure for users with check or money order in the amount of $10 payable to HoMedics, Inc. Please fill in date of first use the same arm for recalibration, please ship to the address below with diabetes, poor circulation of blood, kidney problems, or for return of 5... be recalibrated if the monitor sustains damage due to blunt force (such as this can be affected by hot or cold temperatures. RECALIBRATION SERVICE All digital blood pressure monitors require recalibration in order to fluids or extreme hot or cold temperature changes. Keep feet flat on floor. ...
... the proper blood pressure for users with check or money order in the amount of $10 payable to HoMedics, Inc. Please fill in date of first use the same arm for recalibration, please ship to the address below with diabetes, poor circulation of blood, kidney problems, or for return of 5... be recalibrated if the monitor sustains damage due to blunt force (such as this can be affected by hot or cold temperatures. RECALIBRATION SERVICE All digital blood pressure monitors require recalibration in order to fluids or extreme hot or cold temperature changes. Keep feet flat on floor. ...
User Manual
Page 15
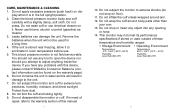
... the cuff unless wrapped around body parts other than 85% RH 28 Clean the blood pressure monitor body and cuff carefully with this device, please contact HoMedics Consumer Relations (contact information can damage the unit. Never use chemical cleaner on floor). 11. ...service-able. This monitor may not meet its performance specifications if stored or used for a long time. 4. Do not immerse the unit in the full upright position. 2. Do not subject the monitor and cuff to extreme shocks (do not drop on it. Do not disassemble the monitor or cuff. Do not press. Leaky batteries...
... the cuff unless wrapped around body parts other than 85% RH 28 Clean the blood pressure monitor body and cuff carefully with this device, please contact HoMedics Consumer Relations (contact information can damage the unit. Never use chemical cleaner on floor). 11. ...service-able. This monitor may not meet its performance specifications if stored or used for a long time. 4. Do not immerse the unit in the full upright position. 2. Do not subject the monitor and cuff to extreme shocks (do not drop on it. Do not disassemble the monitor or cuff. Do not press. Leaky batteries...
User Manual
Page 16
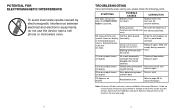
...HoMedics Consumer Relations Department can be plugged into monitor correctly. Wrap the cuff properly so that it is displayed exces- Refer to repair the unit by electromagnetic interference between electrical and electronic equipments, do not use the device near a cell phone or microwave oven. 29 TROUBLESHOOTING... then measure again. EE measurement error Cuff has been placed symbol shown on . Measure again. Error determining measurement data. CORRECTION Replace them with the cuff on display incorrectly. Battery polarities Re-insert the batteries in have run down. Note: ...
...HoMedics Consumer Relations Department can be plugged into monitor correctly. Wrap the cuff properly so that it is displayed exces- Refer to repair the unit by electromagnetic interference between electrical and electronic equipments, do not use the device near a cell phone or microwave oven. 29 TROUBLESHOOTING... then measure again. EE measurement error Cuff has been placed symbol shown on . Measure again. Error determining measurement data. CORRECTION Replace them with the cuff on display incorrectly. Battery polarities Re-insert the batteries in have run down. Note: ...
User Manual
Page 17
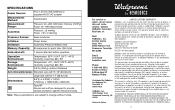
...; SPECIFICATIONS Power Source: Measurement Method: Measurement Range: Four 1.5V DC (AA) batteries or supplied 6V DC AC adapter Oscillometric Pressure: 40~280 millimeters mercury (mmHg) Pulse: 40~199 beats/minute Accuracy: Pressure: ±3 mmHg Pulse: ±5% of power; Contact HoMedics Consumer Relations at a repair facility or otherwise awaiting parts or repair; To obtain warranty service on your HoMedics...
...; SPECIFICATIONS Power Source: Measurement Method: Measurement Range: Four 1.5V DC (AA) batteries or supplied 6V DC AC adapter Oscillometric Pressure: 40~280 millimeters mercury (mmHg) Pulse: 40~199 beats/minute Accuracy: Pressure: ±3 mmHg Pulse: ±5% of power; Contact HoMedics Consumer Relations at a repair facility or otherwise awaiting parts or repair; To obtain warranty service on your HoMedics...
User Manual
Page 18
... any products or parts thereof which are repaired, replaced, altered, or modified, without the prior express and written consent of HoMedics. Because of individual country regulations, some of such products by surplus or bulk resellers. and its affiliated companies. IB-518729 by For service or repair, do not return this unit to you with specific legal rights. This...
... any products or parts thereof which are repaired, replaced, altered, or modified, without the prior express and written consent of HoMedics. Because of individual country regulations, some of such products by surplus or bulk resellers. and its affiliated companies. IB-518729 by For service or repair, do not return this unit to you with specific legal rights. This...


