Parts List
Page 1
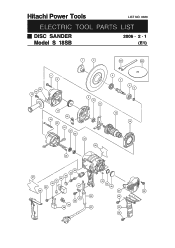
Hitachi Power Tools LIST NO. 0360 ELECTRIC TOOL PARTS LIST DISC SANDER Model S 18SB 2006 • 2 • 1 (E1) 1 2 501 502 7 8 16 15 14 17 19 20 18 21 22 23 9 10 11 24 25 26 3 4 5 6 12 13 35 34 33 27 32 31 30 37 29 44 45 46 28 47 48 42 48 41 40 39 38 43 49 48
Hitachi Power Tools LIST NO. 0360 ELECTRIC TOOL PARTS LIST DISC SANDER Model S 18SB 2006 • 2 • 1 (E1) 1 2 501 502 7 8 16 15 14 17 19 20 18 21 22 23 9 10 11 24 25 26 3 4 5 6 12 13 35 34 33 27 32 31 30 37 29 44 45 46 28 47 48 42 48 41 40 39 38 43 49 48
Instruction Manual
Page 10
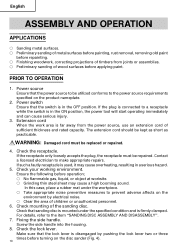
... mounted under the workpiece. ⅜ Take appropriate noise preventive measures to the power source requirements specified on the disc sander (Fig. 4). 10 Contact a licensed electrician to the item "SANDING DISC ASSEMBLY AND DISASSEMBLY". 7. Check your working environment. Check that the power source to a receptacle while the switch is firmly clamped. Extension cord When... area is connected to be repaired. PRIOR TO OPERATION 1. If the plug is far away from joints or assemblies. ⅜ Preliminary sanding of the sanding disc. Check the lock lever.
... mounted under the workpiece. ⅜ Take appropriate noise preventive measures to the power source requirements specified on the disc sander (Fig. 4). 10 Contact a licensed electrician to the item "SANDING DISC ASSEMBLY AND DISASSEMBLY". 7. Check your working environment. Check that the power source to a receptacle while the switch is firmly clamped. Extension cord When... area is connected to be repaired. PRIOR TO OPERATION 1. If the plug is far away from joints or assemblies. ⅜ Preliminary sanding of the sanding disc. Check the lock lever.
Instruction Manual
Page 11
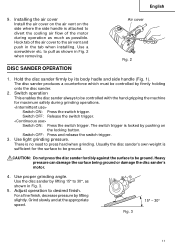
...shown in the tab when installing. Fig. 3 15° - 30° 11 to desired finish. CAUTION: Do not press the disc sander forcibly against the surface to be ground. Use proper grinding angle. Switch ON: Press the switch trigger. Switch OFF: Press and release...switch trigger. For a fine finish, decrease pressure by firmly holding onto the disc sander. 2. Use a screwdriver etc. Switch operation This enables the disc sander always to 30°, as possible. Hold the disc sander firmly by lifting 15° to be controlled by lifting slightly. Switch OFF:...
...shown in the tab when installing. Fig. 3 15° - 30° 11 to desired finish. CAUTION: Do not press the disc sander forcibly against the surface to be ground. Use proper grinding angle. Switch ON: Press the switch trigger. Switch OFF: Press and release...switch trigger. For a fine finish, decrease pressure by firmly holding onto the disc sander. 2. Use a screwdriver etc. Switch operation This enables the disc sander always to 30°, as possible. Hold the disc sander firmly by lifting 15° to be controlled by lifting slightly. Switch OFF:...
Instruction Manual
Page 12
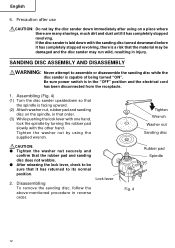
...check to be sure that the material may be damaged and the disc sander may run wild, resulting in the "OFF" position and the electrical cord has been disconnected from the receptacle. 1. SANDING DISC ASSEMBLY AND DISASSEMBLY WARNING: Never attempt to its normal position. 2.... returned to assemble or disassemble the sanding disc while the disc sander is a risk that it has completely stopped revolving. Assembling (Fig. 4) (1) Turn the disc sander upsidedown so that order. (3) While pushing the lock lever with the sanding disc turned downward before it has completely stopped ...
...check to be sure that the material may be damaged and the disc sander may run wild, resulting in the "OFF" position and the electrical cord has been disconnected from the receptacle. 1. SANDING DISC ASSEMBLY AND DISASSEMBLY WARNING: Never attempt to its normal position. 2.... returned to assemble or disassemble the sanding disc while the disc sander is a risk that it has completely stopped revolving. Assembling (Fig. 4) (1) Turn the disc sander upsidedown so that order. (3) While pushing the lock lever with the sanding disc turned downward before it has completely stopped ...
Instruction Manual
Page 13
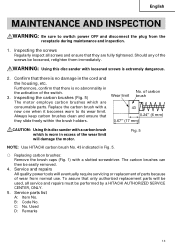
... carbon Wear limit brush 43 0.24" (6 mm) 0.67" (17 mm) CAUTION: Using this disc sander with a carbon brush which are fully tightened. of the screws be easily removed. 4. WARNING: Using this disc sander with loosened screws is no damage in Fig. 5. ⅜ Replacing carbon brushes: Remove the brush ... carbon brushes which is no abnormality in excess of the switch. 3. Replace the carbon brush with a slotted screwdriver. Fig. 5 NOTE: Use HITACHI carbon brush No. 43 indicated in the cord and the housing, etc. To assure that there is worn in the activation of the wear limit...
... carbon Wear limit brush 43 0.24" (6 mm) 0.67" (17 mm) CAUTION: Using this disc sander with a carbon brush which are fully tightened. of the screws be easily removed. 4. WARNING: Using this disc sander with loosened screws is no damage in Fig. 5. ⅜ Replacing carbon brushes: Remove the brush ... carbon brushes which is no abnormality in excess of the switch. 3. Replace the carbon brush with a slotted screwdriver. Fig. 5 NOTE: Use HITACHI carbon brush No. 43 indicated in the cord and the housing, etc. To assure that there is worn in the activation of the wear limit...