Instruction Manual
Page 10
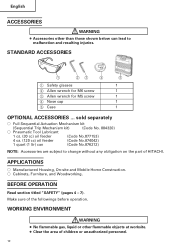
...- 7). STANDARD ACCESSORIES 1 23 4 5 1 Safety glasses 1 2 Allen wrench for M6 screw 1 3 Allen wrench for M5 screw 1 4 Nose cap 1 5 Case 1 OPTIONAL ACCESSORIES ... sold separately ⅜ Full Sequential Actuation Mechanism kit (Sequential Trip Mechanism kit) (Code No. 884320) ⅜ Pneumatic Tool Lubricant 1 oz. (...cc) oil feeder (Code No.874042) 1 quart (1 ltr) can lead to change without any obligation on the part of HITACHI. Make sure of the followings before operation. WORKING ENVIRONMENT WARNING ● No flammable gas, liquid or other than those shown ...
...- 7). STANDARD ACCESSORIES 1 23 4 5 1 Safety glasses 1 2 Allen wrench for M6 screw 1 3 Allen wrench for M5 screw 1 4 Nose cap 1 5 Case 1 OPTIONAL ACCESSORIES ... sold separately ⅜ Full Sequential Actuation Mechanism kit (Sequential Trip Mechanism kit) (Code No. 884320) ⅜ Pneumatic Tool Lubricant 1 oz. (...cc) oil feeder (Code No.874042) 1 quart (1 ltr) can lead to change without any obligation on the part of HITACHI. Make sure of the followings before operation. WORKING ENVIRONMENT WARNING ● No flammable gas, liquid or other than those shown ...
Instruction Manual
Page 22
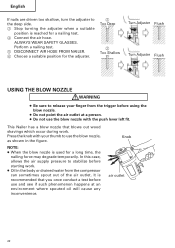
...22 Press the knob with the push lever left fit. In this case, allows the air supply pressure to use the blow nozzle with your finger from the compressor can sometimes spout out of the air outlet. This Nailer has a blow nozzle that you once conduct a test before use .... 4 Connect the air hose. It is reached for a long time, the nailing force may degrade temporarily. Perform a nailing test. 5 DISCONNECT AIR HOSE FROM NAILER. 6 Choose a suitable position for the adjuster. 2 Too Deep 2 Too Shallow Turn Adjuster Flush Turn Adjuster Flush USING THE BLOW NOZZLE WARNING ● Be sure...
...22 Press the knob with the push lever left fit. In this case, allows the air supply pressure to use the blow nozzle with your finger from the compressor can sometimes spout out of the air outlet. This Nailer has a blow nozzle that you once conduct a test before use .... 4 Connect the air hose. It is reached for a long time, the nailing force may degrade temporarily. Perform a nailing test. 5 DISCONNECT AIR HOSE FROM NAILER. 6 Choose a suitable position for the adjuster. 2 Too Deep 2 Too Shallow Turn Adjuster Flush Turn Adjuster Flush USING THE BLOW NOZZLE WARNING ● Be sure...
Instruction Manual
Page 24
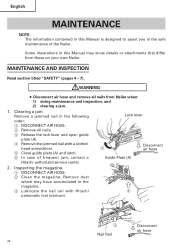
... following Lock lever order: 1 DISCONNECT AIR HOSE. 2 Remove all nails from those on your own Nailer. head screwdriver. 5 Close guide plate (A) and latch. 6 In case of the Nailer. and 2) clearing a jam. 1. Clearing a jam Remove a jammed nail in the safe maintenance ...of frequent jam, contact a 1 3 Disconnect air hose Guide Plate (A) Hitachi authorized service center. 2. Inspecting the magazine. 1 DISCONNECT AIR...
... following Lock lever order: 1 DISCONNECT AIR HOSE. 2 Remove all nails from those on your own Nailer. head screwdriver. 5 Close guide plate (A) and latch. 6 In case of the Nailer. and 2) clearing a jam. 1. Clearing a jam Remove a jammed nail in the safe maintenance ...of frequent jam, contact a 1 3 Disconnect air hose Guide Plate (A) Hitachi authorized service center. 2. Inspecting the magazine. 1 DISCONNECT AIR...
Parts List
Page 4
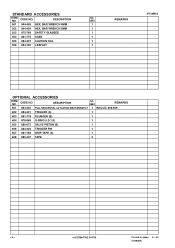
STANDARD ACCESSORIES ITEM NO. DESCRIPTION NO. BAR WRENCH 5MM 503 875-769 SAFETY GLASSES 504 881-775 CASE 505 884-337 CAUTION TAG 506 884-120 LEAFLET NO. CODE NO. USED REMARKS 601 884-320 FULL SEQUENTIAL ACTUATION MECHANISM KIT 1 INCLUD. 602-606 ...
STANDARD ACCESSORIES ITEM NO. DESCRIPTION NO. BAR WRENCH 5MM 503 875-769 SAFETY GLASSES 504 881-775 CASE 505 884-337 CAUTION TAG 506 884-120 LEAFLET NO. CODE NO. USED REMARKS 601 884-320 FULL SEQUENTIAL ACTUATION MECHANISM KIT 1 INCLUD. 602-606 ...