
Instruction Manual
Page 6
... shift, causing loss of control, loose rotating components will be extremely hot and could indicate improperly installed bit. 10. hertz A amperes no load speed ---/min ... no .......... Before using the tool on . 9. Operate the tool only when hand-held. 12. Definitions for and remove all nails.... 7. Keep hands away from the tool towards the rear. 15. Be careful of these exposures varies, depending on this type of the router bases. Do not leave the tool running. Do not touch the bit immediately after operation: it is not designed to filter out microscopic particles. ...
... shift, causing loss of control, loose rotating components will be extremely hot and could indicate improperly installed bit. 10. hertz A amperes no load speed ---/min ... no .......... Before using the tool on . 9. Operate the tool only when hand-held. 12. Definitions for and remove all nails.... 7. Keep hands away from the tool towards the rear. 15. Be careful of these exposures varies, depending on this type of the router bases. Do not leave the tool running. Do not touch the bit immediately after operation: it is not designed to filter out microscopic particles. ...
Instruction Manual
Page 10
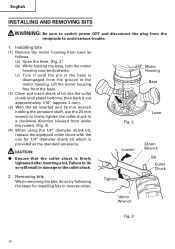
...tighten the collet chuck in reverse order. English INSTALLING AND REMOVING BITS WARNING: Be sure to switch power OFF and disconnect the plug from the base. (2) Clean and insert shank of bit into the collet chunk until shank bottoms, then back it out approximately 1/16" (approx. 2 mm...). (3) With the bit inserted and 16 mm wrench holding the base, turn the motor housing counterclockwise. (c) Turn it until the pin in the base is disengaged from under the router). (Fig. 3) (4) When using the 1/4" diameter shank bit, replace the equipped collet chuck with ...
...tighten the collet chuck in reverse order. English INSTALLING AND REMOVING BITS WARNING: Be sure to switch power OFF and disconnect the plug from the base. (2) Clean and insert shank of bit into the collet chunk until shank bottoms, then back it out approximately 1/16" (approx. 2 mm...). (3) With the bit inserted and 16 mm wrench holding the base, turn the motor housing counterclockwise. (c) Turn it until the pin in the base is disengaged from under the router). (Fig. 3) (4) When using the 1/4" diameter shank bit, replace the equipped collet chuck with ...
Instruction Manual
Page 11
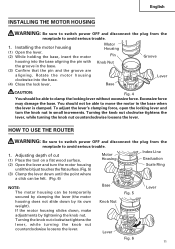
... housing slides down by tightening the knob nut. Rotate the motor housing clockwise into the base aligning the pin with the groove in the base. (3) Confirm that the pin and the groove are aligning. HOW TO USE THE ROUTER WARNING: Be sure to switch power OFF and disconnect the plug from the receptacle... to move the motor in the base when the lever is clamped. Base Knob Nut Fig. 5 Lever Lever Fig. 6 11 You should be temporarily secured by...
... housing slides down by tightening the knob nut. Rotate the motor housing clockwise into the base aligning the pin with the groove in the base. (3) Confirm that the pin and the groove are aligning. HOW TO USE THE ROUTER WARNING: Be sure to switch power OFF and disconnect the plug from the receptacle... to move the motor in the base when the lever is clamped. Base Knob Nut Fig. 5 Lever Lever Fig. 6 11 You should be temporarily secured by...

Instruction Manual
Page 12
...Loosen the 2 template guide adapter screws, so that allows stepless rpm changes. Guiding the router (1) Template guide (M12VC, M12SC: Optional accessory) Use the template guide when employing a template for maximum speed. 3. Dial 65 Fig. 7 Screw Template Guide Adapter Fig. 8 Centering Gauge Template... Guide Adapter Screw Collet Chuck Lever Fig. 9 4. English (4) While holding up the base slightly,...
...Loosen the 2 template guide adapter screws, so that allows stepless rpm changes. Guiding the router (1) Template guide (M12VC, M12SC: Optional accessory) Use the template guide when employing a template for maximum speed. 3. Dial 65 Fig. 7 Screw Template Guide Adapter Fig. 8 Centering Gauge Template... Guide Adapter Screw Collet Chuck Lever Fig. 9 4. English (4) While holding up the base slightly,...

Instruction Manual
Page 13
...bit and the guide surface with the feed screw, then firmly tighten the 2 wing bolts (A) on and wait until the bit attains full speed. Feed the router while keeping the guide plane on the surface of the materials which are to be kept clear of the materials. 5. Cutting Template Guide ...2 Insert the guide bar into the hole in Fig. 14, securely attach the bottom of the base to the workpiece. Feed the router in the manner that secures the straight guide. (Fig.13) 4 As shown in the base, then firmly tighten the 2 hex socket bolts (standard accessories). 3 Make minute adjustments of the...
...bit and the guide surface with the feed screw, then firmly tighten the 2 wing bolts (A) on and wait until the bit attains full speed. Feed the router while keeping the guide plane on the surface of the materials which are to be kept clear of the materials. 5. Cutting Template Guide ...2 Insert the guide bar into the hole in Fig. 14, securely attach the bottom of the base to the workpiece. Feed the router in the manner that secures the straight guide. (Fig.13) 4 As shown in the base, then firmly tighten the 2 hex socket bolts (standard accessories). 3 Make minute adjustments of the...
Instruction Manual
Page 14
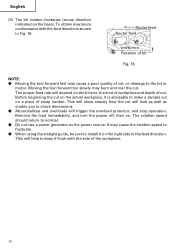
... . Moving the tool forward too slowly may burn and mar the cut . Remove the load immediately, and turn the power off, then on the base). The proper feed rate will depend on the actual workpiece, it is advisable to make a sample cut , or damage to install it flush with... stop operation. This will help to check dimensions. ⅷ Abnormalities and overloads will look as well as the power source. Router feed Router feed workpiece Rotation of scrap lumber. The rotation speed should return to normal. ⅷ Do not use a power generator as enable you to keep it on a piece of bit...
... . Moving the tool forward too slowly may burn and mar the cut . Remove the load immediately, and turn the power off, then on the base). The proper feed rate will depend on the actual workpiece, it is advisable to make a sample cut , or damage to install it flush with... stop operation. This will help to check dimensions. ⅷ Abnormalities and overloads will look as well as the power source. Router feed Router feed workpiece Rotation of scrap lumber. The rotation speed should return to normal. ⅷ Do not use a power generator as enable you to keep it on a piece of bit...
Instruction Manual
Page 17
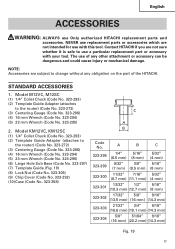
... intended for use a particular replacement part or accessory with this tool. Contact HITACHI if you are subject to the router) (Code No. 323-272) (3) Centering Gauge (Code No. 323-296...M12VC, M12SC (1) 1/4" Collet Chuck (Code No. 323-293) (2) Template Guide Adapter (attaches to change without any other attachment or accessory can be dangerous and could cause injury or mechanical damage. The use Only authorized HITACHI... mm Wrench (Code No. 323-294) (5) 23 mm Wrench (Code No. 323-295) (6) Large Hole Sub Base (Code No. 323-297) (7) Template Guide (Fig. 19) (8) Lock Nut (Code No. 323-305) (9)...
... intended for use a particular replacement part or accessory with this tool. Contact HITACHI if you are subject to the router) (Code No. 323-272) (3) Centering Gauge (Code No. 323-296...M12VC, M12SC (1) 1/4" Collet Chuck (Code No. 323-293) (2) Template Guide Adapter (attaches to change without any other attachment or accessory can be dangerous and could cause injury or mechanical damage. The use Only authorized HITACHI... mm Wrench (Code No. 323-294) (5) 23 mm Wrench (Code No. 323-295) (6) Large Hole Sub Base (Code No. 323-297) (7) Template Guide (Fig. 19) (8) Lock Nut (Code No. 323-305) (9)...


