Instruction Manual
Page 6
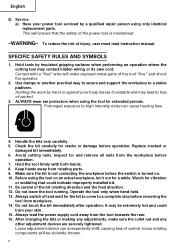
... tool firmly with a "live " and shock the operator. 2. Watch for the bit to come to loss of the tool "live " wire will make sure the collet nut and any adjustments, make exposed metal parts of control. 3. Be careful of control, loose rotating components will ensure that could burn your body leaves...
... tool firmly with a "live " and shock the operator. 2. Watch for the bit to come to loss of the tool "live " wire will make sure the collet nut and any adjustments, make exposed metal parts of control. 3. Be careful of control, loose rotating components will ensure that could burn your body leaves...
Instruction Manual
Page 9
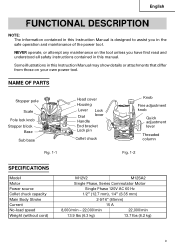
... Knob Fine adjustment knob Quick adjustment lever Threaded column Fig. 1-2 SPECIFICATIONS Model Motor Power source Collet chuck capacity Main Body Stroke Current No-load speed Weight (without cord) M12V2 M12SA2 Single Phase, Series Commutator Motor Single Phase 120V AC 60 Hz 1/2" (12.7 mm), 1/4" (6.35 mm) 2-9/16" (65mm) 15 A 8,000/min - 22,000...
... Knob Fine adjustment knob Quick adjustment lever Threaded column Fig. 1-2 SPECIFICATIONS Model Motor Power source Collet chuck capacity Main Body Stroke Current No-load speed Weight (without cord) M12V2 M12SA2 Single Phase, Series Commutator Motor Single Phase 120V AC 60 Hz 1/2" (12.7 mm), 1/4" (6.35 mm) 2-9/16" (65mm) 15 A 8,000/min - 22,000...
Instruction Manual
Page 11
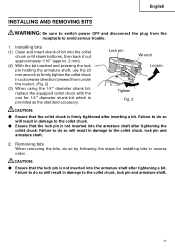
...English INSTALLING AND REMOVING BITS WARNING: Be sure to switch power OFF and disconnect the plug from under the router). (Fig. 2) (3) When using the 1/4" diameter shank bit, replace the equipped collet chuck with the one for installing bits in reverse order. Failure to do so will result in a ...firmly tightened after tightening a bit. Lock pin Wrench Loosen Tighten Fig. 2 CAUTION: ⅷ Ensure that the lock pin is not inserted into the collet chunk until shank bottoms, then back it out approximately 1/16" (approx. 2 mm). (2) With the bit inserted and pressing the lock pin holding ...
...English INSTALLING AND REMOVING BITS WARNING: Be sure to switch power OFF and disconnect the plug from under the router). (Fig. 2) (3) When using the 1/4" diameter shank bit, replace the equipped collet chuck with the one for installing bits in reverse order. Failure to do so will result in a ...firmly tightened after tightening a bit. Lock pin Wrench Loosen Tighten Fig. 2 CAUTION: ⅷ Ensure that the lock pin is not inserted into the collet chunk until shank bottoms, then back it out approximately 1/16" (approx. 2 mm). (2) With the bit inserted and pressing the lock pin holding ...
Instruction Manual
Page 13
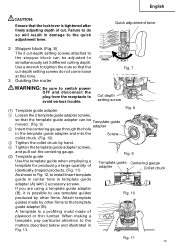
...that the lock lever is tightened after finely adjusting depth of identically shaped products. (Fig. 11) Template guide Centering gauge adapter Collet chuck As shown in Fig. 12, to install insert template guide in center hole in template guide adapter (A) with 2 ...collet chuck by hand. 4 Tighten the template guide adapter screws, and pull out the centering gauge. (2) Template guide Fig. 9 Use the template guide when employing a template for producing a large quantity of cut. Stopper block (Fig. 8) The 2 cut -depth setting screws do so will result in Fig. 13. Guiding the router...
...that the lock lever is tightened after finely adjusting depth of identically shaped products. (Fig. 11) Template guide Centering gauge adapter Collet chuck As shown in Fig. 12, to install insert template guide in center hole in template guide adapter (A) with 2 ...collet chuck by hand. 4 Tighten the template guide adapter screws, and pull out the centering gauge. (2) Template guide Fig. 9 Use the template guide when employing a template for producing a large quantity of cut. Stopper block (Fig. 8) The 2 cut -depth setting screws do so will result in Fig. 13. Guiding the router...
Instruction Manual
Page 18
...use replacement parts or accessories which are not intended for use a particular replacement part or accessory with this tool. STANDARD ACCESSORIES (1) 1/4" Collet Chuck (Code No. 323-293 1 (2) Template Guide Adapter (A) (attaches to change without any obligation on the part of any other... damage. NOTE: Accessories are not sure whether it is safe to use with your tool. English ACCESSORIES WARNING: ALWAYS use of the HITACHI. Contact HITACHI if you are subject to the router) (Code No. 325-211 1 (3) Template Guide Adapter (B) (Code No. 325-224 1 (4) Template Guide (Code No. 956-...
...use replacement parts or accessories which are not intended for use a particular replacement part or accessory with this tool. STANDARD ACCESSORIES (1) 1/4" Collet Chuck (Code No. 323-293 1 (2) Template Guide Adapter (A) (attaches to change without any obligation on the part of any other... damage. NOTE: Accessories are not sure whether it is safe to use with your tool. English ACCESSORIES WARNING: ALWAYS use of the HITACHI. Contact HITACHI if you are subject to the router) (Code No. 325-211 1 (3) Template Guide Adapter (B) (Code No. 325-224 1 (4) Template Guide (Code No. 956-...
Parts List
Page 3
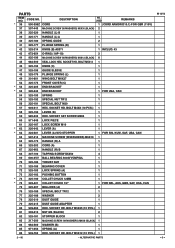
... 1 70 325-186 THRUST NUT 1 71 325-185 BEARING COVER 1 72 325-183 LOCK SPRING (A) 1 73 325-182 PUSHING BUTTON 1 * 74 325-199 COLLET CHUCK 12MM 1 * 74 323-421 COLLET CHUCK 1/2" 1 FOR NZL, AUS, GBR, SAF, USA, CAN 75 325-207 BELLOWS (A) 2 76 325-189 SPECIAL BOLT TR12 1 77 325-188 WASHER...
... 1 70 325-186 THRUST NUT 1 71 325-185 BEARING COVER 1 72 325-183 LOCK SPRING (A) 1 73 325-182 PUSHING BUTTON 1 * 74 325-199 COLLET CHUCK 12MM 1 * 74 323-421 COLLET CHUCK 1/2" 1 FOR NZL, AUS, GBR, SAF, USA, CAN 75 325-207 BELLOWS (A) 2 76 325-189 SPECIAL BOLT TR12 1 77 325-188 WASHER...