
Owners Guide
Page 1
... the Other Devices Connecting to understand its proper use. QUICK GUIDE QR74442 ©Hitachi, Ltd. 2008 This manual was printed with this Instruction Manual to Your PC Additional Information Thank you for purchasing this Hitachi Camcorder. DZ-HS903A Instruction Manual DZ-HS803A Instruction Manual (English) DZ-HS903A DZ-HS803A DZ-HS903A Introduction HDD/DVD/Cards Battery Pack Let's Get Started Recording - Viewing...
... the Other Devices Connecting to understand its proper use. QUICK GUIDE QR74442 ©Hitachi, Ltd. 2008 This manual was printed with this Instruction Manual to Your PC Additional Information Thank you for purchasing this Hitachi Camcorder. DZ-HS903A Instruction Manual DZ-HS803A Instruction Manual (English) DZ-HS903A DZ-HS803A DZ-HS903A Introduction HDD/DVD/Cards Battery Pack Let's Get Started Recording - Viewing...
Owners Guide
Page 2
...private in places subject to cause electric shock. WARNING: TO PREVENT FIRE OR SHOCK HAZARD, BE SURE TO USE THE SPECIFIED AC ADAPTER/ CHARGER (DZ-ACS3). Avoid using and storing the battery pack in -home videotaping of current technology. WARNING: TO PREVENT FIRE OR SHOCK HAZARD.... 2 NO USER-SERVICEABLE PARTS INSIDE. Important Information For Your Safety The power switch turns the camcorder on and off . The DVD video camera/recorder and AC adapter/charger have the following caution marks. REPLACE ONLY WITH THE SAME OR EQUIVALENT TYPE. CAUTION RISK OF ELECTRIC SHOCK...
...private in places subject to cause electric shock. WARNING: TO PREVENT FIRE OR SHOCK HAZARD, BE SURE TO USE THE SPECIFIED AC ADAPTER/ CHARGER (DZ-ACS3). Avoid using and storing the battery pack in -home videotaping of current technology. WARNING: TO PREVENT FIRE OR SHOCK HAZARD.... 2 NO USER-SERVICEABLE PARTS INSIDE. Important Information For Your Safety The power switch turns the camcorder on and off . The DVD video camera/recorder and AC adapter/charger have the following caution marks. REPLACE ONLY WITH THE SAME OR EQUIVALENT TYPE. CAUTION RISK OF ELECTRIC SHOCK...

Owners Guide
Page 3
... registered trademarks of Intel Corporation. However, there is subject to which can radiate radio frequency energy and, if not installed and used in accordance with Part 15 of the FCC Rules. Intel® Core™ is encouraged to try to provide reasonable protection ...more of the following two conditions: (1) This device may cause undesired operation. These limits are trademarks of Intel Corporation. This equipment generates, uses, and can be determined by the manufacturer void the user's authority to each individual company. 3 Microsoft®, Windows®, Windows®...
... registered trademarks of Intel Corporation. However, there is subject to which can radiate radio frequency energy and, if not installed and used in accordance with Part 15 of the FCC Rules. Intel® Core™ is encouraged to try to provide reasonable protection ...more of the following two conditions: (1) This device may cause undesired operation. These limits are trademarks of Intel Corporation. This equipment generates, uses, and can be determined by the manufacturer void the user's authority to each individual company. 3 Microsoft®, Windows®, Windows®...

Owners Guide
Page 4
...safety. IMPORTANT SAFETY INSTRUCTIONS 1 Read these instructions. 2 Keep these instructions. 3 Heed all warnings. 4 Follow all instructions. 5 Do not use this apparatus during lightning storms or when unused for replacement of the obsolete outlet. 10 Protect the power cord from being walked on or pinched... tip-over. 13 Unplug this apparatus near a power outlet with easy accessibility. 17 Do not cover the camcorder with a cloth while using nor use the camcorder in a ill-ventilated space such as in accordance with one wider than the other apparatus (including amplifiers) that produce heat....
...safety. IMPORTANT SAFETY INSTRUCTIONS 1 Read these instructions. 2 Keep these instructions. 3 Heed all warnings. 4 Follow all instructions. 5 Do not use this apparatus during lightning storms or when unused for replacement of the obsolete outlet. 10 Protect the power cord from being walked on or pinched... tip-over. 13 Unplug this apparatus near a power outlet with easy accessibility. 17 Do not cover the camcorder with a cloth while using nor use the camcorder in a ill-ventilated space such as in accordance with one wider than the other apparatus (including amplifiers) that produce heat....
Owners Guide
Page 5
... cards 33 Inserting a DVD 34 When loading a new DVD-RW/+RW .......... 36 Battery Pack 37 CHARGE lamp status and charging time ..... 37 Recording time with a fully charged battery. 37 Connecting the camcorder to a wall outlet.... 38 Detaching the DC power cord/battery pack from the camcorder 38 Efficient Use of the Battery 39...
... cards 33 Inserting a DVD 34 When loading a new DVD-RW/+RW .......... 36 Battery Pack 37 CHARGE lamp status and charging time ..... 37 Recording time with a fully charged battery. 37 Connecting the camcorder to a wall outlet.... 38 Detaching the DC power cord/battery pack from the camcorder 38 Efficient Use of the Battery 39...
Owners Guide
Page 6
... (Edit 99 Adding scenes using the Submenu for Editing (Edit 99 Deleting scenes using the Submenu for Editing (Edit 100 Selecting scenes using the Submenu for External Input (PHOTO Input) (DZ-HS903A 78 Using the Self-Timer 79 Dubbing on DVD 80 First Dubbing ("New 82...86 Clearing the dub marks on Finalization 119 Finalizing a Disc 120 Unfinalizing a Disc 121 Dubbing With Another Audio/Video (A/V) Device 122 Dubbing from another A/V device (DZ-HS903A 122 Dubbing from the camcorder to another A/V device 124 Skip 107 Changing Thumbnail Image (Effect - Delete 102 Dividing...
... (Edit 99 Adding scenes using the Submenu for Editing (Edit 99 Deleting scenes using the Submenu for Editing (Edit 100 Selecting scenes using the Submenu for External Input (PHOTO Input) (DZ-HS903A 78 Using the Self-Timer 79 Dubbing on DVD 80 First Dubbing ("New 82...86 Clearing the dub marks on Finalization 119 Finalizing a Disc 120 Unfinalizing a Disc 121 Dubbing With Another Audio/Video (A/V) Device 122 Dubbing from another A/V device (DZ-HS903A 122 Dubbing from the camcorder to another A/V device 124 Skip 107 Changing Thumbnail Image (Effect - Delete 102 Dividing...

Owners Guide
Page 7
... following before importing images.......... 130 Connecting the camcorder to your PC using the provided USB cable 130 How to remove/replace a DVD or remove a card during the connection 132 Using a PC's DVD drive to read a DVD recorded on the camcorder 133 Before terminating PC connection (removing the USB... cable) and changing the power switch setting 134 How to Use the Software 135 Uninstalling the ...
... following before importing images.......... 130 Connecting the camcorder to your PC using the provided USB cable 130 How to remove/replace a DVD or remove a card during the connection 132 Using a PC's DVD drive to read a DVD recorded on the camcorder 133 Before terminating PC connection (removing the USB... cable) and changing the power switch setting 134 How to Use the Software 135 Uninstalling the ...

Owners Guide
Page 9
... Approx. 3 hours (FINE mode) Not equipped About operations using this Instruction Manual This Instruction Manual is intended for the DZ-HS903A and DZ-HS803A models. Introduction Do you want to play the disc on most other DVD players/recorders once they are compatible with 8 cm DVD-RAM or 8 cm DVD-RW (VR mode) accordingly. * For details, refer...
... Approx. 3 hours (FINE mode) Not equipped About operations using this Instruction Manual This Instruction Manual is intended for the DZ-HS903A and DZ-HS803A models. Introduction Do you want to play the disc on most other DVD players/recorders once they are compatible with 8 cm DVD-RAM or 8 cm DVD-RW (VR mode) accordingly. * For details, refer...
Owners Guide
Page 10
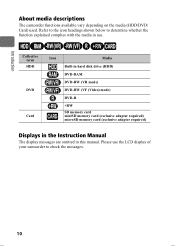
... headings shown below to check the messages. 10 Please use . HDD RAM -RW (VR) -RW (VF) R +RW CARD Collective term HDD DVD Card Icon CARD Media Built-in hard disk drive (HDD) DVD-RAM DVD-RW (VR mode) DVD-RW (VF (Video) mode) DVD-R +RW SD memory card miniSD memory card (exclusive adapter... required) microSD memory card (exclusive adapter required) Displays in the Instruction Manual The display messages are omitted in use the LCD display of your camcorder...
... headings shown below to check the messages. 10 Please use . HDD RAM -RW (VR) -RW (VF) R +RW CARD Collective term HDD DVD Card Icon CARD Media Built-in hard disk drive (HDD) DVD-RAM DVD-RW (VR mode) DVD-RW (VF (Video) mode) DVD-R +RW SD memory card miniSD memory card (exclusive adapter... required) microSD memory card (exclusive adapter required) Displays in the Instruction Manual The display messages are omitted in use the LCD display of your camcorder...

Owners Guide
Page 11
...a disc Recording side For correct recording • Do not touch the recording surface of the discs with this information - About DVD • We recommend using soft protective materials. 11 Recording surface • Single-sided disc: unlabeled side. • Double-sided disc: both sides. ...is lit, do not subject the camcorder to large vibrations or impact during transport, remove the DVD and protect the camcorder using Hitachi Maxell brand discs. Caution on vibrations and impacts Use a soft cloth and gently wipe the disc surface from the inner to the outer region....
...a disc Recording side For correct recording • Do not touch the recording surface of the discs with this information - About DVD • We recommend using soft protective materials. 11 Recording surface • Single-sided disc: unlabeled side. • Double-sided disc: both sides. ...is lit, do not subject the camcorder to large vibrations or impact during transport, remove the DVD and protect the camcorder using Hitachi Maxell brand discs. Caution on vibrations and impacts Use a soft cloth and gently wipe the disc surface from the inner to the outer region....
Owners Guide
Page 12
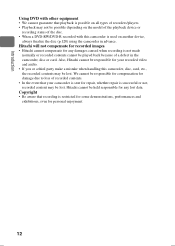
... is sent for your recorded video and audio. • If you or a third party make a mistake when handling this camcorder is used on another device, always finalize the disc (p.120) using the camcorder in the camcorder, disc or card. Introduction Using DVD with other equipment • ...We cannot guarantee that playback is possible on all types of recorders/players. • Playback may be played back because of a defect in advance. Also, Hitachi cannot be responsible...
... is sent for your recorded video and audio. • If you or a third party make a mistake when handling this camcorder is used on another device, always finalize the disc (p.120) using the camcorder in the camcorder, disc or card. Introduction Using DVD with other equipment • ...We cannot guarantee that playback is possible on all types of recorders/players. • Playback may be played back because of a defect in advance. Also, Hitachi cannot be responsible...

Owners Guide
Page 13
...fully charge the battery before use this cable to protect the lens. Power cable Connects the AC adapter/ charger to charge the battery. DC power cord To power the camcorder from the camcorder on the CDROM onto your new Hitachi Camcorder. If swallowed, consult... distance. Remote control (DZ-RM4W) Use to the PC using this battery away from external AV devices using the USB cable. 13 Introduction Checking Provided Accessories Make sure the following accessories are included in the package. The DZ-HS903A can input audio and video signals from children. Software ...
...fully charge the battery before use this cable to protect the lens. Power cable Connects the AC adapter/ charger to charge the battery. DC power cord To power the camcorder from the camcorder on the CDROM onto your new Hitachi Camcorder. If swallowed, consult... distance. Remote control (DZ-RM4W) Use to the PC using this battery away from external AV devices using the USB cable. 13 Introduction Checking Provided Accessories Make sure the following accessories are included in the package. The DZ-HS903A can input audio and video signals from children. Software ...

Owners Guide
Page 15
... a tripod. Speaker RESET button (p.172) FULL AUTO button (p.72) DISPLAY button (p.42, 48-49, 52) CARD ACCESS indicator Tripod receptacle Used to attach the camcorder to display only basic menu items LCD BRIGHTNESS button (p.20) BLC button (p.67) 15 LCD monitor side (when the LCD... 90°), and bottom Introduction Bottom (Disc Navigation) button (p.28) MENU button (p.23) DUBBING button (p.82) C (stop/exit) button (p.47) f/e/d/c (cursor)/ A (confirmation) buttons Used to choose scenes (movies and stills), select menu items and confirm, play/pause, or manually adjust exposure/focus.
... a tripod. Speaker RESET button (p.172) FULL AUTO button (p.72) DISPLAY button (p.42, 48-49, 52) CARD ACCESS indicator Tripod receptacle Used to attach the camcorder to display only basic menu items LCD BRIGHTNESS button (p.20) BLC button (p.67) 15 LCD monitor side (when the LCD... 90°), and bottom Introduction Bottom (Disc Navigation) button (p.28) MENU button (p.23) DUBBING button (p.82) C (stop/exit) button (p.47) f/e/d/c (cursor)/ A (confirmation) buttons Used to choose scenes (movies and stills), select menu items and confirm, play/pause, or manually adjust exposure/focus.

Owners Guide
Page 16
Do not block the light receiving sensor with your hand when recording still pictures. Remote control receiver Recording indicator (p.40) LCD monitor (color wide-screen) 16 Lens side Introduction Inside the cover Light receiving sensor Used to control flash amount. Flash (p.72) Optical 10x zoom lens (p.62) Zoom lever/volume (p.52, 62, 64) USB terminal (p.131) A/V terminal (p.115) Stereo microphone Do not block the microphone with your hand during recording.
Do not block the light receiving sensor with your hand when recording still pictures. Remote control receiver Recording indicator (p.40) LCD monitor (color wide-screen) 16 Lens side Introduction Inside the cover Light receiving sensor Used to control flash amount. Flash (p.72) Optical 10x zoom lens (p.62) Zoom lever/volume (p.52, 62, 64) USB terminal (p.131) A/V terminal (p.115) Stereo microphone Do not block the microphone with your hand during recording.

Owners Guide
Page 18
... strap. Adjusting the hand strap Fasten the hand strap according to the lens when you are not using the camcorder. • Wipe the lens using the string (all supplied). Replace the belt. Attaching the lens cap Tie the lens cap to the... hand strap using a soft dry cloth if the lens gets dirty. 18 Flip the cover. small loop Notes •... IN FIRE. Pass the small loop end of fire or explosion. Note Replace the battery with a Hitachi Maxell, Sony, Panasonic, Sanyo, Toshiba CR2032, or Duracell DL2032.
... strap. Adjusting the hand strap Fasten the hand strap according to the lens when you are not using the camcorder. • Wipe the lens using the string (all supplied). Replace the belt. Attaching the lens cap Tie the lens cap to the... hand strap using a soft dry cloth if the lens gets dirty. 18 Flip the cover. small loop Notes •... IN FIRE. Pass the small loop end of fire or explosion. Note Replace the battery with a Hitachi Maxell, Sony, Panasonic, Sanyo, Toshiba CR2032, or Duracell DL2032.

Owners Guide
Page 19
This will allow you to Open and Use the LCD Monitor Introduction You can use the LCD monitor as follows. To record yourself (p.20) Effortlessly record small children or pets at a gentle pace. How to record effectively without blurring. Recording high places above your line of sight Basic posture Hold the camcorder with both hands and tuck your elbows to your chest or sides, and move the camcorder at their line of sight When playing back, etc. • If the LCD monitor is hard to see while recording in bright outdoor conditions, adjust the LCD brightness (p.20). 19
This will allow you to Open and Use the LCD Monitor Introduction You can use the LCD monitor as follows. To record yourself (p.20) Effortlessly record small children or pets at a gentle pace. How to record effectively without blurring. Recording high places above your line of sight Basic posture Hold the camcorder with both hands and tuck your elbows to your chest or sides, and move the camcorder at their line of sight When playing back, etc. • If the LCD monitor is hard to see while recording in bright outdoor conditions, adjust the LCD brightness (p.20). 19
Owners Guide
Page 21
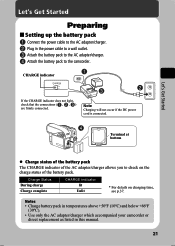
... p.37. Plug in this manual. 21 Notes • Charge battery pack in temperatures above +50ºF (10ºC) and below +86ºF (30ºC). • Use only the AC adapter/charger which accompanied your camcorder or direct replacement as listed in the power cable to a wall outlet.
... p.37. Plug in this manual. 21 Notes • Charge battery pack in temperatures above +50ºF (10ºC) and below +86ºF (30ºC). • Use only the AC adapter/charger which accompanied your camcorder or direct replacement as listed in the power cable to a wall outlet.

Owners Guide
Page 22
Press and hold the gray button, and turn the power switch to "HDD", "DVD", or "SD". * You do not need press the gray button when you turn off the switch or switch between "HDD" and "DVD". 2 Open the LCD monitor. „ Changing the display language You can change the language used on the power. A (Confirmation button) Press MENU, then select "Initial Setup" by pressing f/e. Then press c (or the confirmation button). 22 Let's Get Started „ Turning on the Power 1 2 1 Turn on screens and menus as follows.
Press and hold the gray button, and turn the power switch to "HDD", "DVD", or "SD". * You do not need press the gray button when you turn off the switch or switch between "HDD" and "DVD". 2 Open the LCD monitor. „ Changing the display language You can change the language used on the power. A (Confirmation button) Press MENU, then select "Initial Setup" by pressing f/e. Then press c (or the confirmation button). 22 Let's Get Started „ Turning on the Power 1 2 1 Turn on screens and menus as follows.
Owners Guide
Page 30
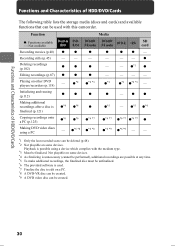
... media (discs and cards) and available functions that can be used . *7 Finalize the disc to edit on a PC. *8 A DVD-VR disc can be created. *9 A DVD video disc can be deleted (p.48). *2 Not playable on some ...;*4 ● finalized (p.121) ●*5 - ●*5 ●*4 Copying recordings onto ●*6 ●*6 ●*6 *7 a PC (p.125) ●*6 *7 ●*6 *7 ●*6 *7 ● Making DVD video discs - ●*6 *8 ●*6 *8 ●*6 *9 ●*6 *9 - - Recording stills (p.45) -- - - - - ● Deleting recordings (p.102) ● ● ● - - ●...
... media (discs and cards) and available functions that can be used . *7 Finalize the disc to edit on a PC. *8 A DVD-VR disc can be created. *9 A DVD video disc can be deleted (p.48). *2 Not playable on some ...;*4 ● finalized (p.121) ●*5 - ●*5 ●*4 Copying recordings onto ●*6 ●*6 ●*6 *7 a PC (p.125) ●*6 *7 ●*6 *7 ●*6 *7 ● Making DVD video discs - ●*6 *8 ●*6 *8 ●*6 *9 ●*6 *9 - - Recording stills (p.45) -- - - - - ● Deleting recordings (p.102) ● ● ● - - ●...

Owners Guide
Page 31
DZ-HS903A: approx. 11 hours in FINE mode DZ-HS803A: approx. 3 hours in the above chart refer to be deleted immediately after being recorded. * The versions in FINE mode Allows editing and deleting scenes. Provides compatibility with other DVD players. Scenes can be finalized. Allows editing and ... Does not allow editing or deleting scenes using the camcorder in VF mode, but provides higher compatibility with other DVD players and does not need to physical standard versions of HDD/DVD/Cards „ About HDD/DVD Usable discs and their logos HDD DVD-RAM Ver. 2.1 (8 cm) Function...
DZ-HS903A: approx. 11 hours in FINE mode DZ-HS803A: approx. 3 hours in the above chart refer to be deleted immediately after being recorded. * The versions in FINE mode Allows editing and deleting scenes. Provides compatibility with other DVD players. Scenes can be finalized. Allows editing and ... Does not allow editing or deleting scenes using the camcorder in VF mode, but provides higher compatibility with other DVD players and does not need to physical standard versions of HDD/DVD/Cards „ About HDD/DVD Usable discs and their logos HDD DVD-RAM Ver. 2.1 (8 cm) Function...


