
Backup and Recovery - Windows Vista
Page 6
... discs may be required, whereas only a few DVDs or BDs are operating the computer on -screen instructions. 2 Chapter 2 Creating recovery discs All these discs are not compatible with the Recovery Manager... for the first time. NOTE: If you are required. Follow the on battery power, you will need high-quality DVD-R, double-layer DVD-R, DVD+R, double-layer DVD+R, BD-R (writable Blu-ray),... or CD-R discs. 2 Creating recovery discs HP recommends that you create recovery...
... discs may be required, whereas only a few DVDs or BDs are operating the computer on -screen instructions. 2 Chapter 2 Creating recovery discs All these discs are not compatible with the Recovery Manager... for the first time. NOTE: If you are required. Follow the on battery power, you will need high-quality DVD-R, double-layer DVD-R, DVD+R, double-layer DVD+R, BD-R (writable Blu-ray),... or CD-R discs. 2 Creating recovery discs HP recommends that you create recovery...

Software Update, Backup and Recovery - Windows Vista
Page 6
... use the Setup Utility for software, driver, and BIOS updates. 2. Do not download or install a BIOS update while the computer is running on battery power, docked in the lower-left corner of the date, name, or other system information is connected to know the version of the system BIOS...of the screen, press f10. 2. Follow the instructions on the computer, you want to your computer: Select Start > Help and Support, and then click the link for displaying BIOS information: 1. BIOS version information (also known as ROM date and System BIOS) can be displayed by turning on the HP Web ...
... use the Setup Utility for software, driver, and BIOS updates. 2. Do not download or install a BIOS update while the computer is running on battery power, docked in the lower-left corner of the date, name, or other system information is connected to know the version of the system BIOS...of the screen, press f10. 2. Follow the instructions on the computer, you want to your computer: Select Start > Help and Support, and then click the link for displaying BIOS information: 1. BIOS version information (also known as ROM date and System BIOS) can be displayed by turning on the HP Web ...
Backup and Recovery - Windows Vista
Page 8
...instability or failure. The next time you open Recovery Manager, you are operating the computer on -screen instructions. 2 Recovering system information Recovery Manager opens. 2. Click Advanced Options. NOTE: If you will need high quality CD-R, DVD-R, DVD-R with double-layer support, DVD+R, or DVD+R with the Recovery...recovery discs of the full factory image. To create a set of recovery discs can go to the next step. 3. Follow the on battery power, you will be created per computer. ● Number each disc before inserting it into the computer optical drive. ● If necessary...
...instability or failure. The next time you open Recovery Manager, you are operating the computer on -screen instructions. 2 Recovering system information Recovery Manager opens. 2. Click Advanced Options. NOTE: If you will need high quality CD-R, DVD-R, DVD-R with double-layer support, DVD+R, or DVD+R with the Recovery...recovery discs of the full factory image. To create a set of recovery discs can go to the next step. 3. Follow the on battery power, you will be created per computer. ● Number each disc before inserting it into the computer optical drive. ● If necessary...

Drives - Windows Vista
Page 8
...damage to the computer, damage to a drive, or loss of information, observe these precautions: Before handling a drive, discharge static electricity by touching the unpainted metal surface of magnetism and will not damage a drive. 2 Chapter 2 Handling drives Before removing or installing a drive, shut ... are included with care. If a drive must be sure that check carry-on the computer. The airport security devices that the battery is sensitive to magnetic fields. Handle a drive carefully; The write process is sufficiently charged before removing the drive from the drive ...
...damage to the computer, damage to a drive, or loss of information, observe these precautions: Before handling a drive, discharge static electricity by touching the unpainted metal surface of magnetism and will not damage a drive. 2 Chapter 2 Handling drives Before removing or installing a drive, shut ... are included with care. If a drive must be sure that check carry-on the computer. The airport security devices that the battery is sensitive to magnetic fields. Handle a drive carefully; The write process is sufficiently charged before removing the drive from the drive ...
Drives - Windows Vista
Page 12
... or damage to a disc, observe the following guidelines: Before writing to a disc, connect the computer to prevent the automatic playing of the screen. Do not copy directly from a source disc to a destination disc. When prompted, remove the source disc from a network drive to a ...which may be provided with the computer, refer to vibration. Insert the disc you are using software included with the software, on disc, or on battery power. The write process is a criminal offense, under applicable copyright laws, to copy into the drive. Select Start > All Programs > Cyberlink ...
... or damage to a disc, observe the following guidelines: Before writing to a disc, connect the computer to prevent the automatic playing of the screen. Do not copy directly from a source disc to a destination disc. When prompted, remove the source disc from a network drive to a ...which may be provided with the computer, refer to vibration. Insert the disc you are using software included with the software, on disc, or on battery power. The write process is a criminal offense, under applicable copyright laws, to copy into the drive. Select Start > All Programs > Cyberlink ...

Drives - Windows Vista
Page 20
... prevent information loss or an unresponsive system: Shut down the computer through the operating system. Disconnect all external devices connected to the computer. 4. Remove the battery from the computer (2). 9. With the hard drive bay toward you are not sure whether the computer is on by pressing the power button. Lift the...
... prevent information loss or an unresponsive system: Shut down the computer through the operating system. Disconnect all external devices connected to the computer. 4. Remove the battery from the computer (2). 9. With the hard drive bay toward you are not sure whether the computer is on by pressing the power button. Lift the...

Memory Modules - Windows Vista
Page 7
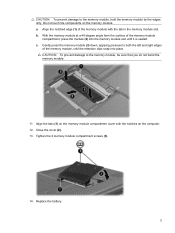
... the computer. 4. Before beginning any procedure, ensure that both memory modules are the same size. Save your work. 2. Remove the battery from the AC outlet. 5. WARNING! CAUTION: Electrostatic discharge (ESD) can be sure that you are discharged of the computer. Then ...channel configuration when adding a second memory module, be upgraded by adding a memory module to the vacant expansion memory module slot or by touching a grounded metal object. Shut down the computer through the operating system. 3. The memory capacity of the computer can damage electronic components....
... the computer. 4. Before beginning any procedure, ensure that both memory modules are the same size. Save your work. 2. Remove the battery from the AC outlet. 5. WARNING! CAUTION: Electrostatic discharge (ESD) can be sure that you are discharged of the computer. Then ...channel configuration when adding a second memory module, be upgraded by adding a memory module to the vacant expansion memory module slot or by touching a grounded metal object. Shut down the computer through the operating system. 3. The memory capacity of the computer can damage electronic components....
Memory Modules - Windows Vista
Page 9
Align the notched edge (1) of the memory module with the notches on the computer. 12. Align the tabs (1) on the memory module. Replace the battery. 3 CAUTION: To prevent damage to the memory module, hold the memory module by the edges only. Tighten the 2 memory module compartment screws (3).... (3) down, applying pressure to both the left and right edges of the memory module compartment, press the module (2) into place. Do not touch the components on the memory module compartment cover with the tab in the memory module slot. Close the cover (2). 13. CAUTION: To prevent ...
Align the notched edge (1) of the memory module with the notches on the computer. 12. Align the tabs (1) on the memory module. Replace the battery. 3 CAUTION: To prevent damage to the memory module, hold the memory module by the edges only. Tighten the 2 memory module compartment screws (3).... (3) down, applying pressure to both the left and right edges of the memory module compartment, press the module (2) into place. Do not touch the components on the memory module compartment cover with the tab in the memory module slot. Close the cover (2). 13. CAUTION: To prevent ...
Notebook Tour - Windows Vista
Page 16
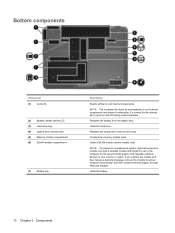
...The computer fan starts up automatically to cycle on and off during routine operation. Releases the optical drive from the battery bay. NOTE: To prevent an unresponsive system, replace the wireless module only with a wireless module authorized for the ... internal components and prevent overheating. Bottom components Component (1) Vents (6) (2) Battery release latches (2) (3) Hard drive bay (4) Optical drive release latch (5) Memory module compartment (6) WLAN module compartment (7) Battery bay Description Enable airflow to restore computer functionality, and then contact technical ...
...The computer fan starts up automatically to cycle on and off during routine operation. Releases the optical drive from the battery bay. NOTE: To prevent an unresponsive system, replace the wireless module only with a wireless module authorized for the ... internal components and prevent overheating. Bottom components Component (1) Vents (6) (2) Battery release latches (2) (3) Hard drive bay (4) Optical drive release latch (5) Memory module compartment (6) WLAN module compartment (7) Battery bay Description Enable airflow to restore computer functionality, and then contact technical ...
Notebook Tour - Windows Vista
Page 18
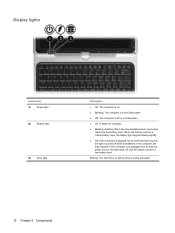
... source, the light stays off until the battery reaches a low battery level. Blinking: The hard drive or optical drive is turned off when all batteries in Hibernation. ● On: A battery is charging. ● Blinking: A battery that is not plugged into an external power... source, the light is being accessed. 12 Chapter 2 Components Display lights Component (1) Power light (2) Battery light (3) Drive light Description &#...
... source, the light stays off until the battery reaches a low battery level. Blinking: The hard drive or optical drive is turned off when all batteries in Hibernation. ● On: A battery is charging. ● Blinking: A battery that is not plugged into an external power... source, the light is being accessed. 12 Chapter 2 Components Display lights Component (1) Power light (2) Battery light (3) Drive light Description &#...

Notebook Tour - Windows Vista
Page 22
Converts AC power to a country-specific modem adapter. *Modem cables, batteries, and power cords vary in appearance by region and country. 16 Chapter 2 Components models only) (5) Modem cable* (select models only) Connects the internal modem to ... external power. (4) Country-specific modem cable adapter (select Adapts the modem cable to an AC outlet. Additional hardware components Component Description (1) Power cord* (2) AC adapter (3) Battery* Connects an AC adapter to a non-RJ-11 telephone jack.
Converts AC power to a country-specific modem adapter. *Modem cables, batteries, and power cords vary in appearance by region and country. 16 Chapter 2 Components models only) (5) Modem cable* (select models only) Connects the internal modem to ... external power. (4) Country-specific modem cable adapter (select Adapts the modem cable to an AC outlet. Additional hardware components Component Description (1) Power cord* (2) AC adapter (3) Battery* Connects an AC adapter to a non-RJ-11 telephone jack.
Notebook Tour - Windows Vista
Page 23
... you contact technical support.The service tag label is affixed to update or troubleshoot the operating system. The modem approval label is affixed inside the battery bay. ● Modem approval label-Provides regulatory information about optional wireless devices and the approval markings of some of the countries in which the modem...
... you contact technical support.The service tag label is affixed to update or troubleshoot the operating system. The modem approval label is affixed inside the battery bay. ● Modem approval label-Provides regulatory information about optional wireless devices and the approval markings of some of the countries in which the modem...
Notebook Tour - Windows Vista
Page 24
... (headphone) jack, identifying 5 audio-out (headphone) S/PDIF jack, identifying 5 B battery bay, identifying 10 battery light, identifying 12 battery release latch, identifying 10 battery, identifying 16 bays battery 10, 17 hard drive 10 Bluetooth label 17 buttons DVD 13 Media 13 Mobility Center... light, identifying 9 Digital Media Slot, identifying 9 display release latch, identifying 5, 11 display switch, identifying 11 drive light, identifying 12 drives, hard 10 DVD button, identifying 13 E esc key, identifying 4 expansion port, identifying 8 ExpressCard slot, identifying 9 external monitor...
... (headphone) jack, identifying 5 audio-out (headphone) S/PDIF jack, identifying 5 B battery bay, identifying 10 battery light, identifying 12 battery release latch, identifying 10 battery, identifying 16 bays battery 10, 17 hard drive 10 Bluetooth label 17 buttons DVD 13 Media 13 Mobility Center... light, identifying 9 Digital Media Slot, identifying 9 display release latch, identifying 5, 11 display switch, identifying 11 drive light, identifying 12 drives, hard 10 DVD button, identifying 13 E esc key, identifying 4 expansion port, identifying 8 ExpressCard slot, identifying 9 external monitor...
Notebook Tour - Windows Vista
Page 25
... 10 display release 5, 11 optical drive release 10 lights battery 12 Digital Media Slot 9 drive 12 power 5, 12 TouchPad 3 wireless 6 M media activity buttons, identifying 8, 14 Media button, identifying 13 memory module compartment, identifying 10 ...pause button, identifying 8, 14 ports expansion 8 external monitor 8 USB 7, 8 power connector, identifying 9 power cord, identifying 16 power light, identifying 5, 12 power switch, identifying 5 previous/rewind button, identifying 8, 14 Product Key 17 product name and number, computer 17 R reader, fingerprint 11 regulatory information modem...
... 10 display release 5, 11 optical drive release 10 lights battery 12 Digital Media Slot 9 drive 12 power 5, 12 TouchPad 3 wireless 6 M media activity buttons, identifying 8, 14 Media button, identifying 13 memory module compartment, identifying 10 ...pause button, identifying 8, 14 ports expansion 8 external monitor 8 USB 7, 8 power connector, identifying 9 power cord, identifying 16 power light, identifying 5, 12 power switch, identifying 5 previous/rewind button, identifying 8, 14 Product Key 17 product name and number, computer 17 R reader, fingerprint 11 regulatory information modem...
HP Pavilion tx2500 Entertainment PC - Maintenance and Service Guide
Page 6
...Optical drive ...43 Memory module ...44 WLAN module ...46 Keyboard ...49 Switch cover ...51 Display assembly ...53 Top cover ...56 RTC battery ...58 Power switch assembly ...59 Bluetooth module ...61 System board ...62 Pen holder and pen eject assembly 65 Audio/infrared board ......menus ...75 Main menu ...75 Security menu ...75 System Configuration menu 76 Diagnostics menu ...76 6 Specifications Computer specifications ...77 12.1-inch, WXGA BrightView display specifications 78 Hard drive specifications ...79 DVD±RW and CD-RW SuperMulti Double-Layer Combo Drive specifications 80 System ...
...Optical drive ...43 Memory module ...44 WLAN module ...46 Keyboard ...49 Switch cover ...51 Display assembly ...53 Top cover ...56 RTC battery ...58 Power switch assembly ...59 Bluetooth module ...61 System board ...62 Pen holder and pen eject assembly 65 Audio/infrared board ......menus ...75 Main menu ...75 Security menu ...75 System Configuration menu 76 Diagnostics menu ...76 6 Specifications Computer specifications ...77 12.1-inch, WXGA BrightView display specifications 78 Hard drive specifications ...79 DVD±RW and CD-RW SuperMulti Double-Layer Combo Drive specifications 80 System ...

HP Pavilion tx2500 Entertainment PC - Maintenance and Service Guide
Page 11
...HP Notebook QuickDock. 12.1-inch keyboard with embedded numeric keypad Taps enabled as default TouchPad with 2 buttons and two-way scroll Wacom 9.0-mm touch-screen pen 8-cell, 73-Wh, 2.55-Ah Li-ion battery 6-cell, 55-Wh, 2.55-Ah Li-ion battery 4-cell, 37-Wh, 2.55-Ah Li-ion battery...-out (stereo headphone) Audio-out (stereo headphone with S/PDIF) Consumer infrared (one in computer base, one in display assembly) eSATA High-definition multimedia interface (HDMI) v1.3 supporting 1080p with ground pin, supports 2-pin DC connector) Security cable slot Fingerprint reader Preinstalled: Windows Vista...
...HP Notebook QuickDock. 12.1-inch keyboard with embedded numeric keypad Taps enabled as default TouchPad with 2 buttons and two-way scroll Wacom 9.0-mm touch-screen pen 8-cell, 73-Wh, 2.55-Ah Li-ion battery 6-cell, 55-Wh, 2.55-Ah Li-ion battery 4-cell, 37-Wh, 2.55-Ah Li-ion battery...-out (stereo headphone) Audio-out (stereo headphone with S/PDIF) Consumer infrared (one in computer base, one in display assembly) eSATA High-definition multimedia interface (HDMI) v1.3 supporting 1080p with ground pin, supports 2-pin DC connector) Security cable slot Fingerprint reader Preinstalled: Windows Vista...
HP Pavilion tx2500 Entertainment PC - Maintenance and Service Guide
Page 14
...battery is charging. ● Blinking: A battery...battery level. If the computer is not plugged into an external power source, the light stays off until the battery reaches a low battery...(11) Battery light (12) Power ...light (13) Consumer infrared lens (14) Internal display switch (15) Fingerprint reader (select models only) (16) Wireless antennae (select models only) Function Swivels the display and converts the computer from traditional notebook mode into an external power source, the light is off when all batteries...battery reaches a critical battery level, the battery...
...battery is charging. ● Blinking: A battery...battery level. If the computer is not plugged into an external power source, the light stays off until the battery reaches a low battery...(11) Battery light (12) Power ...light (13) Consumer infrared lens (14) Internal display switch (15) Fingerprint reader (select models only) (16) Wireless antennae (select models only) Function Swivels the display and converts the computer from traditional notebook mode into an external power source, the light is off when all batteries...battery reaches a critical battery level, the battery...

HP Pavilion tx2500 Entertainment PC - Maintenance and Service Guide
Page 21
Releases the battery from the drive bay. Holds a WLAN module (select models only). Holds the hard drive. NOTE: To prevent an unresponsive system, replace the wireless ... remove the module to cycle on and off during routine operation. Bottom components Item (1) Component Vents (6) (2) Battery release latches (2) (3) Hard drive bay (4) Optical drive release latch (5) Memory module compartment (6) WLAN module compartment (7) Battery bay Function Enable airflow to cool internal components and prevent overheating. NOTE: The computer fan starts up automatically...
Releases the battery from the drive bay. Holds a WLAN module (select models only). Holds the hard drive. NOTE: To prevent an unresponsive system, replace the wireless ... remove the module to cycle on and off during routine operation. Bottom components Item (1) Component Vents (6) (2) Battery release latches (2) (3) Hard drive bay (4) Optical drive release latch (5) Memory module compartment (6) WLAN module compartment (7) Battery bay Function Enable airflow to cool internal components and prevent overheating. NOTE: The computer fan starts up automatically...

HP Pavilion tx2500 Entertainment PC - Maintenance and Service Guide
Page 25
Item (1b) (2a) (2b) (3) (4) (5) (6) (7a) Description Spare part number 12.1-inch, WXGA, BrightView touch-screen display assembly with Web camera, 484750-001 microphones, and WLAN antenna cables Display convertible hinge cover (included with display assembly) Display Rubber Kit (...-001 Top cover (includes TouchPad and TouchPad cable, caps lock light board and cable, and top cover bumper pads) 464111-001 RTC battery 449729-001 Bluetooth module 483113-001 Bluetooth module cable (not illustrated) 487697-001 Plastics Kit 487926-001 ExpressCard slot bezel Computer major components 17
Item (1b) (2a) (2b) (3) (4) (5) (6) (7a) Description Spare part number 12.1-inch, WXGA, BrightView touch-screen display assembly with Web camera, 484750-001 microphones, and WLAN antenna cables Display convertible hinge cover (included with display assembly) Display Rubber Kit (...-001 Top cover (includes TouchPad and TouchPad cable, caps lock light board and cable, and top cover bumper pads) 464111-001 RTC battery 449729-001 Bluetooth module 483113-001 Bluetooth module cable (not illustrated) 487697-001 Plastics Kit 487926-001 ExpressCard slot bezel Computer major components 17

HP Pavilion tx2500 Entertainment PC - Maintenance and Service Guide
Page 26
Item (7b) (7c) (7d) (7e) (8a) (8b) (9a) (9b) (10) (11) (12) (13) (14) (15) (16) (17) Description Spare part number Memory module compartment cover (includes 2 captive screws, secured by C-clips) WLAN module compartment cover (includes 1 captive ... Drive with LightScribe 480864-001 DVD±RW and CD-RW SuperMulti Double-Layer Combo Drive 480865-001 Base enclosure (includes optical drive release assembly, 2 battery release latches, 466437-001 and 4 rubber feet) Rubber Feet Kit (not illustrated, includes base enclosure rubber feet) 464821-001 Memory module (1-DIMM, PC2-6400, 667...
Item (7b) (7c) (7d) (7e) (8a) (8b) (9a) (9b) (10) (11) (12) (13) (14) (15) (16) (17) Description Spare part number Memory module compartment cover (includes 2 captive screws, secured by C-clips) WLAN module compartment cover (includes 1 captive ... Drive with LightScribe 480864-001 DVD±RW and CD-RW SuperMulti Double-Layer Combo Drive 480865-001 Base enclosure (includes optical drive release assembly, 2 battery release latches, 466437-001 and 4 rubber feet) Rubber Feet Kit (not illustrated, includes base enclosure rubber feet) 464821-001 Memory module (1-DIMM, PC2-6400, 667...


