
Getting Started Guide
Page 1
Getting Started
Getting Started

Getting Started Guide
Page 2
... to change without the prior written consent of Microsoft Corporation in the United States and/or other than those permitted by HP. HP supports lawful use of technology and does not endorse or encourage the use or reliability of Microsoft Corporation. No part of...view viewing uses only unless otherwise authorized by copyright. The Windows logo and Windows Vista are trademarks or registered trademarks of HP. This product incorporates copyright protection technology that is subject to another language without notice. This document contains proprietary information that is...
... to change without the prior written consent of Microsoft Corporation in the United States and/or other than those permitted by HP. HP supports lawful use of technology and does not endorse or encourage the use or reliability of Microsoft Corporation. No part of...view viewing uses only unless otherwise authorized by copyright. The Windows logo and Windows Vista are trademarks or registered trademarks of HP. This product incorporates copyright protection technology that is subject to another language without notice. This document contains proprietary information that is...
Getting Started Guide
Page 3
Table of Contents Setting Up the Computer 1 Putting the Computer Together 1 Placing the computer in the proper location 1 Using surge protection 1 Connecting to the computer 2 Connecting a Digital Camera (Photo or Video 8 Connecting Other Devices 10 Storing Documentation and Recovery Discs 10 Adjusting the Monitor 11 Adjusting the screen resolution by using Vista 11 Adjusting the screen resolution by using the NVIDIA Control Panel 11 Setting Up a Local Area Network 12 Setting Up a Wired (Ethernet) Connection 13 Integrated Wireless Devices 14 Connecting the Wireless LAN Device 14...
Table of Contents Setting Up the Computer 1 Putting the Computer Together 1 Placing the computer in the proper location 1 Using surge protection 1 Connecting to the computer 2 Connecting a Digital Camera (Photo or Video 8 Connecting Other Devices 10 Storing Documentation and Recovery Discs 10 Adjusting the Monitor 11 Adjusting the screen resolution by using Vista 11 Adjusting the screen resolution by using the NVIDIA Control Panel 11 Setting Up a Local Area Network 12 Setting Up a Wired (Ethernet) Connection 13 Integrated Wireless Devices 14 Connecting the Wireless LAN Device 14...

Getting Started Guide
Page 4
... the Web 39 Using the Onscreen Help and Support Center 40 Using the PC Help & Tools Folder 40 Using the hardware diagnostic tools 40 Using HP Total Care Advisor Software 41 Turning On the Computer for the First Time 43 Turning Off the Computer 44 Using Shut Down 44 Using Lock...
... the Web 39 Using the Onscreen Help and Support Center 40 Using the PC Help & Tools Folder 40 Using the hardware diagnostic tools 40 Using HP Total Care Advisor Software 41 Turning On the Computer for the First Time 43 Turning Off the Computer 44 Using Shut Down 44 Using Lock...

Getting Started Guide
Page 5
Using the Computer with Safety and Comfort 48 Setting Up User Accounts 49 Protecting the Computer 50 Using passwords 50 Using antivirus software 52 Using firewall software 52 Configuring the computer for automatic Microsoft software updates 53 Installing critical security updates 54 Guidelines for Installing Software and Hardware Devices 54 Transferring Files and Settings from an Old Computer to a New Computer 55 Using the Keyboard 57 Identifying Keyboard Features 57 Alphanumeric keys 57 Function keys 58 Edit keys...58 Arrow keys ...58 Numeric keys 59 Keyboard indicators 59 ...
Using the Computer with Safety and Comfort 48 Setting Up User Accounts 49 Protecting the Computer 50 Using passwords 50 Using antivirus software 52 Using firewall software 52 Configuring the computer for automatic Microsoft software updates 53 Installing critical security updates 54 Guidelines for Installing Software and Hardware Devices 54 Transferring Files and Settings from an Old Computer to a New Computer 55 Using the Keyboard 57 Identifying Keyboard Features 57 Alphanumeric keys 57 Function keys 58 Edit keys...58 Arrow keys ...58 Numeric keys 59 Keyboard indicators 59 ...

Getting Started Guide
Page 6
Configuring Speaker and Sound Options 73 Adjusting speaker volume 74 Selecting a microphone 75 Configuring audio output 75 Using the Creative Sound Blaster X-Fi or X-Fi Fatality audio card 76 Configuring the FlexiJack connector 77 Sound Blaster X-Fi configuration modes 77 Configuring speakers with Realtek HD Audio Manager 78 The Realtek HD Audio Manager control screens 79 Configuring sound for recording with the Realtek HD Audio Manager 81 Retasking front panel audio connectors 82 Configuring multistreaming audio 83 When to use multistreaming audio 84 Setting up multistreaming ...
Configuring Speaker and Sound Options 73 Adjusting speaker volume 74 Selecting a microphone 75 Configuring audio output 75 Using the Creative Sound Blaster X-Fi or X-Fi Fatality audio card 76 Configuring the FlexiJack connector 77 Sound Blaster X-Fi configuration modes 77 Configuring speakers with Realtek HD Audio Manager 78 The Realtek HD Audio Manager control screens 79 Configuring sound for recording with the Realtek HD Audio Manager 81 Retasking front panel audio connectors 82 Configuring multistreaming audio 83 When to use multistreaming audio 84 Setting up multistreaming ...
Getting Started Guide
Page 7
... Light 123 Formatting a Memory Card 123 Troubleshooting the Memory Card Reader 124 Using the HP Personal Media Drive and HP Pocket Media Drive ...........125 Connecting the Drive 126 Inserting the Drive into an HP Drive Bay 127 Connecting the Drive to a Computer Without a Drive Bay 128 Locating ...the Drive and Assigning a Drive Letter 129 Using the Drive 130 Transferring files to another computer manually 130 Disconnecting the Drive 130 Troubleshooting the HP Media Drive 131 Table...
... Light 123 Formatting a Memory Card 123 Troubleshooting the Memory Card Reader 124 Using the HP Personal Media Drive and HP Pocket Media Drive ...........125 Connecting the Drive 126 Inserting the Drive into an HP Drive Bay 127 Connecting the Drive to a Computer Without a Drive Bay 128 Locating ...the Drive and Assigning a Drive Letter 129 Using the Drive 130 Transferring files to another computer manually 130 Disconnecting the Drive 130 Troubleshooting the HP Media Drive 131 Table...
Getting Started Guide
Page 8
Playing CDs, DVDs, or VCDs 133 Using Music...133 Using Music with Windows Media Center 134 Using the music library 135 Adding music to the music library 135 Adding music files from the hard disk drive 135 Adding music files from a CD 136 Deleting music files from the music library 137 Using supported music file types 137 Playing Music Files in Windows Media Center 138 Changing the visualization settings 139 Playing an album in Windows Media Center 140 Playing a song in Windows Media Center 140 Creating a Queue in Windows Media Center 141 Finding and Playing an Album in Windows ...
Playing CDs, DVDs, or VCDs 133 Using Music...133 Using Music with Windows Media Center 134 Using the music library 135 Adding music to the music library 135 Adding music files from the hard disk drive 135 Adding music files from a CD 136 Deleting music files from the music library 137 Using supported music file types 137 Playing Music Files in Windows Media Center 138 Changing the visualization settings 139 Playing an album in Windows Media Center 140 Playing a song in Windows Media Center 140 Creating a Queue in Windows Media Center 141 Finding and Playing an Album in Windows ...

Getting Started Guide
Page 9
Windows Media Center Features 161 The right music for the moment 162 Playing Internet radio 162 Sharing your digital memories 162 Transforming your living space into a theater 163 Online media 163 Navigating Windows Media Center 163 Opening Windows Media Center with a mouse 163 Opening Windows Media Center with the Windows Media Center remote control 164 Using the Windows Media Center menu bars 164 Selecting items in Windows Media Center 165 Windows Media Center control menu 166 Changing Windows Media Center Settings 166 Windows Media Center Settings categories 167 Using Windows ...
Windows Media Center Features 161 The right music for the moment 162 Playing Internet radio 162 Sharing your digital memories 162 Transforming your living space into a theater 163 Online media 163 Navigating Windows Media Center 163 Opening Windows Media Center with a mouse 163 Opening Windows Media Center with the Windows Media Center remote control 164 Using the Windows Media Center menu bars 164 Selecting items in Windows Media Center 165 Windows Media Center control menu 166 Changing Windows Media Center Settings 166 Windows Media Center Settings categories 167 Using Windows ...

Getting Started Guide
Page 10
Playing Videos in Windows Media Center 187 Playing digital videos 187 Using supported video file types 188 Transferring and Recording Video Files 188 Recording analog and digital video files 188 Creating a DVD from Video Files in Windows Media Center 189 Creating Movies by Using muvee autoProducer 191 Basic steps for making a movie 191 Using muvee autoProducer 193 Getting started 193 Capturing video from a digital video camera 195 Adding videos 196 Adding pictures 198 Adding music 199 Selecting the style 199 Changing the settings 200 Making the movie 201 Previewing the movie ...
Playing Videos in Windows Media Center 187 Playing digital videos 187 Using supported video file types 188 Transferring and Recording Video Files 188 Recording analog and digital video files 188 Creating a DVD from Video Files in Windows Media Center 189 Creating Movies by Using muvee autoProducer 191 Basic steps for making a movie 191 Using muvee autoProducer 193 Getting started 193 Capturing video from a digital video camera 195 Adding videos 196 Adding pictures 198 Adding music 199 Selecting the style 199 Changing the settings 200 Making the movie 201 Previewing the movie ...
Getting Started Guide
Page 11
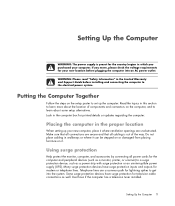
If you purchased your computer. WARNING: Please read "Safety Information" in the computer box for lightning spikes to a surge protection device, such as a power strip with surge protection or an uninterruptible power supply (UPS). Putting the Computer Together Follow the steps on it. Look in the Limited Warranty and Support Guide before plugging the computer into the system. Do not place cabling in this section to learn more about some setup alternatives. Read the topics in walkways or where it where ventilation openings are unobstructed. Many surge protection devices have...
If you purchased your computer. WARNING: Please read "Safety Information" in the computer box for lightning spikes to a surge protection device, such as a power strip with surge protection or an uninterruptible power supply (UPS). Putting the Computer Together Follow the steps on it. Look in the Limited Warranty and Support Guide before plugging the computer into the system. Do not place cabling in this section to learn more about some setup alternatives. Read the topics in walkways or where it where ventilation openings are unobstructed. Many surge protection devices have...

Getting Started Guide
Page 12
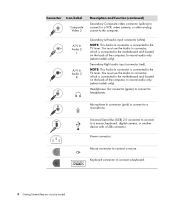
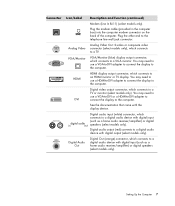
Connector Icon/Label Description and function Mouse (PS/2 connector). Keyboard (PS/2 connector). Printer (parallel). Serial Serial port for mouse, keyboard, digital cameras, or other serial devices. 2 Getting Started (features vary by model) Use a power strip whose manufacturer offers a damage replacement policy that replaces the equipment if surge protection fails. The following table shows some digital cameras or other devices with USB connectors. Not all , connectors: NOTE: The location, availability, and number of connectors on the back of the computer. Other ...
Connector Icon/Label Description and function Mouse (PS/2 connector). Keyboard (PS/2 connector). Printer (parallel). Serial Serial port for mouse, keyboard, digital cameras, or other serial devices. 2 Getting Started (features vary by model) Use a power strip whose manufacturer offers a damage replacement policy that replaces the equipment if surge protection fails. The following table shows some digital cameras or other devices with USB connectors. Not all , connectors: NOTE: The location, availability, and number of connectors on the back of the computer. Other ...

Getting Started Guide
Page 13
Rear speaker out. Center/Subwoofer. S-Video 2 Secondary S-video connector to the computer. Connector Icon/Label Description and function (continued) Audio Line Out (powered speakers). Microphone. NOTE: You must use a 6-pin FireWire (IEEE 1394) transfer cable with very fast transfer rates. Audio Line In. FireWire® (IEEE 1394) for video cameras or other analog source to connect a VCR, video camera, or other devices with this 6-pin connector. Headphones. Digital audio in and digital audio out. Setting Up the Computer 3 Side speaker out.
Rear speaker out. Center/Subwoofer. S-Video 2 Secondary S-video connector to the computer. Connector Icon/Label Description and function (continued) Audio Line Out (powered speakers). Microphone. NOTE: You must use a 6-pin FireWire (IEEE 1394) transfer cable with very fast transfer rates. Audio Line In. FireWire® (IEEE 1394) for video cameras or other analog source to connect a VCR, video camera, or other devices with this 6-pin connector. Headphones. Digital audio in and digital audio out. Setting Up the Computer 3 Side speaker out.
Getting Started Guide
Page 14
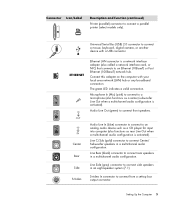
Microphone In connector (pink) to connect to a mouse, keyboard, digital camera, or another device with a USB connector. Universal Serial Bus (USB) 2.0 connector to connect to a microphone. A/V In Audio 2 L A/V In Audio 2 R Secondary Left audio input connector (white). You must use the Audio In connector, which is connected to record audio only (select models only). NOTE: This Audio In connector is connected to the motherboard and located on the back of the computer, to connect a mouse. Power connector. You must use the Audio In connector, which is ...
Microphone In connector (pink) to connect to a mouse, keyboard, digital camera, or another device with a USB connector. Universal Serial Bus (USB) 2.0 connector to connect to a microphone. A/V In Audio 2 L A/V In Audio 2 R Secondary Left audio input connector (white). You must use the Audio In connector, which is connected to record audio only (select models only). NOTE: This Audio In connector is connected to the motherboard and located on the back of the computer, to connect a mouse. Power connector. You must use the Audio In connector, which is ...
Getting Started Guide
Page 15
Line C/Sub (gold) connector to connect Center/ Subwoofer speakers in an eight-speaker system (7.1). Connect this adapter on the computer with a USB connector. The green LED indicates a valid connection. Line Side (gray) connector to connect a mouse, keyboard, digital camera, or another device with your local area network (LAN) hub or any broadband connection. Universal Serial Bus (USB) 2.0 connector to connect side speakers in a multichannel audio configuration. S-video In connector to connect a parallel printer (select models only). Connector Icon/Label Description and ...
Line C/Sub (gold) connector to connect Center/ Subwoofer speakers in an eight-speaker system (7.1). Connect this adapter on the computer with a USB connector. The green LED indicates a valid connection. Line Side (gray) connector to connect a mouse, keyboard, digital camera, or another device with your local area network (LAN) hub or any broadband connection. Universal Serial Bus (USB) 2.0 connector to connect side speakers in a multichannel audio configuration. S-video In connector to connect a parallel printer (select models only). Connector Icon/Label Description and ...
Getting Started Guide
Page 16
Some computers include this Audio In connector, which receives CATV (Community Antenna Television) or cable TV channels. TV In connector for TV cable or antenna, which receives ATSC channels (Advanced Television System Committee), which are over -the-air analog transmission channels. NOTE: Audio can be recorded by using this primary right audio input connector on the front of the computer on the front of the cable to a TV set -top box). TV In connector for TV cable or antenna, which receives NTSC channels (National Television System Committee), which are over -the-air ...
Some computers include this Audio In connector, which receives CATV (Community Antenna Television) or cable TV channels. TV In connector for TV cable or antenna, which receives ATSC channels (Advanced Television System Committee), which are over -the-air analog transmission channels. NOTE: Audio can be recorded by using this primary right audio input connector on the front of the computer on the front of the cable to a TV set -top box). TV In connector for TV cable or antenna, which receives NTSC channels (National Television System Committee), which are over -the-air ...
Getting Started Guide
Page 17
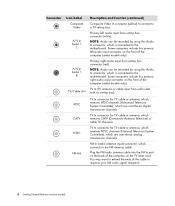
Analog Video Out: S-video or composite video connector (select models only), which connects to a TV. HDMI display output connector, which connects to an HDMI monitor or TV display. Setting Up the Computer 7 VGA/Monitor (blue) display output connector, which connects to a VGA monitor. You may need to use a HDMI-to-DVI adapter to connect the display to the computer. Digital audio input (white) connector, which connects to a digital audio device with digital input (such as a home audio receiver/amplifier) or digital speakers (select models only). Plug the modem cable (...
Analog Video Out: S-video or composite video connector (select models only), which connects to a TV. HDMI display output connector, which connects to an HDMI monitor or TV display. Setting Up the Computer 7 VGA/Monitor (blue) display output connector, which connects to a VGA monitor. You may need to use a HDMI-to-DVI adapter to connect the display to the computer. Digital audio input (white) connector, which connects to a digital audio device with digital input (such as a home audio receiver/amplifier) or digital speakers (select models only). Plug the modem cable (...

Getting Started Guide
Page 18
NOTE: If a Digital Video Device AutoPlay window appears when you connect the camera, click Cancel. 2 Connect the 6-pin video camera transfer cable into the camera, and then into an open port on the front or back of the computer. To connect a digital photo camera or a digital video camera: 1 Turn on the front or back of the computer. Most digital video cameras use the Video and Audio In connectors on the computer, and wait for the Microsoft® Windows Vista® operating system to digital photo cameras and digital video cameras. NOTE: When connecting an analog video camera to...
NOTE: If a Digital Video Device AutoPlay window appears when you connect the camera, click Cancel. 2 Connect the 6-pin video camera transfer cable into the camera, and then into an open port on the front or back of the computer. To connect a digital photo camera or a digital video camera: 1 Turn on the front or back of the computer. Most digital video cameras use the Video and Audio In connectors on the computer, and wait for the Microsoft® Windows Vista® operating system to digital photo cameras and digital video cameras. NOTE: When connecting an analog video camera to...

Getting Started Guide
Page 19
If the name of the camera appears, the device is not there, try the following: Click Action, and then click Scan for hardware changes. If the name is ready. Look in Device Manager for your camera. Insert the driver software CD, click Locate and install driver software, and then follow any onscreen instructions to the camera port. Unplug the video camera transfer cable from the computer, and plug it into a different port. Wait 2 or 3 minutes for Windows Vista to make the necessary settings for a new addition under the port. If the computer does not recognize the ...
If the name of the camera appears, the device is not there, try the following: Click Action, and then click Scan for hardware changes. If the name is ready. Look in Device Manager for your camera. Insert the driver software CD, click Locate and install driver software, and then follow any onscreen instructions to the camera port. Unplug the video camera transfer cable from the computer, and plug it into a different port. Wait 2 or 3 minutes for Windows Vista to make the necessary settings for a new addition under the port. If the computer does not recognize the ...

Getting Started Guide
Page 20
NOTE: You must use a 6-pin (not a 4-pin) FireWire (IEEE 1394) cable with the computer. NOTE: Some peripheral devices are not included with the 6-pin FireWire (IEEE 1394) connector on the computer. This allows easy access to all computer user manuals and warranty information in an easy-to the documentation that came with the documentation. These peripheral devices include printers, scanners, video cameras, digital photo cameras, memory card readers, and PDAs (personal digital assistants) or handheld computers. Connecting Other Devices Other peripheral devices can be connected to the ...
NOTE: You must use a 6-pin (not a 4-pin) FireWire (IEEE 1394) cable with the computer. NOTE: Some peripheral devices are not included with the 6-pin FireWire (IEEE 1394) connector on the computer. This allows easy access to all computer user manuals and warranty information in an easy-to the documentation that came with the documentation. These peripheral devices include printers, scanners, video cameras, digital photo cameras, memory card readers, and PDAs (personal digital assistants) or handheld computers. Connecting Other Devices Other peripheral devices can be connected to the ...