
Hardware Reference Guide HP rp5800
Page 5
... ...1 Standard Configuration Features ...1 Front Panel Components ...2 Rear Panel Components ...3 Changing from Desktop to Tower Configuration 4 Installing the Optional Port Cover ...5 Serial Number Location ...6 2 Hardware Upgrades ...7 Warnings and Cautions ...7 Removing the Computer Access Panel 8 Replacing the Computer ... Half-Height Expansion Card 17 Installing a 12-Volt Powered USB Expansion Card 18 Installing a Full-Height Expansion Card 24 Installing a Powered Serial Port Expansion Card 25 Configuring Powered Serial Ports 30 Replacing the Riser Card ...31 Drive Positions ...37 ...
... ...1 Standard Configuration Features ...1 Front Panel Components ...2 Rear Panel Components ...3 Changing from Desktop to Tower Configuration 4 Installing the Optional Port Cover ...5 Serial Number Location ...6 2 Hardware Upgrades ...7 Warnings and Cautions ...7 Removing the Computer Access Panel 8 Replacing the Computer ... Half-Height Expansion Card 17 Installing a 12-Volt Powered USB Expansion Card 18 Installing a Full-Height Expansion Card 24 Installing a Powered Serial Port Expansion Card 25 Configuring Powered Serial Ports 30 Replacing the Riser Card ...31 Drive Positions ...37 ...

Hardware Reference Guide HP rp5800
Page 7
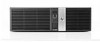
... may vary depending on some computer models only). ENWW Standard Configuration Features 1 1 Product Features Standard Configuration Features The HP Point of Sale System rp5800 Configuration NOTE: This product features optional Powered USB ports. Some models include an optical drive while other models have a driveless bezel covering the optical drive bay. In this document, these...
... may vary depending on some computer models only). ENWW Standard Configuration Features 1 1 Product Features Standard Configuration Features The HP Point of Sale System rp5800 Configuration NOTE: This product features optional Powered USB ports. Some models include an optical drive while other models have a driveless bezel covering the optical drive bay. In this document, these...

Hardware Reference Guide HP rp5800
Page 8
... 1-2 Front Panel Components Table 1-1 Front Panel Components 1 5.25-inch Optical Drive (optional) 5 NIC Link Light 2 Power On Light 6 USB Ports (2) 3 Dual-State Power Button 7 NIC Activity Light 4 Hard Drive Activity Light NOTE: Some models without an optical drive include an optical ...drive bezel. The Power On Light is normally green when the power is a problem with a bezel blank covering the optical drive bay. The USB ports are located behind a sliding door. If it is flashing red, there is on. Front Panel Components Drive configuration may vary by model. Refer...
... 1-2 Front Panel Components Table 1-1 Front Panel Components 1 5.25-inch Optical Drive (optional) 5 NIC Link Light 2 Power On Light 6 USB Ports (2) 3 Dual-State Power Button 7 NIC Activity Light 4 Hard Drive Activity Light NOTE: Some models without an optical drive include an optical ...drive bezel. The Power On Light is normally green when the power is a problem with a bezel blank covering the optical drive bay. The USB ports are located behind a sliding door. If it is flashing red, there is on. Front Panel Components Drive configuration may vary by model. Refer...

Hardware Reference Guide HP rp5800
Page 9
...HP. The serial ports can be configured as 5V or 12V powered serial ports. ENWW Rear Panel Components 3 CAUTION: The cash drawer connector is similar in size and shape to the computer, DO NOT plug a network cable into the cash drawer connector. Rear Panel Components Table 1-2 Rear Panel Components 1 Powered USB 24V 9 Powered USB...45 Network Connector 11 DisplayPort 4 Serial Connector (COM4) (optional) 12 Serial Connector (COM2) 5 Serial Connector (COM1) 13 USB Ports (5) 6 PS/2 Mouse Connector (green) 14 VGA Connector 7 Line-In Audio Connector (blue) 8 Power Cord Connector 15...
...HP. The serial ports can be configured as 5V or 12V powered serial ports. ENWW Rear Panel Components 3 CAUTION: The cash drawer connector is similar in size and shape to the computer, DO NOT plug a network cable into the cash drawer connector. Rear Panel Components Table 1-2 Rear Panel Components 1 Powered USB 24V 9 Powered USB...45 Network Connector 11 DisplayPort 4 Serial Connector (COM4) (optional) 12 Serial Connector (COM2) 5 Serial Connector (COM1) 13 USB Ports (5) 6 PS/2 Mouse Connector (green) 14 VGA Connector 7 Line-In Audio Connector (blue) 8 Power Cord Connector 15...

Hardware Reference Guide HP rp5800
Page 24
... board and the corresponding expansion slot on the riser card, and may have one or two 12-volt Powered USB half-height expansion cards installed for a total of 6 optional 12-volt Powered USB ports. CAUTION: Regardless of the power-on state, voltage is always present on the system board as long as the...
... board and the corresponding expansion slot on the riser card, and may have one or two 12-volt Powered USB half-height expansion cards installed for a total of 6 optional 12-volt Powered USB ports. CAUTION: Regardless of the power-on state, voltage is always present on the system board as long as the...

Hardware Reference Guide HP rp5800
Page 32
.... 3. If the computer is on the system board as long as compact discs or USB flash drives, from the power outlet and disconnect any external devices. Figure 2-22 Removing the Powered Serial Port Caps To install a Powered Serial Port expansion card: 1. Remove all removable media, such as the system is always present on...
.... 3. If the computer is on the system board as long as compact discs or USB flash drives, from the power outlet and disconnect any external devices. Figure 2-22 Removing the Powered Serial Port Caps To install a Powered Serial Port expansion card: 1. Remove all removable media, such as the system is always present on...

Hardware Reference Guide HP rp5800
Page 37
...slot designated for this product. Remove all removable media, such as the system is on the system board as long as compact discs or USB flash drives, from HP. Rotate the power supply all the way back. Remove the computer access panel. 7. Remove/disengage any external devices. 4. NOTE: If... disconnect the power cord to avoid damage to access the full-height expansion card retention latch. Disconnect the power cord from HP for the Powered Serial Port expansion card. If the computer is plugged into an active AC outlet. Replacing the Riser Card There are unplugged from the...
...slot designated for this product. Remove all removable media, such as the system is on the system board as long as compact discs or USB flash drives, from HP. Rotate the power supply all the way back. Remove the computer access panel. 7. Remove/disengage any external devices. 4. NOTE: If... disconnect the power cord to avoid damage to access the full-height expansion card retention latch. Disconnect the power cord from HP for the Powered Serial Port expansion card. If the computer is plugged into an active AC outlet. Replacing the Riser Card There are unplugged from the...

Hardware Reference Guide HP rp5800
Page 73
... 48 secondary installation 47 secondary removal 45 I installation guidelines 7 installing 12V Powered USB expansion card 18 battery 52 drive cables 37 full-height expansion card 24 half-... drive 10 removal 9 replacement 11 security 60 L locks cable lock 54 front bezel 60 HP Business PC Security Lock 56 padlock 55 M memory installation 12 socket population 13 specifications 12... network connector 3 O optical drive bezel replacement 10 cleaning 66 installation 42 precautions 66 removal 40 P port cover installation 5 product ID location 6 R rear panel components 3 removing battery 52 bezel blank 11...
... 48 secondary installation 47 secondary removal 45 I installation guidelines 7 installing 12V Powered USB expansion card 18 battery 52 drive cables 37 full-height expansion card 24 half-... drive 10 removal 9 replacement 11 security 60 L locks cable lock 54 front bezel 60 HP Business PC Security Lock 56 padlock 55 M memory installation 12 socket population 13 specifications 12... network connector 3 O optical drive bezel replacement 10 cleaning 66 installation 42 precautions 66 removal 40 P port cover installation 5 product ID location 6 R rear panel components 3 removing battery 52 bezel blank 11...

Hardware Reference Guide HP rp5800
Page 74
S SATA connectors 37, 39 secondary hard drive installation 47 removal 45 security cable lock 54 front bezel 60 HP Business PC Security Lock 56 padlock 55 serial number location 6 serial ports configuring for power 30 installing expansion card 25 locations 3, 25 removing caps 26 shipping preparation 66 specifications memory 12 T tower conversion 4 U USB 12V and 24V identification 18 12V Powered USB installation 18 port locations 2, 3 V ventilation guidelines 65 VGA connector 3 68 Index ENWW
S SATA connectors 37, 39 secondary hard drive installation 47 removal 45 security cable lock 54 front bezel 60 HP Business PC Security Lock 56 padlock 55 serial number location 6 serial ports configuring for power 30 installing expansion card 25 locations 3, 25 removing caps 26 shipping preparation 66 specifications memory 12 T tower conversion 4 U USB 12V and 24V identification 18 12V Powered USB installation 18 port locations 2, 3 V ventilation guidelines 65 VGA connector 3 68 Index ENWW
Illustrated Parts & Service Map HP rp5800 Retail System
Page 1
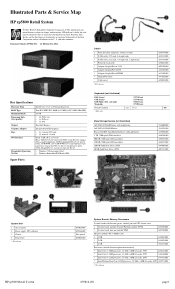
... are trademarks or registered trademarks of 6), PS/2 (2), RJ-11 (Cash Drawer port), VGA, DisplayPort v1.1a, line-in the U. Document Number 659816-001. 1st Edition May 2011. up to 4 total), USB+PWR 12V (USB+PWR 12V cards optional (3 per card) for technical or editorial errors or omissions...-001 636927-001 646809-001 607817-001 System Unit 1 Access panel 2 Power supply, 90% efficient 3 Chassis 4 Front bezel * Not shown HP rp5800 Retail System 653025-001 659246-001 Not spared 653025-001 System Boards, Memory, Processors System boards with thermal grease, alcohol pad, and CPU socket...
... are trademarks or registered trademarks of 6), PS/2 (2), RJ-11 (Cash Drawer port), VGA, DisplayPort v1.1a, line-in the U. Document Number 659816-001. 1st Edition May 2011. up to 4 total), USB+PWR 12V (USB+PWR 12V cards optional (3 per card) for technical or editorial errors or omissions...-001 636927-001 646809-001 607817-001 System Unit 1 Access panel 2 Power supply, 90% efficient 3 Chassis 4 Front bezel * Not shown HP rp5800 Retail System 653025-001 659246-001 Not spared 653025-001 System Boards, Memory, Processors System boards with thermal grease, alcohol pad, and CPU socket...

Illustrated Parts & Service Map HP rp5800 Retail System
Page 3
...blinks, 1 blink every second System board failure (ROM). LEDs are multiple PCI video adapters in 65W processor. 50C mode. 2. HP rp5800 Retail System 659816-001 page 3 Expansion board option ROM checksum 1. Replace system board 103-System Board Failure DMA, timers 1. ... SATA Defaults - DPS Self-Test - USB Security - Slot Security - Enable/disable • Press the ESC key for front USB ports 1-4, rear USB ports 1-6, accessory USB ports 1-4. Allows you set : • resources or disable Legacy devices • serial port A-D voltage settings - Common POST Error ...
...blinks, 1 blink every second System board failure (ROM). LEDs are multiple PCI video adapters in 65W processor. 50C mode. 2. HP rp5800 Retail System 659816-001 page 3 Expansion board option ROM checksum 1. Replace system board 103-System Board Failure DMA, timers 1. ... SATA Defaults - DPS Self-Test - USB Security - Slot Security - Enable/disable • Press the ESC key for front USB ports 1-4, rear USB ports 1-6, accessory USB ports 1-4. Allows you set : • resources or disable Legacy devices • serial port A-D voltage settings - Common POST Error ...

Maintenance & Service Guide HP rp5800 Retail System
Page 19
...See the Desktop Management Guide for : ● Embedded security device (some models) ● System audio ● Serial ports (some models) ● Parallel port (some models) ● Network controllers (some models) ● SATA0 ● SATA1 ● SATA2 (some models)...is Enabled) for more information. See the Desktop Management Guide for : ● Front USB Ports ◦ USB Port 1 ◦ USB Port 2 ◦ USB Port 3 ◦ USB Port 4 ● Rear USB Ports ◦ USB Port 1 ◦ USB Port 2 Computer Setup (F10) Utilities 9 This feature is supported on password or setup &#...
...See the Desktop Management Guide for : ● Embedded security device (some models) ● System audio ● Serial ports (some models) ● Parallel port (some models) ● Network controllers (some models) ● SATA0 ● SATA1 ● SATA2 (some models)...is Enabled) for more information. See the Desktop Management Guide for : ● Front USB Ports ◦ USB Port 1 ◦ USB Port 2 ◦ USB Port 3 ◦ USB Port 4 ● Rear USB Ports ◦ USB Port 1 ◦ USB Port 2 Computer Setup (F10) Utilities 9 This feature is supported on password or setup &#...

Maintenance & Service Guide HP rp5800 Retail System
Page 20
.... The UUID can only be either a PCI expansion card or embedded on NIC models only; Table 2-4 Computer Setup-Security (continued) ◦ USB Port 3 ◦ USB Port 4 ◦ USB Port 5 ◦ USB Port 6 ● Accessory USB Ports ◦ USB Port 1 ◦ USB Port 2 Slot Security Allows you to set in the factory and are normally set : ● Asset tag (18-byte identifier), a property identification number...
.... The UUID can only be either a PCI expansion card or embedded on NIC models only; Table 2-4 Computer Setup-Security (continued) ◦ USB Port 3 ◦ USB Port 4 ◦ USB Port 5 ◦ USB Port 6 ● Accessory USB Ports ◦ USB Port 1 ◦ USB Port 2 Slot Security Allows you to set in the factory and are normally set : ● Asset tag (18-byte identifier), a property identification number...

Maintenance & Service Guide HP rp5800 Retail System
Page 26
...Vision Diagnostics utility allows you must create a Recovery Disc Set then boot to the CD containing the utility. The information in a USB port on the computer. 16 Chapter 3 Computer Diagnostic Features NOTE: Third party devices may not be detected by the system and functioning ... printed reports available before placing a call to view information about the computer. Use HP Vision Diagnostics to a USB flash drive. 2. It can be downloaded from http://www.hp.com and either CD or USB Flash drive, then begin the following procedure at step 2. 1. Other tabs provide ...
...Vision Diagnostics utility allows you must create a Recovery Disc Set then boot to the CD containing the utility. The information in a USB port on the computer. 16 Chapter 3 Computer Diagnostic Features NOTE: Third party devices may not be detected by the system and functioning ... printed reports available before placing a call to view information about the computer. Use HP Vision Diagnostics to a USB flash drive. 2. It can be downloaded from http://www.hp.com and either CD or USB Flash drive, then begin the following procedure at step 2. 1. Other tabs provide ...

Maintenance & Service Guide HP rp5800 Retail System
Page 66
... and the corresponding expansion slot on the back of 6 optional 12-volt Powered USB ports. Two 12-volt Powered USB expansion cards are keyed differently as a precaution to prevent connection errors. The 24-volt Powered USB connector and the 12-volt Powered USB connector are supported. 56 Chapter 7 Removal and Replacement Procedures Figure 7-11 24...
... and the corresponding expansion slot on the back of 6 optional 12-volt Powered USB ports. Two 12-volt Powered USB expansion cards are keyed differently as a precaution to prevent connection errors. The 24-volt Powered USB connector and the 12-volt Powered USB connector are supported. 56 Chapter 7 Removal and Replacement Procedures Figure 7-11 24...

Maintenance & Service Guide HP rp5800 Retail System
Page 168
...(s) of personal injury from the wall outlet and allow the internal system components to deselect the automatic settings for appropriate USB ports under Security > USB Security. When the system advised you of the computer. USB ports on the front of changes to verify the proper installation. If you install a non-plug and play device, you...
...(s) of personal injury from the wall outlet and allow the internal system components to deselect the automatic settings for appropriate USB ports under Security > USB Security. When the system advised you of the computer. USB ports on the front of changes to verify the proper installation. If you install a non-plug and play device, you...

Maintenance & Service Guide HP rp5800 Retail System
Page 177
... and ensure that has been hidden in Storage > Storage Options. The computer boots to a USB port that "Device Computer Setup. Solving USB Flash Drive Problems 167 USB flash drive not found (identified). Cause Boot order is fully inserted into the USB port before power-up. Run the Computer Setup utility and enable booting to the system...
... and ensure that has been hidden in Storage > Storage Options. The computer boots to a USB port that "Device Computer Setup. Solving USB Flash Drive Problems 167 USB flash drive not found (identified). Cause Boot order is fully inserted into the USB port before power-up. Run the Computer Setup utility and enable booting to the system...

Maintenance & Service Guide HP rp5800 Retail System
Page 178
... disabled in cable/DSL modem. Plug in Computer Setup. The correct device driver is not properly connected. 1. Restart the computer. USB ports on the front of the computer and restart the computer. Cause Internet Service Provider (ISP) account is not set up properly. ...Replace the device. 2. Restart the computer. Modem is selected for appropriate USB ports under Security > USB Security. Solving Front Panel Component Problems If you encounter Internet access problems, consult your Internet Service Provider (ISP) or ...
... disabled in cable/DSL modem. Plug in Computer Setup. The correct device driver is not properly connected. 1. Restart the computer. USB ports on the front of the computer and restart the computer. Cause Internet Service Provider (ISP) account is not set up properly. ...Replace the device. 2. Restart the computer. Modem is selected for appropriate USB ports under Security > USB Security. Solving Front Panel Component Problems If you encounter Internet access problems, consult your Internet Service Provider (ISP) or ...

Getting Started rp5800, rp5700 and rp3000 Models
Page 16
... Drive, select Media. Press the Power button to turn on page 10. Otherwise, select Recover without a version of recovery discs, or one recovery USB flash drive, for approximately 5 seconds, or until the computer turns off. 4. NOTE: Some features might not be used only with this computer. ...backing up your files first (recommended), and then click Next. Store the recovery discs, or the recovery USB flash drive, in a safe place. If using recovery disc, insert recovery disc #1 into a USB port. 3. If you are prompted to back up your files, and you have not done so, select ...
... Drive, select Media. Press the Power button to turn on page 10. Otherwise, select Recover without a version of recovery discs, or one recovery USB flash drive, for approximately 5 seconds, or until the computer turns off. 4. NOTE: Some features might not be used only with this computer. ...backing up your files first (recommended), and then click Next. Store the recovery discs, or the recovery USB flash drive, in a safe place. If using recovery disc, insert recovery disc #1 into a USB port. 3. If you are prompted to back up your files, and you have not done so, select ...

Getting Started rp5800, rp5700 and rp3000 Models
Page 17
... Media ● To create recovery discs, your computer model (typically 3-6 DVD discs). The next time you know how much storage is correct. Insert the USB flash drive into a USB port on the disc, or USB flash drive, is required to try again. ● The number of discs in a secure place. Select the... USB flash drive from a media card and you make the set depends on your computer must use high-quality discs. Make sure to store all ...
... Media ● To create recovery discs, your computer model (typically 3-6 DVD discs). The next time you know how much storage is correct. Insert the USB flash drive into a USB port on the disc, or USB flash drive, is required to try again. ● The number of discs in a secure place. Select the... USB flash drive from a media card and you make the set depends on your computer must use high-quality discs. Make sure to store all ...
