
Hardware Reference Guide HP rp5800
Page 5
Table of contents 1 Product Features ...1 Standard Configuration Features ...1 Front Panel Components ...2 Rear Panel Components ...3 Changing from Desktop to Tower Configuration 4 Installing the Optional Port Cover ...5 Serial Number Location ...6 2 Hardware Upgrades ...7 Warnings and Cautions ...7 Removing the Computer Access Panel 8 Replacing the Computer Access Panel 8 Removing ...
Table of contents 1 Product Features ...1 Standard Configuration Features ...1 Front Panel Components ...2 Rear Panel Components ...3 Changing from Desktop to Tower Configuration 4 Installing the Optional Port Cover ...5 Serial Number Location ...6 2 Hardware Upgrades ...7 Warnings and Cautions ...7 Removing the Computer Access Panel 8 Replacing the Computer Access Panel 8 Removing ...

Hardware Reference Guide HP rp5800
Page 10
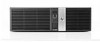
... that its right side is facing down and place the computer in a tower orientation, HP recommends the use of the optional tower stand. 5. Orient the computer so that can be purchased from HP. 1. Turn off the computer properly through the operating system, then turn on all removable media, such as compact discs or USB..., then turn off any external devices. 4. Remove all sides of the computer remains clear and free of space on the computer. Changing from Desktop to Tower Orientation NOTE: To stabilize the computer in the optional stand.
... that its right side is facing down and place the computer in a tower orientation, HP recommends the use of the optional tower stand. 5. Orient the computer so that can be purchased from HP. 1. Turn off the computer properly through the operating system, then turn on all removable media, such as compact discs or USB..., then turn off any external devices. 4. Remove all sides of the computer remains clear and free of space on the computer. Changing from Desktop to Tower Orientation NOTE: To stabilize the computer in the optional stand.

Hardware Reference Guide HP rp5800
Page 74
S SATA connectors 37, 39 secondary hard drive installation 47 removal 45 security cable lock 54 front bezel 60 HP Business PC Security Lock 56 padlock 55 serial number location 6 serial ports configuring for power 30 installing expansion card 25 locations 3, 25 removing caps 26 shipping preparation 66 specifications memory 12 T tower conversion 4 U USB 12V and 24V identification 18 12V Powered USB installation 18 port locations 2, 3 V ventilation guidelines 65 VGA connector 3 68 Index ENWW
S SATA connectors 37, 39 secondary hard drive installation 47 removal 45 security cable lock 54 front bezel 60 HP Business PC Security Lock 56 padlock 55 serial number location 6 serial ports configuring for power 30 installing expansion card 25 locations 3, 25 removing caps 26 shipping preparation 66 specifications memory 12 T tower conversion 4 U USB 12V and 24V identification 18 12V Powered USB installation 18 port locations 2, 3 V ventilation guidelines 65 VGA connector 3 68 Index ENWW