
Hardware Reference Guide HP rp5800
Page 6
Removing a 3.5-inch Secondary Hard Drive from a Drive Bay 45 Installing a 3.5-inch Secondary Hard Drive into a Drive Bay 47 Removing and Replacing the Primary 3.5-inch Internal Hard Drive 48 Appendix A Battery Replacement ...52 Appendix B External Security Devices ...54 Installing a Security Lock ...54 HP/Kensington MicroSaver Security Cable Lock 54 Padlock ...55 HP Business PC Security Lock 56 Front Bezel Security ...60 Appendix...
Removing a 3.5-inch Secondary Hard Drive from a Drive Bay 45 Installing a 3.5-inch Secondary Hard Drive into a Drive Bay 47 Removing and Replacing the Primary 3.5-inch Internal Hard Drive 48 Appendix A Battery Replacement ...52 Appendix B External Security Devices ...54 Installing a Security Lock ...54 HP/Kensington MicroSaver Security Cable Lock 54 Padlock ...55 HP Business PC Security Lock 56 Front Bezel Security ...60 Appendix...

Hardware Reference Guide HP rp5800
Page 8
...Front Panel Components 1 5.25-inch Optical Drive (optional) 5 NIC Link Light 2 Power On Light 6 USB Ports (2) 3 Dual-State Power Button 7 NIC Activity Light 4 Hard Drive Activity Light NOTE: Some models without an optical drive include an optical drive bezel with the computer and it is flashing... red, there is a problem with a bezel blank covering the optical drive bay. The Power On Light is...
...Front Panel Components 1 5.25-inch Optical Drive (optional) 5 NIC Link Light 2 Power On Light 6 USB Ports (2) 3 Dual-State Power Button 7 NIC Activity Light 4 Hard Drive Activity Light NOTE: Some models without an optical drive include an optical drive bezel with the computer and it is flashing... red, there is a problem with a bezel blank covering the optical drive bay. The Power On Light is...

Hardware Reference Guide HP rp5800
Page 43
...; Two hard drives and one optical drive ◦ Two hard drives and one eSATA drive ◦ One hard drive, one optical drive, and one eSATA drive ● The primary Serial ATA (SATA) hard drive must be different than the drive configuration shown above. Drive Positions Figure 2-39 Drive Positions Table 2-6 Drive Positions 1 3.5-inch Primary Hard Drive Bay 2 3.5-inch Secondary Hard Drive Bay 3 5.25-inch Optical Drive Bay NOTE: The drive configuration on...
...; Two hard drives and one optical drive ◦ Two hard drives and one eSATA drive ◦ One hard drive, one optical drive, and one eSATA drive ● The primary Serial ATA (SATA) hard drive must be different than the drive configuration shown above. Drive Positions Figure 2-39 Drive Positions Table 2-6 Drive Positions 1 3.5-inch Primary Hard Drive Bay 2 3.5-inch Secondary Hard Drive Bay 3 5.25-inch Optical Drive Bay NOTE: The drive configuration on...

Hardware Reference Guide HP rp5800
Page 44
... black eSATA connector on page 60 for more information). 38 Chapter 2 Hardware Upgrades ENWW HP has provided extra guide screws for the drive bays (five 6-32 standard screws and four M3 metric screws), installed in the new hard drive. The fifth is plugged into the system board with the first connector routed to the...
... black eSATA connector on page 60 for more information). 38 Chapter 2 Hardware Upgrades ENWW HP has provided extra guide screws for the drive bays (five 6-32 standard screws and four M3 metric screws), installed in the new hard drive. The fifth is plugged into the system board with the first connector routed to the...

Hardware Reference Guide HP rp5800
Page 45
... System Board Label 1 SATA0 SATA0 2 SATA1 SATA1 3 eSATA SATA2 Color dark blue light blue black Device Primary Hard Drive Secondary Hard Drive or Optical Drive if an eSATA Adapter is on page 64. Handle a drive carefully; Avoid exposing a hard drive to liquids, temperature extremes, or products that you are discharged of work and damage to identify the system...
... System Board Label 1 SATA0 SATA0 2 SATA1 SATA1 3 eSATA SATA2 Color dark blue light blue black Device Primary Hard Drive Secondary Hard Drive or Optical Drive if an eSATA Adapter is on page 64. Handle a drive carefully; Avoid exposing a hard drive to liquids, temperature extremes, or products that you are discharged of work and damage to identify the system...

Hardware Reference Guide HP rp5800
Page 50
...position. If an eSATA adapter is installed, connect the SATA data cable to the light blue SATA connector on page 39 for the optical drive is a three-headed cable that is installed. Route the data cable through the cable guides. 44 Chapter 2 Hardware Upgrades ENWW Rotate the...rear of the system board drive connectors. 13. Connect the SATA data cable to the black eSATA connector on the system board labeled SATA2 unless an eSATA adapter is routed from the system board to the primary hard drive, then to the secondary hard drive, then to System Board Drive Connections on the system board...
...position. If an eSATA adapter is installed, connect the SATA data cable to the light blue SATA connector on page 39 for the optical drive is a three-headed cable that is installed. Route the data cable through the cable guides. 44 Chapter 2 Hardware Upgrades ENWW Rotate the...rear of the system board drive connectors. 13. Connect the SATA data cable to the black eSATA connector on the system board labeled SATA2 unless an eSATA adapter is routed from the system board to the primary hard drive, then to the secondary hard drive, then to System Board Drive Connections on the system board...

Hardware Reference Guide HP rp5800
Page 51
... the access panel was on page 40 to its normal position. The 3.5-inch secondary hard drive is located underneath the 5.25-inch optical drive. Follow the procedure in Removing a 5.25-inch Optical Drive from the electrical outlet before removing the 3.5-inch secondary hard drive. 1. Reconnect the power cord and any cables or wires when rotating the...
... the access panel was on page 40 to its normal position. The 3.5-inch secondary hard drive is located underneath the 5.25-inch optical drive. Follow the procedure in Removing a 5.25-inch Optical Drive from the electrical outlet before removing the 3.5-inch secondary hard drive. 1. Reconnect the power cord and any cables or wires when rotating the...

Hardware Reference Guide HP rp5800
Page 52
Figure 2-52 Removing a Secondary Hard Drive 46 Chapter 2 Hardware Upgrades ENWW While pressing the drive retainer button, slide the drive back until it stops, then lift it up and out of the hard drive. Disconnect the power cable (1) and data cable (2) from the drive cage (1). 2. Figure 2-51 Disconnecting the Secondary Hard Drive Power and Data Cables 3. Press down on the green drive retainer button located on the left side of the drive to disengage the drive from the back of the drive cage (2).
Figure 2-52 Removing a Secondary Hard Drive 46 Chapter 2 Hardware Upgrades ENWW While pressing the drive retainer button, slide the drive back until it stops, then lift it up and out of the hard drive. Disconnect the power cable (1) and data cable (2) from the drive cage (1). 2. Figure 2-51 Disconnecting the Secondary Hard Drive Power and Data Cables 3. Press down on the green drive retainer button located on the left side of the drive to disengage the drive from the back of the drive cage (2).

Hardware Reference Guide HP rp5800
Page 53
To install a secondary hard drive: 1. HP has provided four extra 6-32 standard guide screws on page 40 to remove the 5.25-inch optical drive and access the 3.5-inch secondary hard drive bay. NOTE: When replacing the drive, transfer the four 6-32 standard guide screws from a Drive Bay on the front of the extra 6-32 standard guide screws location. Position...
To install a secondary hard drive: 1. HP has provided four extra 6-32 standard guide screws on page 40 to remove the 5.25-inch optical drive and access the 3.5-inch secondary hard drive bay. NOTE: When replacing the drive, transfer the four 6-32 standard guide screws from a Drive Bay on the front of the extra 6-32 standard guide screws location. Position...

Hardware Reference Guide HP rp5800
Page 54
...opening the computer. 2. CAUTION: Regardless of the drive cage. CAUTION: There are two cable guides that you remove the old hard drive, be sure to the new hard drive. Route the data cable through these guides. 6. The preinstalled 3.5-inch primary hard drive is plugged into an active AC outlet. You must... devices that were disengaged when the access panel was on the system board as long as compact discs or USB flash drives, from the old hard drive so that keep the data cable from the power outlet and disconnect any external devices. Removing and Replacing the Primary ...
...opening the computer. 2. CAUTION: Regardless of the drive cage. CAUTION: There are two cable guides that you remove the old hard drive, be sure to the new hard drive. Route the data cable through these guides. 6. The preinstalled 3.5-inch primary hard drive is plugged into an active AC outlet. You must... devices that were disengaged when the access panel was on the system board as long as compact discs or USB flash drives, from the old hard drive so that keep the data cable from the power outlet and disconnect any external devices. Removing and Replacing the Primary ...

Hardware Reference Guide HP rp5800
Page 55
... power supply to its upright position. The hard drive is on a stand, remove the computer from rotating all the way back. Figure 2-56 Rotating the Drive Cage Up 8. If the computer is located beneath the power supply. Figure 2-57 Raising the Power Supply ENWW Installing and Removing Drives 49 NOTE: If you are using...
... power supply to its upright position. The hard drive is on a stand, remove the computer from rotating all the way back. Figure 2-56 Rotating the Drive Cage Up 8. If the computer is located beneath the power supply. Figure 2-57 Raising the Power Supply ENWW Installing and Removing Drives 49 NOTE: If you are using...

Hardware Reference Guide HP rp5800
Page 56
... data cable (2) from the old hard drive to the hard drive (1). To install a hard drive, you must transfer the silver and blue isolation mounting guide screws from the back of the bay (2). While holding the latch down on the green release latch next to the new hard drive. 9. Figure 2-60 Installing Primary Hard Drive Guide Screws 50 Chapter 2 Hardware Upgrades...
... data cable (2) from the old hard drive to the hard drive (1). To install a hard drive, you must transfer the silver and blue isolation mounting guide screws from the back of the bay (2). While holding the latch down on the green release latch next to the new hard drive. 9. Figure 2-60 Installing Primary Hard Drive Guide Screws 50 Chapter 2 Hardware Upgrades...

Hardware Reference Guide HP rp5800
Page 57
...to the dark blue connector labeled SATA0 on the system board to avoid any hard drive performance problems. Figure 2-62 Connecting the Hard Drive Power and Data Cables NOTE: Refer to the back of the system board drive connectors. 14. Align the guide screws with the slots on a stand, ...stand. 17. Replace the access panel. 16. Figure 2-61 Installing the Hard Drive 13. Reconnect the power cord and any security devices that were disengaged when the access panel was on the chassis drive cage, press the hard drive down to their normal positions. 15. Connect the power cable (1) and ...
...to the dark blue connector labeled SATA0 on the system board to avoid any hard drive performance problems. Figure 2-62 Connecting the Hard Drive Power and Data Cables NOTE: Refer to the back of the system board drive connectors. 14. Align the guide screws with the slots on a stand, ...stand. 17. Replace the access panel. 16. Figure 2-61 Installing the Hard Drive 13. Reconnect the power cord and any security devices that were disengaged when the access panel was on the chassis drive cage, press the hard drive down to their normal positions. 15. Connect the power cable (1) and ...

Hardware Reference Guide HP rp5800
Page 72
...Never spray cleaning fluids directly on the unit. ● Avoid using any object or liquid falls into the drive, immediately unplug the computer and have it checked by an authorized HP service provider. Be sure that is turned off. 2. Remove and store all boards are seated properly and ...Follow these suggestions when preparing to electrical or magnetic impulses while stored or in their power sources, then from the computer. 5. Back up the hard drive files on , wait at least one hour before shipping the computer. 6. If you turn off the computer and external devices. 4. NOTE:...
...Never spray cleaning fluids directly on the unit. ● Avoid using any object or liquid falls into the drive, immediately unplug the computer and have it checked by an authorized HP service provider. Be sure that is turned off. 2. Remove and store all boards are seated properly and ...Follow these suggestions when preparing to electrical or magnetic impulses while stored or in their power sources, then from the computer. 5. Back up the hard drive files on , wait at least one hour before shipping the computer. 6. If you turn off the computer and external devices. 4. NOTE:...

Hardware Reference Guide HP rp5800
Page 73
... 17 memory 12 optical drive 42 optical drive bezel 10 powered serial port expansion card 25 primary hard drive 48 riser card 31 secondary hard drive 47 security locks 54 integration tray 62 F front bezel blank removal 11 optical drive 10 removal 9 replacement 11 security 60 L locks cable lock 54 front bezel 60 HP Business PC Security Lock...
... 17 memory 12 optical drive 42 optical drive bezel 10 powered serial port expansion card 25 primary hard drive 48 riser card 31 secondary hard drive 47 security locks 54 integration tray 62 F front bezel blank removal 11 optical drive 10 removal 9 replacement 11 security 60 L locks cable lock 54 front bezel 60 HP Business PC Security Lock...

Hardware Reference Guide HP rp5800
Page 74
S SATA connectors 37, 39 secondary hard drive installation 47 removal 45 security cable lock 54 front bezel 60 HP Business PC Security Lock 56 padlock 55 serial number location 6 serial ports configuring for power 30 installing expansion card 25 locations 3, 25 removing caps 26 shipping preparation 66 specifications memory 12 T tower conversion 4 U USB 12V and 24V identification 18 12V Powered USB installation 18 port locations 2, 3 V ventilation guidelines 65 VGA connector 3 68 Index ENWW
S SATA connectors 37, 39 secondary hard drive installation 47 removal 45 security cable lock 54 front bezel 60 HP Business PC Security Lock 56 padlock 55 serial number location 6 serial ports configuring for power 30 installing expansion card 25 locations 3, 25 removing caps 26 shipping preparation 66 specifications memory 12 T tower conversion 4 U USB 12V and 24V identification 18 12V Powered USB installation 18 port locations 2, 3 V ventilation guidelines 65 VGA connector 3 68 Index ENWW
Illustrated Parts & Service Map HP rp5800 Retail System
Page 1
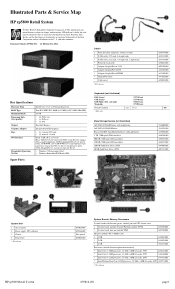
...16X SATA DVD±RW drive with LightScribe 16X SATA DVD-ROM drive Blu-ray BD-RW SuperMulti DL Drive with LightScribe 1 TB, 7200 rpm SATA hard drive 500 GB, 7200 rpm SATA hard drive 250 GB, 7200 rpm SATA hard drive 160 GB Solid State Drive (SSD) 80 GB Solid State Drive (SSD) 655579-001 ...638813-001 638814-001 653023-001 603250-001 484156-001 617450-001 487562-001 653028-001 -001 581600-001 581599-001 617030-001 636930-001 636929-001 636927-001 646809-001 607817-001 System Unit 1 Access panel 2 Power supply, 90% efficient 3 Chassis 4 Front bezel * Not shown HP rp5800...
...16X SATA DVD±RW drive with LightScribe 16X SATA DVD-ROM drive Blu-ray BD-RW SuperMulti DL Drive with LightScribe 1 TB, 7200 rpm SATA hard drive 500 GB, 7200 rpm SATA hard drive 250 GB, 7200 rpm SATA hard drive 160 GB Solid State Drive (SSD) 80 GB Solid State Drive (SSD) 655579-001 ...638813-001 638814-001 653023-001 603250-001 484156-001 617450-001 487562-001 653028-001 -001 581600-001 581599-001 617030-001 636930-001 636929-001 636927-001 646809-001 607817-001 System Unit 1 Access panel 2 Power supply, 90% efficient 3 Chassis 4 Front bezel * Not shown HP rp5800...

Illustrated Parts & Service Map HP rp5800 Retail System
Page 2
... FRNT AUD Front panel connector DISPLAYPORT DisplayPort connector FRONT_USB2 2nd USB connector RPOS RISER Riser card connector SATA0 1st hard drive X16PCIEXP PCIe X16 slot HP rp5800 Retail System 659816-001 page 2 As soon as the computer turns on the computer and allow it to ...176;C Thermal Kit 1 Heat sink, copper-base 2 Partition 3 Radial fan, 70mm 4 Fan holder 5 Vented slot covers 6 Front bezel trim (no optical drive) System Board 649033-001 Miscellaneous Parts 1 Heat sink (includes replacement thermal material) 2 Chassis fan 3 Speaker 4 Printer port, PCI card 5 Fan duct 6 ...
... FRNT AUD Front panel connector DISPLAYPORT DisplayPort connector FRONT_USB2 2nd USB connector RPOS RISER Riser card connector SATA0 1st hard drive X16PCIEXP PCIe X16 slot HP rp5800 Retail System 659816-001 page 2 As soon as the computer turns on the computer and allow it to ...176;C Thermal Kit 1 Heat sink, copper-base 2 Partition 3 Radial fan, 70mm 4 Fan holder 5 Vented slot covers 6 Front bezel trim (no optical drive) System Board 649033-001 Miscellaneous Parts 1 Heat sink (includes replacement thermal material) 2 Chassis fan 3 Speaker 4 Printer port, PCI card 5 Fan duct 6 ...

Illustrated Parts & Service Map HP rp5800 Retail System
Page 3
...214-DIMM Configuration Warning Populated DIMM configura- Replace graphics card. 1720-SMART Hard Drive Hard drive is unable to Temporarily Override Boot Order Security Setup Password - Determine if hard drive is violating the thermal environment requirement. The system is giving correct error ...1 blink every second Pre-video memory error. followed by a 2 second pause. 3 blinks, 1 blink every second Processor not installed. HP rp5800 Retail System 659816-001 page 3 Clear CMOS memory, reboot 4. Remove expansion boards. 3. Reset the date and time under Storage > DPS...
...214-DIMM Configuration Warning Populated DIMM configura- Replace graphics card. 1720-SMART Hard Drive Hard drive is unable to Temporarily Override Boot Order Security Setup Password - Determine if hard drive is violating the thermal environment requirement. The system is giving correct error ...1 blink every second Pre-video memory error. followed by a 2 second pause. 3 blinks, 1 blink every second Processor not installed. HP rp5800 Retail System 659816-001 page 3 Clear CMOS memory, reboot 4. Remove expansion boards. 3. Reset the date and time under Storage > DPS...

Maintenance & Service Guide HP rp5800 Retail System
Page 6
... listing ...28 5 Serial and Parallel ATA Drive Guidelines and Features 30 SATA Hard Drives ...30 SATA Hard Drive Cables ...31 SATA Data Cable ...31 SATA Power Cable ...31 PATA Device Information ...32 ATA SMART Drives ...32 Hard Drive Capacities ...32 6 Identifying the Chassis, Routine Care, and Disassembly Preparation 33 Chassis Designations ...33 rp5800 ...33 Electrostatic Discharge Information ...34 Generating...
... listing ...28 5 Serial and Parallel ATA Drive Guidelines and Features 30 SATA Hard Drives ...30 SATA Hard Drive Cables ...31 SATA Data Cable ...31 SATA Power Cable ...31 PATA Device Information ...32 ATA SMART Drives ...32 Hard Drive Capacities ...32 6 Identifying the Chassis, Routine Care, and Disassembly Preparation 33 Chassis Designations ...33 rp5800 ...33 Electrostatic Discharge Information ...34 Generating...
