
Drives
Page 1
Drives Document Part Number: 396318-001 December 2005 This guide explains the computer hard drive and optical disc drive.
Drives Document Part Number: 396318-001 December 2005 This guide explains the computer hard drive and optical disc drive.

Drives
Page 2
Contents 1 Drive care 2 IDE drive light 3 Hard drive 4 Optical drives Inserting an optical disc 4-3 Removing an optical disc (with power 4-4 Removing an optical disc (without power 4-5 Avoiding standby or hibernation 4-6 Drives ii
Contents 1 Drive care 2 IDE drive light 3 Hard drive 4 Optical drives Inserting an optical disc 4-3 Removing an optical disc (with power 4-4 Removing an optical disc (without power 4-5 Avoiding standby or hibernation 4-6 Drives ii

Drives
Page 4
... such as conveyor belts, use excessive force when inserting a drive into a drive bay. ■ Do not type on the keyboard or move a computer or external hard drive from one location to another. ■ Before handling a drive, discharge static electricity by touching the unpainted metal surface of the... drive. ■ Do not touch the connector pins on a removable drive or on , and then shut it with ...
... such as conveyor belts, use excessive force when inserting a drive into a drive bay. ■ Do not type on the keyboard or move a computer or external hard drive from one location to another. ■ Before handling a drive, discharge static electricity by touching the unpainted metal surface of the... drive. ■ Do not touch the connector pins on a removable drive or on , and then shut it with ...

Drives
Page 5
Drives 2-1 2 IDE drive light The IDE drive light blinks when either the primary hard drive or an optical drive is being accessed.
Drives 2-1 2 IDE drive light The IDE drive light blinks when either the primary hard drive or an optical drive is being accessed.

Drives
Page 6
...computer through the operating system. Save your work. 2. Drives 3-1 Then shut down the computer before removing the hard drive from the hard drive bay. Turn the computer upside down the computer and close the display. 3. Do not remove the hard drive while the computer is off or in hibernation. &#...9632; If you . To remove the hard drive: 1. Shut down , with the hard drive bay ...
...computer through the operating system. Save your work. 2. Drives 3-1 Then shut down the computer before removing the hard drive from the hard drive bay. Turn the computer upside down the computer and close the display. 3. Do not remove the hard drive while the computer is off or in hibernation. &#...9632; If you . To remove the hard drive: 1. Shut down , with the hard drive bay ...

Drives
Page 7
Loosen the 2 hard drive cover screws 1. 5. Lift the hard drive cover away from the computer 2. 3-2 Drives Hard drive 4.
Loosen the 2 hard drive cover screws 1. 5. Lift the hard drive cover away from the computer 2. 3-2 Drives Hard drive 4.

Drives
Page 8
Drives 3-3 Loosen the hard drive screw 1. 7. Lift the hard drive 3 from the computer. Pull the hard drive tab 2 to the left to disconnect the hard drive. 8. Hard drive 6.
Drives 3-3 Loosen the hard drive screw 1. 7. Lift the hard drive 3 from the computer. Pull the hard drive tab 2 to the left to disconnect the hard drive. 8. Hard drive 6.

Drives
Page 9
Pull the hard drive tab 2 to the right to connect the hard drive. 3. Lower the hard drive into the hard drive bay 1. 2. Tighten the hard drive screw 3. 3-4 Drives Hard drive To install a hard drive: 1.
Pull the hard drive tab 2 to the right to connect the hard drive. 3. Lower the hard drive into the hard drive bay 1. 2. Tighten the hard drive screw 3. 3-4 Drives Hard drive To install a hard drive: 1.

Drives
Page 10
Tighten the hard drive cover screws 3. Align the tabs 1 on the hard drive cover with the notches on the computer. 5. Hard drive 4. Drives 3-5 Close the cover 2. 6.
Tighten the hard drive cover screws 3. Align the tabs 1 on the hard drive cover with the notches on the computer. 5. Hard drive 4. Drives 3-5 Close the cover 2. 6.

Memory Modules
Page 18
...Computer. 2. Memory Modules 2-1 2 Effects of free space on the hard drive: 1. Right-click the hard drive listing, and then click Properties. If you experience problems with hibernation after increasing memory, verify that your hard drive has enough free space to accommodate a larger hibernation file. To ...display the amount of increasing memory When random access memory (RAM) increases, the operating system increases the hard drive space reserved for the hibernation file. To display the amount of space required by the hibernation file: » Select Start ...
...Computer. 2. Memory Modules 2-1 2 Effects of free space on the hard drive: 1. Right-click the hard drive listing, and then click Properties. If you experience problems with hibernation after increasing memory, verify that your hard drive has enough free space to accommodate a larger hibernation file. To ...display the amount of increasing memory When random access memory (RAM) increases, the operating system increases the hard drive space reserved for the hibernation file. To display the amount of space required by the hibernation file: » Select Start ...

Notebook Tour
Page 5
... an external power source, the light is turned off until the battery reaches a low-battery condition. 7 IDE (Integrated Drive Electronics) drive light Blinking: The hard drive or optical drive is being accessed. *There are fully charged. Both display the same information. Blinking amber: A battery pack that is ...pack is always visible on the front of the computer. The light on the wireless button is visible only when the computer is charging. Notebook Tour 1-3 Components Component Description 3 Caps lock light On: Caps lock is on. 4 Num lock light On: Num lock is on ...
... an external power source, the light is turned off until the battery reaches a low-battery condition. 7 IDE (Integrated Drive Electronics) drive light Blinking: The hard drive or optical drive is being accessed. *There are fully charged. Both display the same information. Blinking amber: A battery pack that is ...pack is always visible on the front of the computer. The light on the wireless button is visible only when the computer is charging. Notebook Tour 1-3 Components Component Description 3 Caps lock light On: Caps lock is on. 4 Num lock light On: Num lock is on ...

Notebook Tour
Page 15
... device to restore computer functionality. To contact Customer Care, click Contact a Technician in your country. Then contact Customer Care. Bottom components Components Component 1 Hard drive bay Description Holds the hard drive. 2 Expansion memory module Contains the expansion memory and Mini PCI card module slot and a wireless LAN device. compartment Ä To prevent an unresponsive...only a Mini PCI device authorized for use in the computer by the governmental agency that regulates wireless devices in the Help and Support Center. (Continued) Notebook Tour 1-13
... device to restore computer functionality. To contact Customer Care, click Contact a Technician in your country. Then contact Customer Care. Bottom components Components Component 1 Hard drive bay Description Holds the hard drive. 2 Expansion memory module Contains the expansion memory and Mini PCI card module slot and a wireless LAN device. compartment Ä To prevent an unresponsive...only a Mini PCI device authorized for use in the computer by the governmental agency that regulates wireless devices in the Help and Support Center. (Continued) Notebook Tour 1-13

Notebook Tour
Page 23
... latch 1-14 battery pack, identifying 1-17 bays battery 1-14, 1-18 hard drive 1-13 Bluetooth label 1-18 buttons Info Center 1-6 mute 1-6 optical drive 1-11 PC Card slot eject 1-12 power 1-5 Presentation mode 1-6 TouchPad 1-4 volume ...1-6 wireless 1-6 C cables modem 1-12 network 1-12 RJ-11 (modem) 1-17 caps lock light 1-3 Certificate of Authenticity label 1-18 compartments expansion memory module 1-13 Mini PCI card 1-13 components bottom 1-13 front 1-9 left-side 1-12 rear 1-10 right-side 1-11 top 1-2 Notebook...
... latch 1-14 battery pack, identifying 1-17 bays battery 1-14, 1-18 hard drive 1-13 Bluetooth label 1-18 buttons Info Center 1-6 mute 1-6 optical drive 1-11 PC Card slot eject 1-12 power 1-5 Presentation mode 1-6 TouchPad 1-4 volume ...1-6 wireless 1-6 C cables modem 1-12 network 1-12 RJ-11 (modem) 1-17 caps lock light 1-3 Certificate of Authenticity label 1-18 compartments expansion memory module 1-13 Mini PCI card 1-13 components bottom 1-13 front 1-9 left-side 1-12 rear 1-10 right-side 1-11 top 1-2 Notebook...
Notebook Tour
Page 24
...identifying 1-17 D digital cards 1-9 display release latch 1-9 display switch, identifying 1-5 docking connector 1-14 drives, optical 1-11 E eject button, PC Card slot 1-12 environmental specifications 2-1 exhaust vents 1-12, 1-14 external monitor port 1-12 F fn key 1-7 function keys 1-8 H hard drive bay, identifying 1-13 headphone (audio-out) jack 1-11 hotkey commands initiate standby 1-8 hotkeys, Quick ... logo 1-7 L labels Microsoft Certificate of Authenticity 1-18 modem approval 1-18 regulatory 1-18 service tag 1-18 wireless certification 1-18 WLAN 1-18 WWAN 1-18 Index-2 Notebook Tour
...identifying 1-17 D digital cards 1-9 display release latch 1-9 display switch, identifying 1-5 docking connector 1-14 drives, optical 1-11 E eject button, PC Card slot 1-12 environmental specifications 2-1 exhaust vents 1-12, 1-14 external monitor port 1-12 F fn key 1-7 function keys 1-8 H hard drive bay, identifying 1-13 headphone (audio-out) jack 1-11 hotkey commands initiate standby 1-8 hotkeys, Quick ... logo 1-7 L labels Microsoft Certificate of Authenticity 1-18 modem approval 1-18 regulatory 1-18 service tag 1-18 wireless certification 1-18 WLAN 1-18 WWAN 1-18 Index-2 Notebook Tour

Power
Page 9
... during hibernation, resuming from a docking device. ■ Do not add or remove memory modules. ■ Do not insert or remove hard drives or optical drives. ■ Do not connect or disconnect external devices. ■ Do not insert or remove an external media card, such as a MultiMediaCard ...or a PC Card. Hibernation saves your work to the screen where you have set a power-on the hard drive, and then shuts down the computer. Standby and hibernation Hibernation Ä CAUTION: If the configuration of...
... during hibernation, resuming from a docking device. ■ Do not add or remove memory modules. ■ Do not insert or remove hard drives or optical drives. ■ Do not connect or disconnect external devices. ■ Do not insert or remove an external media card, such as a MultiMediaCard ...or a PC Card. Hibernation saves your work to the screen where you have set a power-on the hard drive, and then shuts down the computer. Standby and hibernation Hibernation Ä CAUTION: If the configuration of...

Power
Page 11
Hibernation saves your work is stored in standby, it uses less power than when it is on the hard drive, and then shuts down the computer and remove the battery pack to extend the life of networking communications or perform any computer functions while the ...
Hibernation saves your work is stored in standby, it uses less power than when it is on the hard drive, and then shuts down the computer and remove the battery pack to extend the life of networking communications or perform any computer functions while the ...

Power
Page 22
... area, and then click Adjust Power Properties. 2. Setting a security prompt You can also set a power scheme that initiates standby or turns off the display or hard drive after a time interval that prompts you want to system components. Click Apply. Click the Advanced tab. 3. Click Apply. To set a password prompt: 1. Click the Power...
... area, and then click Adjust Power Properties. 2. Setting a security prompt You can also set a power scheme that initiates standby or turns off the display or hard drive after a time interval that prompts you want to system components. Click Apply. Click the Advanced tab. 3. Click Apply. To set a password prompt: 1. Click the Power...

Power
Page 40
... plan to leave the computer unattended during the discharge, save your system during the discharge process: ❏ The monitor will not turn off automatically. ❏ Hard drive speed will not decrease automatically while the computer is idle. ❏ System-initiated standby will discharge faster while the computer is in use the computer...
... plan to leave the computer unattended during the discharge, save your system during the discharge process: ❏ The monitor will not turn off automatically. ❏ Hard drive speed will not decrease automatically while the computer is idle. ❏ System-initiated standby will discharge faster while the computer is in use the computer...

HP Compaq nc6140 Notebook PC - Maintenance and Service Guide
Page 8
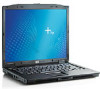
and 40-GB high-capacity hard drive, varying by computer model ■ 256-MB DDR2 synchronous DRAM (SDRAM) at 400 and 533 MHz, expandable to 2.0 GB ■ Microsoft® Windows® XP ... support for Mini Card broadband wireless wide area network (WWAN) device ■ Support for one or two Type II PC Card slots, with support for both 32-bit (CardBus) and 16-bit PC Cards, varying by computer model: ❏ 15.0-inch, SXGA+WVA, TFT (1400 × 1050) with over 16.8 million colors...
and 40-GB high-capacity hard drive, varying by computer model ■ 256-MB DDR2 synchronous DRAM (SDRAM) at 400 and 533 MHz, expandable to 2.0 GB ■ Microsoft® Windows® XP ... support for Mini Card broadband wireless wide area network (WWAN) device ■ Support for one or two Type II PC Card slots, with support for both 32-bit (CardBus) and 16-bit PC Cards, varying by computer model: ❏ 15.0-inch, SXGA+WVA, TFT (1400 × 1050) with over 16.8 million colors...

HP Compaq nc6140 Notebook PC - Maintenance and Service Guide
Page 13
Stereo speakers (2) Produce stereo sound. Drive light Blinking: The hard drive or optical drive is being accessed. Display release latch Opens the computer. 6-in-1 Digital Media Slot Supports 6 optional digital memory card formats: SD (Secure Digital) Memory Card, MultiMediaCard, ...
Stereo speakers (2) Produce stereo sound. Drive light Blinking: The hard drive or optical drive is being accessed. Display release latch Opens the computer. 6-in-1 Digital Media Slot Supports 6 optional digital memory card formats: SD (Secure Digital) Memory Card, MultiMediaCard, ...

