
End User License Agreement
Page 1
...documentation. You do not have Software Product into Your Computer's AGREE TO ALL TERMS AND temporary memory (RAM) for use on more than one computer. c. You may accompany the HP Product. Reservation of download. Notwithstanding the terms and conditions of this EULA may make archival or...Other software may load the Software ON THE CONDITION THAT YOU Product into the local memory or storage device of the original Software Product's proprietary notices and that governs your HP product ("HP Product"), that is used only for use of using the Software INSTALLING, COPYING, ...
...documentation. You do not have Software Product into Your Computer's AGREE TO ALL TERMS AND temporary memory (RAM) for use on more than one computer. c. You may accompany the HP Product. Reservation of download. Notwithstanding the terms and conditions of this EULA may make archival or...Other software may load the Software ON THE CONDITION THAT YOU Product into the local memory or storage device of the original Software Product's proprietary notices and that governs your HP product ("HP Product"), that is used only for use of using the Software INSTALLING, COPYING, ...
Limited Warranty and Support Guide - Refurbished
Page 9
...The transfer may copy the Software Product into Your Computer's temporary memory (RAM) for which constitutes non-proprietary HP software or software provided under public license by HP unless HP provides other terms along with your HP product ("HP Product"), that is not otherwise subject to the terms and ... of this EULA, all component parts, media, printed materials, this EULA may load the Software Product into the local memory or storage device of the HP Product. f. After upgrading, you may no longer use of any Microsoft operating system software contained in any other terms ...
...The transfer may copy the Software Product into Your Computer's temporary memory (RAM) for which constitutes non-proprietary HP software or software provided under public license by HP unless HP provides other terms along with your HP product ("HP Product"), that is not otherwise subject to the terms and ... of this EULA, all component parts, media, printed materials, this EULA may load the Software Product into the local memory or storage device of the HP Product. f. After upgrading, you may no longer use of any Microsoft operating system software contained in any other terms ...

Safety and Regulatory Information Desktops, Thin Clients, and Personal Workstations
Page 29
... requirement in SJ/T11363-2006. Table 2-2 Toxic and Hazardous Substances and Elements (continued) Part Name Lead (Pb) Mercury (Hg) Cadmium (Cd) Hexavalent Chromium (Cr(VI)) Memory X O O O I/O PCAs X O O O Power supply X O O O Keyboard X O O O Mouse X O O O Chassis/Other X O O O Fans X O O O Internal/External Media Reading X O O O Devices External Control Devices X O O O Cable X O O O Hard Disk Drive X O O O Display X X O O Polybrominated biphenyls (PBB) Polybrominated...
... requirement in SJ/T11363-2006. Table 2-2 Toxic and Hazardous Substances and Elements (continued) Part Name Lead (Pb) Mercury (Hg) Cadmium (Cd) Hexavalent Chromium (Cr(VI)) Memory X O O O I/O PCAs X O O O Power supply X O O O Keyboard X O O O Mouse X O O O Chassis/Other X O O O Fans X O O O Internal/External Media Reading X O O O Devices External Control Devices X O O O Cable X O O O Hard Disk Drive X O O O Display X X O O Polybrominated biphenyls (PBB) Polybrominated...

Upgrade and Service
Page 35
Removing and Replacing Memory
Removing and Replacing Memory

Upgrade and Service
Page 36
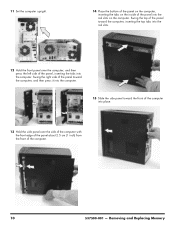
...the electronic components inside the computer. CAUTION: Static electricity can use a flathead screwdriver with the power cord attached or power applied. Removing and Replacing Memory Observe the following screw (Torque screw). Remove the Personal Media Drive, if it is present. 2 Turn off the computer. 3 Disconnect all ...may not be injured from the front and the back of the computer. Avoid touching sharp edges inside the computer. Removing Memory 1 Remove the Pocket Media Drive, if it is present. Disconnect the power cord last. You may damage your computer and the maximum...
...the electronic components inside the computer. CAUTION: Static electricity can use a flathead screwdriver with the power cord attached or power applied. Removing and Replacing Memory Observe the following screw (Torque screw). Remove the Personal Media Drive, if it is present. 2 Turn off the computer. 3 Disconnect all ...may not be injured from the front and the back of the computer. Avoid touching sharp edges inside the computer. Removing Memory 1 Remove the Pocket Media Drive, if it is present. Disconnect the power cord last. You may damage your computer and the maximum...

Upgrade and Service
Page 37
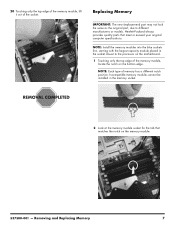
Pull each of the computer to release it. 7 Locate the three tabs that secure the front panel to release the panel. 537500-001 - 4 Loosen the side panel thumbscrew on the back of the computer. 6 Tilt out the top of the side panel, and then lift the panel from the computer. 5 Grasp the handle, and pull the side panel about 2.5 cm (1 inch) toward the back of the tabs out slightly, away from the computer, to the computer. Removing and Replacing Memory 3
Pull each of the computer to release it. 7 Locate the three tabs that secure the front panel to release the panel. 537500-001 - 4 Loosen the side panel thumbscrew on the back of the computer. 6 Tilt out the top of the side panel, and then lift the panel from the computer. 5 Grasp the handle, and pull the side panel about 2.5 cm (1 inch) toward the back of the tabs out slightly, away from the computer, to the computer. Removing and Replacing Memory 3

Upgrade and Service
Page 38
8 Swing the front panel open toward the left, and then lift it off the computer. 11 Squeeze the top and bottom of the PMD connector and remove it from the top cage. 9 Lay the computer on the side. 12 Remove the two screws that secure the drive cage in the computer. 10 Locate the hard disk drive cage inside the computer. Removing and Replacing Memory You must remove the cage to access memory. 4 537500-001 -
8 Swing the front panel open toward the left, and then lift it off the computer. 11 Squeeze the top and bottom of the PMD connector and remove it from the top cage. 9 Lay the computer on the side. 12 Remove the two screws that secure the drive cage in the computer. 10 Locate the hard disk drive cage inside the computer. Removing and Replacing Memory You must remove the cage to access memory. 4 537500-001 -

Upgrade and Service
Page 39
13 Insert a long screwdriver into the opening in the cage. 15 Slide the cage toward the top of the computer to release it. 14 Using the screwdriver, press the latch for the drive cage inside the computer. 16 Lift the cage partway out of the computer. 537500-001 - Removing and Replacing Memory 5
13 Insert a long screwdriver into the opening in the cage. 15 Slide the cage toward the top of the computer to release it. 14 Using the screwdriver, press the latch for the drive cage inside the computer. 16 Lift the cage partway out of the computer. 537500-001 - Removing and Replacing Memory 5

Upgrade and Service
Page 40
... when there are keyed and can be inserted only when aligned properly with the connector on the drive. NOTE: The location and number of the memory socket to the processor (1) on each plug, and then pull the plug (2 or 4) from the connector. MASTER SLAVE To CPU For plugs ...6 537500-001 - The plugs on your computer. In addition, some plugs have a latch that must be paired sets, coded blue and black. Removing and Replacing Memory Set the cage aside. 1 19 Push down the retaining clip on the motherboard. The blue sockets are filled first, starting with a latch, press the latch...
... when there are keyed and can be inserted only when aligned properly with the connector on the drive. NOTE: The location and number of the memory socket to the processor (1) on each plug, and then pull the plug (2 or 4) from the connector. MASTER SLAVE To CPU For plugs ...6 537500-001 - The plugs on your computer. In addition, some plugs have a latch that must be paired sets, coded blue and black. Removing and Replacing Memory Set the cage aside. 1 19 Push down the retaining clip on the motherboard. The blue sockets are filled first, starting with a latch, press the latch...
Upgrade and Service
Page 41
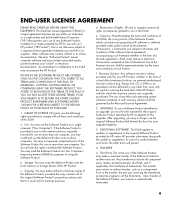
...due to the processor on the motherboard. 1 Touching only the top edge of the memory module, locate the notch on the memory module. 537500-001 - NOTE: Each type of the socket. Incompatible memory modules cannot be installed in the socket closest to different manufacturers or models. NOTE: ...Install the memory modules into the blue sockets first, starting with the largest capacity module placed in the memory socket. 2 Look at the memory module socket for the tab that meet or exceed your original computer specifications....
...due to the processor on the motherboard. 1 Touching only the top edge of the memory module, locate the notch on the memory module. 537500-001 - NOTE: Each type of the socket. Incompatible memory modules cannot be installed in the socket closest to different manufacturers or models. NOTE: ...Install the memory modules into the blue sockets first, starting with the largest capacity module placed in the memory socket. 2 Look at the memory module socket for the tab that meet or exceed your original computer specifications....

Upgrade and Service
Page 42
Removing and Replacing Memory 3 Position the memory module over the socket, aligning the notch with the tab in the socket, and then firmly press the module down into the socket... 4 Tip up the hard disk drive cage, and locate the four tabs on the bottom. ...until the retaining clips at the ends of the socket lock the module into place. 5 Locate the four slots inside the computer that match the tabs on the bottom of the hard disk drive cage. 8 537500-001 -
Removing and Replacing Memory 3 Position the memory module over the socket, aligning the notch with the tab in the socket, and then firmly press the module down into the socket... 4 Tip up the hard disk drive cage, and locate the four tabs on the bottom. ...until the retaining clips at the ends of the socket lock the module into place. 5 Locate the four slots inside the computer that match the tabs on the bottom of the hard disk drive cage. 8 537500-001 -

Upgrade and Service
Page 43
Removing and Replacing Memory 9 6 Hold the cage over the computer, and connect the hard disk drive power and data cables. 8 Slide the cage toward the bottom of the computer until it locks into place. 7 Lower the cage into the computer, inserting the four tabs on the bottom of the cage into the computer slots. 9 Insert and tighten the two screws that secure the cage in the computer. 10 Squeeze the top and bottom of the PMD connector and insert it into the top cage. 537500-001 -
Removing and Replacing Memory 9 6 Hold the cage over the computer, and connect the hard disk drive power and data cables. 8 Slide the cage toward the bottom of the computer until it locks into place. 7 Lower the cage into the computer, inserting the four tabs on the bottom of the cage into the computer slots. 9 Insert and tighten the two screws that secure the cage in the computer. 10 Squeeze the top and bottom of the PMD connector and insert it into the top cage. 537500-001 -
Upgrade and Service
Page 44
Removing and Replacing Memory Swing the top of the panel toward the front of the computer into place. 13 Hold the side panel over the computer, and then press ...
Removing and Replacing Memory Swing the top of the panel toward the front of the computer into place. 13 Hold the side panel over the computer, and then press ...

Upgrade and Service
Page 45
Removing and Replacing Memory 11 16 Tighten the side panel thumbscrew on the back of the computer. 17 Reconnect all peripherals and cables, and then turn on the computer. 537500-001 -
Removing and Replacing Memory 11 16 Tighten the side panel thumbscrew on the back of the computer. 17 Reconnect all peripherals and cables, and then turn on the computer. 537500-001 -
Warranty
Page 12
...you comply with your HP Product, whether in its online documentation. If the Software Product is provided to you via the internet and was originally purchased. You may make archival or back-up purposes. You may copy the Software Product into Your Computer's temporary memory (RAM) for use... on more than one computer, you may only be used only for use on a single computer ("Your Computer"). HP and its suppliers. b. e. You do not have the right to distribute the...
...you comply with your HP Product, whether in its online documentation. If the Software Product is provided to you via the internet and was originally purchased. You may make archival or back-up purposes. You may copy the Software Product into Your Computer's temporary memory (RAM) for use... on more than one computer, you may only be used only for use on a single computer ("Your Computer"). HP and its suppliers. b. e. You do not have the right to distribute the...

Warranty
Page 28
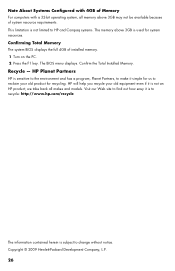
...Web site to change without notice. Confirming Total Memory The system BIOS displays the full 4GB of installed memory. 1 Turn on the PC. 2 Press the F1 key. HP will help you recycle your old product for us to HP and Compaq systems. The memory above 3GB may not be available because of ...system resource requirements. HP Planet Partners HP is not an HP product; This limitation is not...
...Web site to change without notice. Confirming Total Memory The system BIOS displays the full 4GB of installed memory. 1 Turn on the PC. 2 Press the F1 key. HP will help you recycle your old product for us to HP and Compaq systems. The memory above 3GB may not be available because of ...system resource requirements. HP Planet Partners HP is not an HP product; This limitation is not...

Warranty
Page 12
...the form of a discrete agreement, shrink wrap license or electronic license terms accepted at time of download. Use. c. The use of the HP Product. Other software may use the Software Product on more than one computer. e. The term "Software Product" means computer software and may ... ONLY ON THE CONDITION THAT YOU AGREE TO ALL TERMS AND CONDITIONS OF THIS EULA. You may copy the Software Product into Your Computer's temporary memory (RAM) for use on a single computer ("Your Computer"). f. b. Copying. You may include associated media, printed materials and "online" or ...
...the form of a discrete agreement, shrink wrap license or electronic license terms accepted at time of download. Use. c. The use of the HP Product. Other software may use the Software Product on more than one computer. e. The term "Software Product" means computer software and may ... ONLY ON THE CONDITION THAT YOU AGREE TO ALL TERMS AND CONDITIONS OF THIS EULA. You may copy the Software Product into Your Computer's temporary memory (RAM) for use on a single computer ("Your Computer"). f. b. Copying. You may include associated media, printed materials and "online" or ...
Warranty
Page 28
...The BIOS menu displays. Visit our Web site to find out how easy it simple for us to change without notice. Confirm the Total Installed Memory. HP will help you recycle your old product for system resources. Recycle - This limitation is subject to reclaim your old equipment even if it is... sensitive to the environment and has a program, Planet Partners, to make it is to recycle: http://www.hp.com/recycle The information contained herein is not limited to HP and Compaq systems. The memory above 3GB may not be available because of installed memory. 1 Turn on the PC. 2 Press the F1 key...
...The BIOS menu displays. Visit our Web site to find out how easy it simple for us to change without notice. Confirm the Total Installed Memory. HP will help you recycle your old product for system resources. Recycle - This limitation is subject to reclaim your old equipment even if it is... sensitive to the environment and has a program, Planet Partners, to make it is to recycle: http://www.hp.com/recycle The information contained herein is not limited to HP and Compaq systems. The memory above 3GB may not be available because of installed memory. 1 Turn on the PC. 2 Press the F1 key...
Getting Started
Page 3
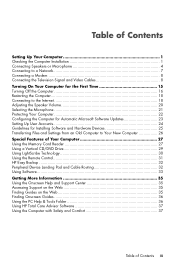
... an Old Computer to Your New Computer 26 Special Features of Your Computer 27 Using the Memory Card Reader 27 Using a Vertical CD/DVD Drive 29 Using LightScribe Technology 30 Using the Remote Control 31 HP Easy Backup ...32 Peripheral Device Landing Pad and Cable Routing 32 Using Software...33 Getting More... 35 Accessing Support on the Web 35 Finding Guides on the Web 35 Finding Onscreen Guides 36 Using the PC Help & Tools Folder 36 Using HP Total Care Advisor Software 37 Using the Computer with Safety and Comfort 37 Table of Contents iii
... an Old Computer to Your New Computer 26 Special Features of Your Computer 27 Using the Memory Card Reader 27 Using a Vertical CD/DVD Drive 29 Using LightScribe Technology 30 Using the Remote Control 31 HP Easy Backup ...32 Peripheral Device Landing Pad and Cable Routing 32 Using Software...33 Getting More... 35 Accessing Support on the Web 35 Finding Guides on the Web 35 Finding Onscreen Guides 36 Using the PC Help & Tools Folder 36 Using HP Total Care Advisor Software 37 Using the Computer with Safety and Comfort 37 Table of Contents iii

Getting Started
Page 20
It saves memory to put it into a reduced-power state. Action Shut Down Lock Click the Windows Vista start the computer after a shut down, press the On button ... automatically into Sleep or Hibernate mode. Hibernate mode (available as an advanced power setting) saves the system memory to the screen. The computer has these reduced power states: Sleep mode saves your work to memory, so you had open software programs by model) When you turn off the power for safety reasons...
It saves memory to put it into a reduced-power state. Action Shut Down Lock Click the Windows Vista start the computer after a shut down, press the On button ... automatically into Sleep or Hibernate mode. Hibernate mode (available as an advanced power setting) saves the system memory to the screen. The computer has these reduced power states: Sleep mode saves your work to memory, so you had open software programs by model) When you turn off the power for safety reasons...


