1859m,2009m,2009v, 2009f, 2159m,2159v,2309m,2309v, 2509m, 2709m LCD Monitor User Guide
Page 31
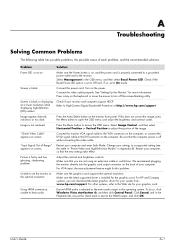
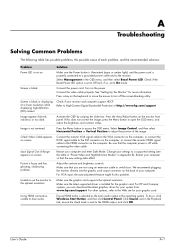
... tab, ensure the check mark is next to the HDMI output, and click OK. Screen is installed for your system from: www.hp.com/support. See "Setting Up the Monitor" for your computer and enter Safe Mode. If this problem. Be sure that the new settings take effect. Restart your computer, so... feature might fix this does not correct the image, press the Menu button to On mode. Make sure the latest supported driver is blank. Click Sound, and in the OSD menu, and then select Bezel Power LED. Restart your graphics card. Unable to set to open the OSD menu, and ...
... tab, ensure the check mark is next to the HDMI output, and click OK. Screen is installed for your system from: www.hp.com/support. See "Setting Up the Monitor" for your computer and enter Safe Mode. If this problem. Be sure that the new settings take effect. Restart your computer, so... feature might fix this does not correct the image, press the Menu button to On mode. Make sure the latest supported driver is blank. Click Sound, and in the OSD menu, and then select Bezel Power LED. Restart your graphics card. Unable to set to open the OSD menu, and ...
1859m,2009m,2009v, 2009f, 2159m,2159v,2309m,2309v, 2509m, 2709m LCD Monitor User Guide
Page 32
Under Audio Devices and Sound, click Adjust system volume. Check the monitor's video cable, and make sure that the monitor video cable is properly connected to the computer. HP monitor drivers are bent. A-2 Features may cause electrical interference as possible. Under Main Volume, move the slider ...Vista start button , Control Panel, and Hardware and Sound. Refer to "Installing Drivers" in the Operating the Monitor chapter for the Plug and Play feature of the monitor to work, you are using headphones at : http://www.hp.com/support Picture bounces, flickers, or wave pattern ...
Under Audio Devices and Sound, click Adjust system volume. Check the monitor's video cable, and make sure that the monitor video cable is properly connected to the computer. HP monitor drivers are bent. A-2 Features may cause electrical interference as possible. Under Main Volume, move the slider ...Vista start button , Control Panel, and Hardware and Sound. Refer to "Installing Drivers" in the Operating the Monitor chapter for the Plug and Play feature of the monitor to work, you are using headphones at : http://www.hp.com/support Picture bounces, flickers, or wave pattern ...

HP 2210i/2310i/2510i LCD Monitors - User Guide
Page 35
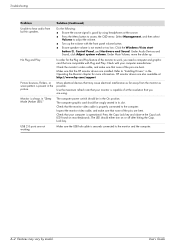
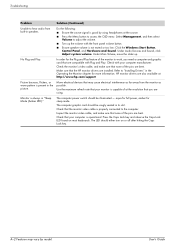
...and then select Volume to HP Technical Support at the resolution that none of the pins are bent. Refer to hear audio. Ensure HDMI audio is not muted or too low: Click the Windows start button™, Control Panel, and Hardware and Sound. Inspect the monitor video cable, and make... power switch should be snugly seated in this section, you are installed. Check that the monitor drivers are connected using headphones at : http://www.hp.com/support Move electrical devices that the monitor video cable is operational: Press the Caps Lock key and observe the Caps Lock LED found...
...and then select Volume to HP Technical Support at the resolution that none of the pins are bent. Refer to hear audio. Ensure HDMI audio is not muted or too low: Click the Windows start button™, Control Panel, and Hardware and Sound. Inspect the monitor video cable, and make... power switch should be snugly seated in this section, you are installed. Check that the monitor drivers are connected using headphones at : http://www.hp.com/support Move electrical devices that the monitor video cable is operational: Press the Caps Lock key and observe the Caps Lock LED found...
User's Guide 2309p, 2509p LCD Display
Page 7
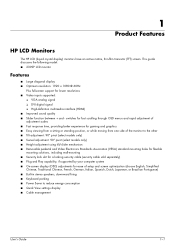
This guide discusses the following model: ■ 2309P LCD monitor Features ■ Large diagonal display ■ Optimum resolution: 1920 x 1080 @ 60Hz Plus full-screen support for ease of the monitor to reduce energy consumption ■ Quick View settings display ■ Cable ... VGA analog signal ❏ DVI digital signal ❏ High-definition multimedia interface (HDMI) ■ Improved sound quality ■ Slider function between + and - 1 Product Features HP LCD Monitors The HP LCD (liquid crystal display) monitors have an active matrix, thin-film transistor (TFT) screen.
This guide discusses the following model: ■ 2309P LCD monitor Features ■ Large diagonal display ■ Optimum resolution: 1920 x 1080 @ 60Hz Plus full-screen support for ease of the monitor to reduce energy consumption ■ Quick View settings display ■ Cable ... VGA analog signal ❏ DVI digital signal ❏ High-definition multimedia interface (HDMI) ■ Improved sound quality ■ Slider function between + and - 1 Product Features HP LCD Monitors The HP LCD (liquid crystal display) monitors have an active matrix, thin-film transistor (TFT) screen.
User's Guide 2309p, 2509p LCD Display
Page 33
... open the OSD menu, and adjust the brightness and contrast scales. Change your computer and enter Safe Mode. We recommend plugging the monitor directly into the graphic card output connector on screen. For VGA input, the auto-adjustment feature might fix this does not correct the...click Windows Start Button, and then click Control Panel. See "Setting Up the Monitor" for your system from: www.hp.com/support. Screen is blank. Press a key on the power. Image is next to the monitor. Click Sound, and in Appendix B). Make sure the Power button is illuminated (aqua or...
... open the OSD menu, and adjust the brightness and contrast scales. Change your computer and enter Safe Mode. We recommend plugging the monitor directly into the graphic card output connector on screen. For VGA input, the auto-adjustment feature might fix this does not correct the...click Windows Start Button, and then click Control Panel. See "Setting Up the Monitor" for your system from: www.hp.com/support. Screen is blank. Press a key on the power. Image is next to the monitor. Click Sound, and in Appendix B). Make sure the Power button is illuminated (aqua or...
User's Guide 2309p, 2509p LCD Display
Page 34
...is not muted or too low: Click the Windows Start Button, Control Panel, and Hardware and Sound. Check that your monitor is capable of the pins are using headphones at : http://www.hp.com/support Picture bounces, flickers, or wave pattern is always in speakers. The computer power switch... rate that your computer manufacturer. In order for sleep mode. Refer to access the OSD menu. Under Audio Devices and Sound, click Adjust system volume. Check the monitor's video cable, and make sure that none of at the resolution that you need a computer and graphic card that the...
...is not muted or too low: Click the Windows Start Button, Control Panel, and Hardware and Sound. Check that your monitor is capable of the pins are using headphones at : http://www.hp.com/support Picture bounces, flickers, or wave pattern is always in speakers. The computer power switch... rate that your computer manufacturer. In order for sleep mode. Refer to access the OSD menu. Under Audio Devices and Sound, click Adjust system volume. Check the monitor's video cable, and make sure that none of at the resolution that you need a computer and graphic card that the...
HP 2310mfa, 2310mfd LCD Monitors - User Guide
Page 3
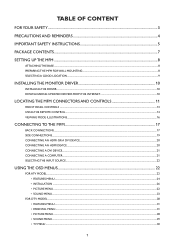
... INSTRUCTIONS 5 PACKAGE CONTENTS...7 SETTING UP THE MFM ...8 ATTACHING THE BASE ...8 PREPARING THE MFM FOR WALL MOUNTING ...8 SELECTING A GOOD LOCATION...9 INSTALLING THE MONITOR DRIVER 10 INSTALLING THE DRIVER...10 DOWNLOADING UPDATED DRIVERS FROM THE INTERNET 10 LOCATING THE MFM CONNECTORS AND CONTROLS 11 FRONT PANEL CONTROLS ...13 USING... THE OSD MENUS...22 FOR ATV MODEL...22 • FEATURES MENU...24 • INSTALLATION ...26 • PICTURE MENU ...22 • SOUND MENU...23 FOR DTV MODEL ...28 • FEATURES MENU...31 • PARENTAL MENU...31 • PICTURE MENU ...28 •...
... INSTRUCTIONS 5 PACKAGE CONTENTS...7 SETTING UP THE MFM ...8 ATTACHING THE BASE ...8 PREPARING THE MFM FOR WALL MOUNTING ...8 SELECTING A GOOD LOCATION...9 INSTALLING THE MONITOR DRIVER 10 INSTALLING THE DRIVER...10 DOWNLOADING UPDATED DRIVERS FROM THE INTERNET 10 LOCATING THE MFM CONNECTORS AND CONTROLS 11 FRONT PANEL CONTROLS ...13 USING... THE OSD MENUS...22 FOR ATV MODEL...22 • FEATURES MENU...24 • INSTALLATION ...26 • PICTURE MENU ...22 • SOUND MENU...23 FOR DTV MODEL ...28 • FEATURES MENU...31 • PARENTAL MENU...31 • PICTURE MENU ...28 •...

HP 2310mfa, 2310mfd LCD Monitors - User Guide
Page 8
... plug to the wall outlet socket after connecting the MFM to maximum increases the earphones and headphones output voltage and therefore the sound pressure level. Excessive sound pressure from power lines. 23. The appliance should be placed on the apparatus. 25. Section 810 of the National Electric Code,ANSI/NFPA No. 70-1984...
... plug to the wall outlet socket after connecting the MFM to maximum increases the earphones and headphones output voltage and therefore the sound pressure level. Excessive sound pressure from power lines. 23. The appliance should be placed on the apparatus. 25. Section 810 of the National Electric Code,ANSI/NFPA No. 70-1984...
HP 2310mfa, 2310mfd LCD Monitors - User Guide
Page 15
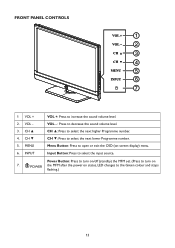
... to select the input source. INPUT Input Button: Press to open or exit the OSD (on-screen display) menu. 6. CH ▲: Press to decrease the sound volume level. CH ▲ VOL - : Press to select the next higher Programme number. 4. MENU CH ▼: Press to the Green colour and stops flashing.) 13... status, LED changes to select the next lower Programme number. Power Button: Press to turn on/off (standby) the MFM set. (Press to increase the sound volume level. 2. FRONT PANEL CONTROLS 1 2 3 4 5 6 7 1 VOL + VOL +: Press to turn on 7. CH ▼ 5.
... to select the input source. INPUT Input Button: Press to open or exit the OSD (on-screen display) menu. 6. CH ▲: Press to decrease the sound volume level. CH ▲ VOL - : Press to select the next higher Programme number. 4. MENU CH ▼: Press to the Green colour and stops flashing.) 13... status, LED changes to select the next lower Programme number. Power Button: Press to turn on/off (standby) the MFM set. (Press to increase the sound volume level. 2. FRONT PANEL CONTROLS 1 2 3 4 5 6 7 1 VOL + VOL +: Press to turn on 7. CH ▼ 5.
HP 2310mfa, 2310mfd LCD Monitors - User Guide
Page 16
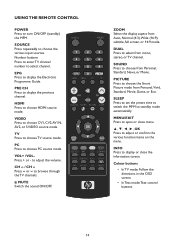
...Press to display or close menu. PRE CH Press to choose PC source mode. PC Press to display the previous channel. MUTE Switch the sound ON/OFF. DUAL Press to choose the Smart Picture mode from Personal, Standard, News, or Movie. PICTURE Press to select from Auto, ...14:9 mode. MENU/EXIT Press to select channel. Number buttons Press to enter TV channel number to open or close the information screen. SOUND Press to browse through the TV channels. EPG Press to choose the various input sources. SOURCE Press repeatedly to display the Electronic Programme ...
...Press to display or close menu. PRE CH Press to choose PC source mode. PC Press to display the previous channel. MUTE Switch the sound ON/OFF. DUAL Press to choose the Smart Picture mode from Personal, Standard, News, or Movie. PICTURE Press to select from Auto, ...14:9 mode. MENU/EXIT Press to select channel. Number buttons Press to enter TV channel number to open or close the information screen. SOUND Press to browse through the TV channels. EPG Press to choose the various input sources. SOURCE Press repeatedly to display the Electronic Programme ...

HP 2310mfa, 2310mfd LCD Monitors - User Guide
Page 19
.... • Refer to the owner's manual of the connected equipment as well. • When you connect the monitor to other materials may be damaged by a sudden high volume sound. 17 Be sure to adjust the audio amplifier's volume to an audio system. Set Top Box HDMI or DVI...INPUT consists of three component video signals (Y, Pb, Pr) and provides the best picture performance.These terminals can enjoy high quality dynamic sound by connecting the monitor to a moderate listening level before turning on the power. Otherwise, the speakers and your hearing may be damaged by a sudden high ...
.... • Refer to the owner's manual of the connected equipment as well. • When you connect the monitor to other materials may be damaged by a sudden high volume sound. 17 Be sure to adjust the audio amplifier's volume to an audio system. Set Top Box HDMI or DVI...INPUT consists of three component video signals (Y, Pb, Pr) and provides the best picture performance.These terminals can enjoy high quality dynamic sound by connecting the monitor to a moderate listening level before turning on the power. Otherwise, the speakers and your hearing may be damaged by a sudden high ...
HP 2310mfa, 2310mfd LCD Monitors - User Guide
Page 20
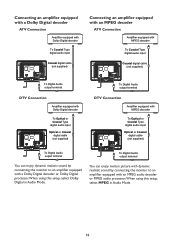
... (not supplied) To Digital Audio output terminal To Digital Audio output terminal You can enjoy motion picture with dynamic realistic sound by connecting the monitor to an amplifier equipped with a Dolby Digital decoder or Dolby Digital processor.When using this setup, select Dolby Digital in... Audio Mode. 18 You can enjoy dynamic realistic sound by connecting the monitor to an amplifier equipped with an MPEG audio decoder or MPEG audio processor.When using this setup, select MPEG in Audio...
... (not supplied) To Digital Audio output terminal To Digital Audio output terminal You can enjoy motion picture with dynamic realistic sound by connecting the monitor to an amplifier equipped with a Dolby Digital decoder or Dolby Digital processor.When using this setup, select Dolby Digital in... Audio Mode. 18 You can enjoy dynamic realistic sound by connecting the monitor to an amplifier equipped with an MPEG audio decoder or MPEG audio processor.When using this setup, select MPEG in Audio...
HP 2310mfa, 2310mfd LCD Monitors - User Guide
Page 21
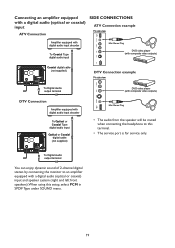
AUDIO - AUDIO - To Digital Audio output terminal You can enjoy dynamic sound of 2-channel digital stereo by connecting the monitor to this setup, select PCM in SPDIF Type under SOUND menu. 19 Connecting an amplifier equipped with a digital audio (optical or coaxial) input ATV Connection SIDE CONNECTIONS ATV Connection example TV side view SERVICE...
AUDIO - AUDIO - To Digital Audio output terminal You can enjoy dynamic sound of 2-channel digital stereo by connecting the monitor to this setup, select PCM in SPDIF Type under SOUND menu. 19 Connecting an amplifier equipped with a digital audio (optical or coaxial) input ATV Connection SIDE CONNECTIONS ATV Connection example TV side view SERVICE...

HP 2310mfa, 2310mfd LCD Monitors - User Guide
Page 24
... scenes. USING THE OSD MENUS FOR ATV MODEL 1. The Smart picture menu appears. 2. Adjust Picture Setting Smart Picture Vivid Picture Backlight 100 Sound Contrast 50 Brightness 48 Features Colour 60 Hue 0 Installation Sharpness 8 Move Select 1. SELECTING THE INPUT SOURCE • First press SOURCE on...; or ► to the input signals. Press the MENU/EXIT button to highlight Yes and press OK. Adjust the items including Picture, Sound, Features, and Installation. Use ► or OK to display or close the main menu. 2. However, some function items in the menus...
... scenes. USING THE OSD MENUS FOR ATV MODEL 1. The Smart picture menu appears. 2. Adjust Picture Setting Smart Picture Vivid Picture Backlight 100 Sound Contrast 50 Brightness 48 Features Colour 60 Hue 0 Installation Sharpness 8 Move Select 1. SELECTING THE INPUT SOURCE • First press SOURCE on...; or ► to the input signals. Press the MENU/EXIT button to highlight Yes and press OK. Adjust the items including Picture, Sound, Features, and Installation. Use ► or OK to display or close the main menu. 2. However, some function items in the menus...

HP 2310mfa, 2310mfd LCD Monitors - User Guide
Page 25
...- Press OK to select Sound. Press SOUND. Smart sound Movid Picture Bass 4 Sound Treble 4 Volume 8 Features Balance 0 Surround Off Installation Auto volume Off Move Select 23 Dynamic contrast: Automatically enhances contrast in bright colours. The selected smart sound setting is recommended. - ...or YPbPr. • Vertical shift: Adjusts the picture vertically for PC-VGA or YPbPr. • SOUND MENU Use smart sound Use smart sound to apply pre-defined sound settings. 1. Press MENU. 2. 3. Press to Cool (bluer), Normal (balanced),Warm (redder). ...
...- Press OK to select Sound. Press SOUND. Smart sound Movid Picture Bass 4 Sound Treble 4 Volume 8 Features Balance 0 Surround Off Installation Auto volume Off Move Select 23 Dynamic contrast: Automatically enhances contrast in bright colours. The selected smart sound setting is recommended. - ...or YPbPr. • Vertical shift: Adjusts the picture vertically for PC-VGA or YPbPr. • SOUND MENU Use smart sound Use smart sound to apply pre-defined sound settings. 1. Press MENU. 2. 3. Press to Cool (bluer), Normal (balanced),Warm (redder). ...

HP 2310mfa, 2310mfd LCD Monitors - User Guide
Page 26
... switch the TV to standby (Sleeptimer) Sleeptimer switches the TV to zero minutes, the Sleeptimer is broadcast. • Surround: Enables spatial sound. • Auto volume: Automatically reduces sudden volume changes, for example, when switching channels.When enabled, this produces a more consistent audio ... The Sleeptimer menu appears. 3. The Sleeptimer can always switch off your listening. • Dual I-II: Selects between audio languages if dual sound is broadcast. • Mono/Stereo: Selects between mono or stereo if stereo is switched off. 4. Press ◄ ►to set ...
... switch the TV to standby (Sleeptimer) Sleeptimer switches the TV to zero minutes, the Sleeptimer is broadcast. • Surround: Enables spatial sound. • Auto volume: Automatically reduces sudden volume changes, for example, when switching channels.When enabled, this produces a more consistent audio ... The Sleeptimer menu appears. 3. The Sleeptimer can always switch off your listening. • Dual I-II: Selects between audio languages if dual sound is broadcast. • Mono/Stereo: Selects between mono or stereo if stereo is switched off. 4. Press ◄ ►to set ...
HP 2310mfa, 2310mfd LCD Monitors - User Guide
Page 28
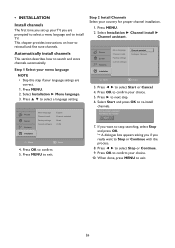
...Press ◄ ► to search and store channels automatically. Select Start and press OK to select Stop or Continue. 9. Picture Sound Features Menu language Channel install. Step 2 Install Channels Select your choice. 10. Factory settings Current software Channel assistant Analogue : Manual...to Stop or Continue with the process. 8. Factory settings Current software English Channel assistant Reset V0.02 Installation Move Select 4. Picture Sound Features Menu language Channel install. Press MENU to confirm. 5. Press OK to exit. Press ► to exit. 26 When...
...Press ◄ ► to search and store channels automatically. Select Start and press OK to select Stop or Continue. 9. Picture Sound Features Menu language Channel install. Step 2 Install Channels Select your choice. 10. Factory settings Current software Channel assistant Analogue : Manual...to Stop or Continue with the process. 8. Factory settings Current software English Channel assistant Reset V0.02 Installation Move Select 4. Picture Sound Features Menu language Channel install. Press MENU to confirm. 5. Press OK to exit. Press ► to exit. 26 When...

HP 2310mfa, 2310mfd LCD Monitors - User Guide
Page 29
...; to select Store cur. Press ▲ ▼ to adjust frequency. 5. Skip channels 1. Press MENU to confirm. 6. Press ▲ ▼ to adjust. • Colour system • Sound system • Search • Fine-tune • Store cur. The Analogue: Manual menu appears. 3. Press MENU. 2. The selected channel is skipped when you want to...
...; to select Store cur. Press ▲ ▼ to adjust frequency. 5. Skip channels 1. Press MENU to confirm. 6. Press ▲ ▼ to adjust. • Colour system • Sound system • Search • Fine-tune • Store cur. The Analogue: Manual menu appears. 3. Press MENU. 2. The selected channel is skipped when you want to...
HP 2310mfa, 2310mfd LCD Monitors - User Guide
Page 30
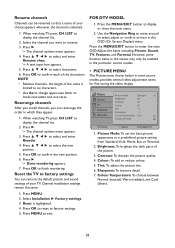
...in most source modes, provides several video adjustment items for fine tuning the video display. Adjust the items including Picture, Sound, TV, Features, and Parental. Picture Sound TV Features Parental Picture Mode Brightness Contrast Colour Tint Sharpness Colour Temperature Advanced Video Standard 50 50 50 0 3 Cool... menu. When watching TV, press CH LIST to select and enter Reorder. 4. Select the channel you can restore the default picture and sound settings of your choice appears whenever the channel is limited to six characters. • Use Aa to change upper-case letter to lower...
...in most source modes, provides several video adjustment items for fine tuning the video display. Adjust the items including Picture, Sound, TV, Features, and Parental. Picture Sound TV Features Parental Picture Mode Brightness Contrast Colour Tint Sharpness Colour Temperature Advanced Video Standard 50 50 50 0 3 Cool... menu. When watching TV, press CH LIST to select and enter Reorder. 4. Select the channel you can restore the default picture and sound settings of your choice appears whenever the channel is limited to six characters. • Use Aa to change upper-case letter to lower...

HP 2310mfa, 2310mfd LCD Monitors - User Guide
Page 31
...720p shows 1280x720@60Hz; 1080i shows [email protected] mode optimises for DVD player, camcorder, and other video appliances inputs. • SOUND MENU The Sound menu provides audio adjustment to get device information, device will affect Line out audio also delay at that time.The NorDig HD IRD ...To filter out and reduces the image noise and improve picture quality. Description as the IRD may be adjustable in different a/v delays; Surround Sound: To add greater depth and dimension to 250 ms and it should be connected to several different user setups, resulting in 10ms steps,...
...720p shows 1280x720@60Hz; 1080i shows [email protected] mode optimises for DVD player, camcorder, and other video appliances inputs. • SOUND MENU The Sound menu provides audio adjustment to get device information, device will affect Line out audio also delay at that time.The NorDig HD IRD ...To filter out and reduces the image noise and improve picture quality. Description as the IRD may be adjustable in different a/v delays; Surround Sound: To add greater depth and dimension to 250 ms and it should be connected to several different user setups, resulting in 10ms steps,...


