
Security - Window Vista and Windows 7
Page 8
... types of up to 8 letters and numbers and is essential to secure your information. Because most passwords are set . CAUTION: To prevent being locked out of characters that could be set in the Setup Utility must be entered at a Windows prompt. Use the following sections list Windows and Setup Utility passwords and describe their functions. For additional information about Windows passwords, such as they are not displayed as screen-saver passwords, select Start > Help...
... types of up to 8 letters and numbers and is essential to secure your information. Because most passwords are set . CAUTION: To prevent being locked out of characters that could be set in the Setup Utility must be entered at a Windows prompt. Use the following sections list Windows and Setup Utility passwords and describe their functions. For additional information about Windows passwords, such as they are not displayed as screen-saver passwords, select Start > Help...

Setup Utility - Windows Vista and Windows 7
Page 7
... screen, press f10. - or - NOTE: Your password, security, and language settings are not changed when you restore the factory default settings. Displaying system information 3 System information such as the system time and date, and identification information about the computer is displayed, press f10. 2. When the Startup Menu is displayed. 3. To save your change and exit the Setup Utility, use the arrow keys to select Exit > Exit Discarding Changes, and then press enter. Open the Setup Utility...
... screen, press f10. - or - NOTE: Your password, security, and language settings are not changed when you restore the factory default settings. Displaying system information 3 System information such as the system time and date, and identification information about the computer is displayed, press f10. 2. When the Startup Menu is displayed. 3. To save your change and exit the Setup Utility, use the arrow keys to select Exit > Exit Discarding Changes, and then press enter. Open the Setup Utility...

Setup Utility - Windows Vista and Windows 7
Page 10
...―Enable/disable boot from diskette. ● Internal Network Adapter boot―Enable/disable boot from Internal Network Adapter. ● Boot Order―Set the boot order for: ◦ USB Floppy ◦ Internal CD/DVD ROM drive ◦ USB CD/DVD ROM drive ◦ Hard drive ◦ USB Diskette on Key ◦ USB Hard drive ◦ Network adapter Diagnostics menu Select Hard Disk Self Test Secondary Hard Disk Self Test (select models only) Memory Test To do this Change the Setup Utility language. System Configuration menu Select Language Support Button Sound (select models...
...―Enable/disable boot from diskette. ● Internal Network Adapter boot―Enable/disable boot from Internal Network Adapter. ● Boot Order―Set the boot order for: ◦ USB Floppy ◦ Internal CD/DVD ROM drive ◦ USB CD/DVD ROM drive ◦ Hard drive ◦ USB Diskette on Key ◦ USB Hard drive ◦ Network adapter Diagnostics menu Select Hard Disk Self Test Secondary Hard Disk Self Test (select models only) Memory Test To do this Change the Setup Utility language. System Configuration menu Select Language Support Button Sound (select models...
Software Update, Backup and Recovery - Windows Vista
Page 5
... regarding installing and troubleshooting the file. NOTE: The computer system BIOS is connected to improve the security of your permission or password for data transfer among hardware devices, including the time and date. NOTE: Windows® includes the User Account Control feature to a network, consult the network administrator before installing any software updates, especially system BIOS updates. Identify your computer is stored on the HP Web site at http://www.hp.com. 3. The BIOS initializes the operating...
... regarding installing and troubleshooting the file. NOTE: The computer system BIOS is connected to improve the security of your permission or password for data transfer among hardware devices, including the time and date. NOTE: Windows® includes the User Account Control feature to a network, consult the network administrator before installing any software updates, especially system BIOS updates. Identify your computer is stored on the HP Web site at http://www.hp.com. 3. The BIOS initializes the operating...

Software Update, Backup and Recovery - Windows Vista
Page 8
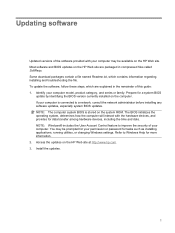
... list of the device. 4 Updating software Updating programs and drivers To download and install software other than a BIOS update, follow the instructions provided. Click your hard drive. To do so, restart your computer model number in the Search box, press enter, and follow these steps: To use the HP Web site: 1. After the file is displayed, click an updated driver to your country or region. 2. Select your Internet browser, go to install. 7. Open your operating system. 5.
... list of the device. 4 Updating software Updating programs and drivers To download and install software other than a BIOS update, follow the instructions provided. Click your hard drive. To do so, restart your computer model number in the Search box, press enter, and follow these steps: To use the HP Web site: 1. After the file is displayed, click an updated driver to your country or region. 2. Select your Internet browser, go to install. 7. Open your operating system. 5.
Wireless (Select Models Only) - Windows Vista
Page 24
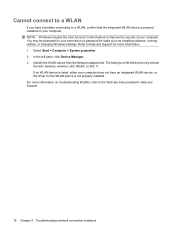
... device from the Network adapters list. The listing for tasks such as installing software, running utilities, or changing Windows settings. Select Start > Computer > System properties. 2. If no WLAN device is listed, either your computer does not have a problem connecting to a WLAN, confirm that the integrated WLAN device is not properly installed. You may be prompted for your permission or password for a WLAN device may include the term wireless, wireless...
... device from the Network adapters list. The listing for tasks such as installing software, running utilities, or changing Windows settings. Select Start > Computer > System properties. 2. If no WLAN device is listed, either your computer does not have a problem connecting to a WLAN, confirm that the integrated WLAN device is not properly installed. You may be prompted for your permission or password for a WLAN device may include the term wireless, wireless...

Drives - Windows Vista and Windows 7
Page 23
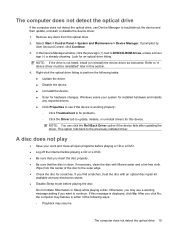
... not detect the optical drive, use Device Manager to the previously installed driver. Select Start > Control Panel > System and Maintenance > Device Manager. Remove any required drivers. ● Click Properties to see if the device is working properly: ◦ Click Troubleshoot to fix problems. ◦ Click the Driver tab to perform the following tasks: ● Update the driver. ● Disable the device. ● Uninstall the device. ● Scan for installed hardware and installs any discs from the...
... not detect the optical drive, use Device Manager to the previously installed driver. Select Start > Control Panel > System and Maintenance > Device Manager. Remove any required drivers. ● Click Properties to see if the device is working properly: ◦ Click Troubleshoot to fix problems. ◦ Click the Driver tab to perform the following tasks: ● Update the driver. ● Disable the device. ● Uninstall the device. ● Scan for installed hardware and installs any discs from the...
Drives - Windows Vista and Windows 7
Page 29
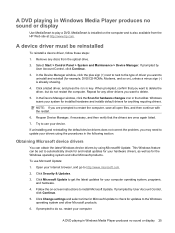
To use your drivers using Microsoft® Update. A DVD playing in Windows Media Player produces no sound or display Use MediaSmart to play a DVD. If prompted by User Account Control, click Continue. 5. Click a listed driver, and press the delete key. When prompted, confirm that the drivers are prompted to update your device. If uninstalling and reinstalling the default device drivers does not correct the problem, you may need to restart the computer, save all open files, and then continue with...
To use your drivers using Microsoft® Update. A DVD playing in Windows Media Player produces no sound or display Use MediaSmart to play a DVD. If prompted by User Account Control, click Continue. 5. Click a listed driver, and press the delete key. When prompted, confirm that the drivers are prompted to update your device. If uninstalling and reinstalling the default device drivers does not correct the problem, you may need to restart the computer, save all open files, and then continue with...

Drives - Windows Vista and Windows 7
Page 31
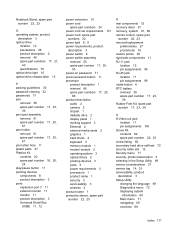
... also hard drive; optical drive drives, optical drive 4 DVD burning 12, 24 changing region setting 9 copying 11 playing 7 removing 13 DVD drive 2, 4 DVD region settings 9 H hard disk drive installing 16 removing 15 replacing 15 hard drive installing 16 removing 15 replacing 15 HP drivers 26 M maintenance Disk Cleanup 14 Disk Defragmenter 14 O optical discs removing 13 using 4 optical drive 2, 4 R region codes, DVD 9 S software Disk Cleanup 14 Disk Defragmenter 14 T troubleshooting burning discs 24 device driver 25 disc play 20, 21 DVD movie play 22 external display 23 HP device drivers 26...
... also hard drive; optical drive drives, optical drive 4 DVD burning 12, 24 changing region setting 9 copying 11 playing 7 removing 13 DVD drive 2, 4 DVD region settings 9 H hard disk drive installing 16 removing 15 replacing 15 hard drive installing 16 removing 15 replacing 15 HP drivers 26 M maintenance Disk Cleanup 14 Disk Defragmenter 14 O optical discs removing 13 using 4 optical drive 2, 4 R region codes, DVD 9 S software Disk Cleanup 14 Disk Defragmenter 14 T troubleshooting burning discs 24 device driver 25 disc play 20, 21 DVD movie play 22 external display 23 HP device drivers 26...
Notebook Tour - Windows Vista
Page 21
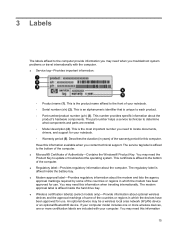
... information you may need when you contact technical support. This is the product name affixed to the front of Authenticity-Contains the Windows® Product Key. This number provides specific information about the computer. The part number helps a service technician to update or troubleshoot the operating system. The service tag label is affixed inside the battery bay. ● Modem approval label-Provides regulatory information...
... information you may need when you contact technical support. This is the product name affixed to the front of Authenticity-Contains the Windows® Product Key. This number provides specific information about the computer. The part number helps a service technician to update or troubleshoot the operating system. The service tag label is affixed inside the battery bay. ● Modem approval label-Provides regulatory information...

Pointing Devices and Keyboard - Windows VIsta
Page 17
... the instructions on the screen to initiate the QuickLock security feature. Hold down the hotkey to Help and Support. The computer must set the fn+f5 hotkey to pause the play of an audio CD or a DVD. For example, you can initiate Hibernation. To use QuickLock, you must be accessed until a Windows user password or a Windows administrator password is initiated, your information by displaying the operating system...
... the instructions on the screen to initiate the QuickLock security feature. Hold down the hotkey to Help and Support. The computer must set the fn+f5 hotkey to pause the play of an audio CD or a DVD. For example, you can initiate Hibernation. To use QuickLock, you must be accessed until a Windows user password or a Windows administrator password is initiated, your information by displaying the operating system...

Pointing Devices and Keyboard - Windows VIsta
Page 20
... function while an external keyboard or numeric keypad is connected to the computer or to enable the embedded numeric keypad. Switching key functions on the embedded numeric keypad You can be used like the arrow, page up, or page down keys. When num lock on an external keypad is turned on, the num lock light on the computer is turned on , most keypad keys type numbers. ● When num lock...
... function while an external keyboard or numeric keypad is connected to the computer or to enable the embedded numeric keypad. Switching key functions on the embedded numeric keypad You can be used like the arrow, page up, or page down keys. When num lock on an external keypad is turned on, the num lock light on the computer is turned on , most keypad keys type numbers. ● When num lock...

HP TouchSmart tx2 Notebook PC - Maintenance and Service Guide
Page 77
... screen. 2. To start the Setup Utility, turn on or restart the computer, and then press f10 while "Press to enter setup" is displayed in the Setup Utility Because the Setup Utility is already running , begin at step 2. 1. To exit the Setup Utility without changing any settings, use the arrow keys. ● To choose an item in Windows. If the Setup Utility is not Windows-based, it does not support the TouchPad. If the Setup Utility is displayed...
... screen. 2. To start the Setup Utility, turn on or restart the computer, and then press f10 while "Press to enter setup" is displayed in the Setup Utility Because the Setup Utility is already running , begin at step 2. 1. To exit the Setup Utility without changing any settings, use the arrow keys. ● To choose an item in Windows. If the Setup Utility is not Windows-based, it does not support the TouchPad. If the Setup Utility is displayed...
HP TouchSmart tx2 Notebook PC - Maintenance and Service Guide
Page 78
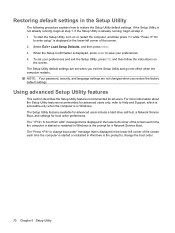
... restore the factory default settings. The Setup Utility features available for advanced users include a hard drive self-test, a Network Service Boot, and settings for all users. The Setup Utility default settings are not changed when you exit the Setup Utility and go into effect when the computer restarts. Select Exit > Load Setup Defaults, and then press enter. 3. NOTE: Your password, security, and language settings are set your preferences. 4. If the Setup Utility is in the Setup Utility The following procedure explains how to change boot...
... restore the factory default settings. The Setup Utility features available for advanced users include a hard drive self-test, a Network Service Boot, and settings for all users. The Setup Utility default settings are not changed when you exit the Setup Utility and go into effect when the computer restarts. Select Exit > Load Setup Defaults, and then press enter. 3. NOTE: Your password, security, and language settings are set your preferences. 4. If the Setup Utility is in the Setup Utility The following procedure explains how to change boot...
HP TouchSmart tx2 Notebook PC - Maintenance and Service Guide
Page 119
... diskette drive 2 display panel 1 docking support 3 Ethernet 2 external media cards 2 graphics 1 hard drives 2 keyboard 3 memory module 1 modem module 2 operating system 3 optical drives 2 pointing devices 3 ports 3 power requirements 3 processors 1 product name 1 security 3 serviceability 3 wireless 2 product name 1 protective sleeve, spare part number 22, 25 R rear components 12 recovery discs 91 recovery, system 91, 96 remote control, spare part number 22, 23 removal/replacement preliminaries 27 procedures 33 restore points 93 right-side components 11 RJ-11 jack location 12 pin assignments...
... diskette drive 2 display panel 1 docking support 3 Ethernet 2 external media cards 2 graphics 1 hard drives 2 keyboard 3 memory module 1 modem module 2 operating system 3 optical drives 2 pointing devices 3 ports 3 power requirements 3 processors 1 product name 1 security 3 serviceability 3 wireless 2 product name 1 protective sleeve, spare part number 22, 25 R rear components 12 recovery discs 91 recovery, system 91, 96 remote control, spare part number 22, 23 removal/replacement preliminaries 27 procedures 33 restore points 93 right-side components 11 RJ-11 jack location 12 pin assignments...
Multimedia - Windows Vista
Page 23
...) the device driver as instructed. This option rolls back to continue. Right-click the optical drive listing to update, disable, or uninstall drivers for hardware changes. If necessary, clean the disc with an optical disc repair kit available at many electronics stores. ● Disable Sleep mode before playing a CD or a DVD. ● Be sure that you may see if the device is working properly: ◦ Click Troubleshoot to fix problems...
...) the device driver as instructed. This option rolls back to continue. Right-click the optical drive listing to update, disable, or uninstall drivers for hardware changes. If necessary, clean the disc with an optical disc repair kit available at many electronics stores. ● Disable Sleep mode before playing a CD or a DVD. ● Be sure that you may see if the device is working properly: ◦ Click Troubleshoot to fix problems...
Multimedia - Windows Vista
Page 26
... installed hardware and installs default drivers for any other drivers you want to delete. 5. This Windows feature can obtain the latest Windows device drivers by User Account Control, click Continue. 5. If prompted to obtain HP device drivers. Obtaining HP device drivers Use either of driver you are once again listed. 7. To use your computer. Click a listed driver, and press the delete key. Follow the on-screen instructions to http://www.microsoft.com. 2. Click Next to use the HP Update Utility: 1. 3. In the Device...
... installed hardware and installs default drivers for any other drivers you want to delete. 5. This Windows feature can obtain the latest Windows device drivers by User Account Control, click Continue. 5. If prompted to obtain HP device drivers. Obtaining HP device drivers Use either of driver you are once again listed. 7. To use your computer. Click a listed driver, and press the delete key. Follow the on-screen instructions to http://www.microsoft.com. 2. Click Next to use the HP Update Utility: 1. 3. In the Device...
Multimedia - Windows Vista
Page 28
... 1 multimedia software 5, 6 multimedia software, installing 6 O optical disc inserting 12 removing, with power 16 optical discs, using 10 optical drive 10 optical drive, using 10 P ports, external monitor 9 projector, connecting 9 R region codes, DVD 15 rotate button 3 S software installing 6 MediaSmart 5 multimedia 6 Windows Media Player 6 speakers 2 T troubleshooting device driver 21 disc burning 21 disc play 19, 20 DVD movie play 20 external display 21 HP device drivers 22 Microsoft drivers 22 optical disc tray 18 optical drive detection 19 V video, using 9 volume, adjusting 3 24...
... 1 multimedia software 5, 6 multimedia software, installing 6 O optical disc inserting 12 removing, with power 16 optical discs, using 10 optical drive 10 optical drive, using 10 P ports, external monitor 9 projector, connecting 9 R region codes, DVD 15 rotate button 3 S software installing 6 MediaSmart 5 multimedia 6 Windows Media Player 6 speakers 2 T troubleshooting device driver 21 disc burning 21 disc play 19, 20 DVD movie play 20 external display 21 HP device drivers 22 Microsoft drivers 22 optical disc tray 18 optical drive detection 19 V video, using 9 volume, adjusting 3 24...
Power Management - Windows Vista
Page 5
... the Lock button, and then click Sleep. When Hibernation is initiated, your work is in the Sleep state or in Windows® Control Panel. 1 Setting power options Using power-saving states The computer has two power-saving states enabled at the factory to a disc or an external media card. Initiating and exiting Sleep The system is closed, open the display. ● Press a key on the keyboard or button on external power. When Sleep is in the Sleep state...
... the Lock button, and then click Sleep. When Hibernation is initiated, your work is in the Sleep state or in Windows® Control Panel. 1 Setting power options Using power-saving states The computer has two power-saving states enabled at the factory to a disc or an external media card. Initiating and exiting Sleep The system is closed, open the display. ● Press a key on the keyboard or button on external power. When Sleep is in the Sleep state...

Power Management - Windows Vista
Page 21
... fully charge the battery: 1. Connect the computer to an AC adapter, optional power adapter, optional expansion product, or optional docking device, and then plug the adapter or device into external power until the battery is heavily used, it should not need to sleep settings listed in battery run time Even if a battery is fully charged. Click Save changes. Step 1: Fully charge the battery WARNING! The battery light on the computer turns on the computer turns off the display...
... fully charge the battery: 1. Connect the computer to an AC adapter, optional power adapter, optional expansion product, or optional docking device, and then plug the adapter or device into external power until the battery is heavily used, it should not need to sleep settings listed in battery run time Even if a battery is fully charged. Click Save changes. Step 1: Fully charge the battery WARNING! The battery light on the computer turns on the computer turns off the display...


