Watching and Recording TV
Page 19
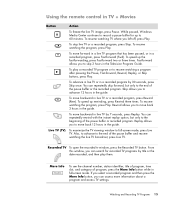
... resume watching TV where you to full-screen mode, press Live TV. More Info To see the channel number, station identifier, title of program, time slot, and category of the pause buffer or recorded program. To move backward in live TV program that has been paused, or in the Television Program...
... resume watching TV where you to full-screen mode, press Live TV. More Info To see the channel number, station identifier, title of program, time slot, and category of the pause buffer or recorded program. To move backward in live TV program that has been paused, or in the Television Program...

Warranty and Support Guide
Page 15
... disc any data that you created or installed after purchase. NOTE: System Recovery deletes any data or programs that you created as you see the desktop. 14 Turn off . 4 Disconnect all peripheral devices, and turn on page 14. When you to do so. 12 When the Recovery Manager is working , ...create a backup CD or DVD containing all peripheral devices from the disc slot. 7 Click Next at system startup If Windows Vista is not responding, but the computer is finished, remove the last recovery disc. 13 Click Finish to...
... disc any data that you created or installed after purchase. NOTE: System Recovery deletes any data or programs that you created as you see the desktop. 14 Turn off . 4 Disconnect all peripheral devices, and turn on page 14. When you to do so. 12 When the Recovery Manager is working , ...create a backup CD or DVD containing all peripheral devices from the disc slot. 7 Click Next at system startup If Windows Vista is not responding, but the computer is finished, remove the last recovery disc. 13 Click Finish to...

Getting Started Guide
Page 9
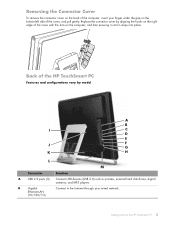
... cannot turn on back side panel) Watch your favorite DVD or Blu-ray (select models only) disc, or listen to your HP TouchSmart PC, or put it in Sleep mode. Your memory card reader also supports adapters for quick access to your existing wireless network. It is ...Press the Power/Sleep button to turn the computer off your environment, to one-half meter (2 feet) away from the computer. G Slot-loading CD/DVD drive (located on your CD collection. I HP TouchSmart button Turn your HP TouchSmart PC on the lower right side of our products for purposes other files directly from your...
... cannot turn on back side panel) Watch your favorite DVD or Blu-ray (select models only) disc, or listen to your HP TouchSmart PC, or put it in Sleep mode. Your memory card reader also supports adapters for quick access to your existing wireless network. It is ...Press the Power/Sleep button to turn the computer off your environment, to one-half meter (2 feet) away from the computer. G Slot-loading CD/DVD drive (located on your CD collection. I HP TouchSmart button Turn your HP TouchSmart PC on the lower right side of our products for purposes other files directly from your...
Getting Started Guide
Page 11
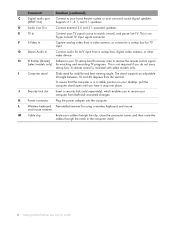
Back of the HP TouchSmart PC Features and configurations vary by aligning the hooks on the right edge of the cover with the slots on the bottom-left side of the cover, and pull gently. Replace the connector cover by model A B I C D E J F G K H L M Connector Function A USB 2.0 ports (3) Connect USB devices (USB 2.0) ... under the gap on the computer, and then pressing it until it snaps into place. B Gigabit Ethernet LAN (10/100/1G) Connect to Know the HP TouchSmart PC 5
Back of the HP TouchSmart PC Features and configurations vary by aligning the hooks on the right edge of the cover with the slots on the bottom-left side of the cover, and pull gently. Replace the connector cover by model A B I C D E J F G K H L M Connector Function A USB 2.0 ports (3) Connect USB devices (USB 2.0) ... under the gap on the computer, and then pressing it until it snaps into place. B Gigabit Ethernet LAN (10/100/1G) Connect to Know the HP TouchSmart PC 5
Getting Started Guide
Page 12
...TV In Connect your cables through the clip, close the connector cover, and then route the cables through the notch in a stable position on your desktop, pull the computer stand open until you to secure your surround sound digital speakers. (SPDIF Out) Supports 3.1, 4.1, and 5.1 speakers. H IR ... In Capture analog video from a video camera, or connect to a set-top box for A/V input from a set -top box. J Security lock slot Insert a security lock (sold separately), which enables you hear it snap into the computer. and mouse receiver M Cable clip Route your TV signal source...
...TV In Connect your cables through the clip, close the connector cover, and then route the cables through the notch in a stable position on your desktop, pull the computer stand open until you to secure your surround sound digital speakers. (SPDIF Out) Supports 3.1, 4.1, and 5.1 speakers. H IR ... In Capture analog video from a video camera, or connect to a set-top box for A/V input from a set -top box. J Security lock slot Insert a security lock (sold separately), which enables you hear it snap into the computer. and mouse receiver M Cable clip Route your TV signal source...

Getting Started Guide
Page 15
2 Route your cables through the notch (B) in the computer stand. B Getting to Know the HP TouchSmart PC 9 A 3 Replace the connector cover by aligning the hooks on the computer, and then pressing it until it snaps into place. Then, route the cables through the cable routing clip (A), and out of the back of the cover with the slots on the right edge of the computer.
2 Route your cables through the notch (B) in the computer stand. B Getting to Know the HP TouchSmart PC 9 A 3 Replace the connector cover by aligning the hooks on the computer, and then pressing it until it snaps into place. Then, route the cables through the cable routing clip (A), and out of the back of the cover with the slots on the right edge of the computer.
Getting Started Guide
Page 24
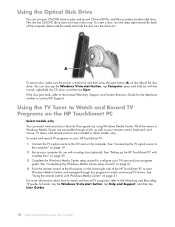
... Computer, press and hold (or with Windows Media Center" on page 19. 2 Set up the HP TouchSmart PC with a set-top box (optional). Using the TV Tuner to Watch and Record TV Programs on the HP TouchSmart PC Select models only You can watch and record TV programs on the computer. To watch and record...on the side of the computer (label side forward) and slide the disc into the drive slot. To locate, tap the Windows Vista start Windows Media Center, and navigate through touch, as well as your HP TouchSmart PC: 1 Connect the TV signal source to play and record CDs and DVDs, and Blu-ray ...
... Computer, press and hold (or with Windows Media Center" on page 19. 2 Set up the HP TouchSmart PC with a set-top box (optional). Using the TV Tuner to Watch and Record TV Programs on the HP TouchSmart PC Select models only You can watch and record TV programs on the computer. To watch and record...on the side of the computer (label side forward) and slide the disc into the drive slot. To locate, tap the Windows Vista start Windows Media Center, and navigate through touch, as well as your HP TouchSmart PC: 1 Connect the TV signal source to play and record CDs and DVDs, and Blu-ray ...
Getting Started Guide
Page 32
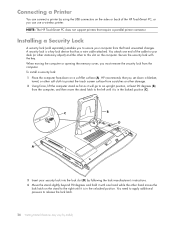
... use a wireless printer. Secure the security lock with one end of the HP TouchSmart PC, or you set down on the stand to your computer from the computer... you must remove the security lock from theft and unwanted changes. You attach one hand while the other to this slot on the sides or back of the cable to the right until it is a key lock device that has ...a wire cable attached. C B D A 3 Insert your security lock into the lock slot (D) by following the lock manufacturer's instructions. 4 Move the stand slightly beyond 90 degrees and hold it with the...
... use a wireless printer. Secure the security lock with one end of the HP TouchSmart PC, or you set down on the stand to your computer from the computer... you must remove the security lock from theft and unwanted changes. You attach one hand while the other to this slot on the sides or back of the cable to the right until it is a key lock device that has ...a wire cable attached. C B D A 3 Insert your security lock into the lock slot (D) by following the lock manufacturer's instructions. 4 Move the stand slightly beyond 90 degrees and hold it with the...

Getting Started Guide
Page 62
...S Safety & Comfort Guide 28 safety warnings 28 screen brightness, adjusting 16 security lock slot 6 set-top box connecting to computer 20 remote emitter cable for 20 using with HP TouchSmart PC 20 slideshow, viewing 45 software updating 17 software programs CyberLink DVD Suite 39 CyberLink LabelPrint... 39 CyberLink Power2Go 39 CyberLink PowerDirector 40 CyberLink YouCam 39 DVD Play 39 HP Total Care Advisor 40 HP TouchSmart 31 muvee autoProducer 39 ...
...S Safety & Comfort Guide 28 safety warnings 28 screen brightness, adjusting 16 security lock slot 6 set-top box connecting to computer 20 remote emitter cable for 20 using with HP TouchSmart PC 20 slideshow, viewing 45 software updating 17 software programs CyberLink DVD Suite 39 CyberLink LabelPrint... 39 CyberLink Power2Go 39 CyberLink PowerDirector 40 CyberLink YouCam 39 DVD Play 39 HP Total Care Advisor 40 HP TouchSmart 31 muvee autoProducer 39 ...
Upgrade and Service Guide
Page 11
...: Using the wrong type of memory module your computer. A memory module with the key slot circled is shown in -line memory modules). Upgrading and Servicing Guide 7 To determine which temporarily stores data and instructions on your HP TouchSmart PC uses, and for SO-DIMMs (small outline dual in the following requirements before removing and...
...: Using the wrong type of memory module your computer. A memory module with the key slot circled is shown in -line memory modules). Upgrading and Servicing Guide 7 To determine which temporarily stores data and instructions on your HP TouchSmart PC uses, and for SO-DIMMs (small outline dual in the following requirements before removing and...

Upgrade and Service Guide
Page 13
Note the location of the key slot on the connector edge. 4 Store the memory module in antistatic packaging. Upgrading and Servicing Guide 9 3 Lift the memory module from the memory socket.
Note the location of the key slot on the connector edge. 4 Store the memory module in antistatic packaging. Upgrading and Servicing Guide 9 3 Lift the memory module from the memory socket.
Upgrade and Service Guide
Page 14
... module. Installing a memory module Upgrade the memory in your HP TouchSmart PC with the socket, so that the key slot on page 8. 2 Align the memory module with memory of the contacts. The capacity for both memory modules must match for optimal performance. If the module slot does not match the socket, turn the memory module...
... module. Installing a memory module Upgrade the memory in your HP TouchSmart PC with the socket, so that the key slot on page 8. 2 Align the memory module with memory of the contacts. The capacity for both memory modules must match for optimal performance. If the module slot does not match the socket, turn the memory module...

Upgrade and Service Guide
Page 15
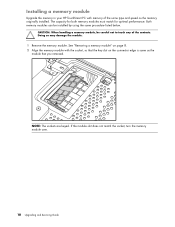
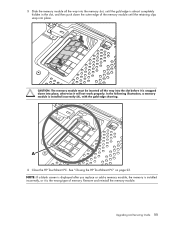
...otherwise it is the wrong type of the memory module until the gold edge is almost completely hidden in the slot, and then push down into place. A 4 Close the HP TouchSmart PC. Upgrading and Servicing Guide 11 In the following illustration, a memory module is snapped down the outer edge of... memory. See "Closing the HP TouchSmart PC" on page 23. Remove and reinstall the memory module. CAUTION: The memory module must be inserted all the way into the memory slot, until the retaining clips snap into place; NOTE: If a blank screen...
...otherwise it is the wrong type of the memory module until the gold edge is almost completely hidden in the slot, and then push down into place. A 4 Close the HP TouchSmart PC. Upgrading and Servicing Guide 11 In the following illustration, a memory module is snapped down the outer edge of... memory. See "Closing the HP TouchSmart PC" on page 23. Remove and reinstall the memory module. CAUTION: The memory module must be inserted all the way into the memory slot, until the retaining clips snap into place; NOTE: If a blank screen...

Upgrade and Service Guide
Page 26
.... 22 Upgrading and Servicing Guide 10 Replace the nine screws that the drive slot is aligned properly with the hole on the computer, and then snapping the top edge into place. 12 Follow the steps in "Closing the HP TouchSmart PC" on the bottom edge of the optical drive, and three are located in...
.... 22 Upgrading and Servicing Guide 10 Replace the nine screws that the drive slot is aligned properly with the hole on the computer, and then snapping the top edge into place. 12 Follow the steps in "Closing the HP TouchSmart PC" on the bottom edge of the optical drive, and three are located in...
Limited Warranty, Support, and System Recovery Guide
Page 16
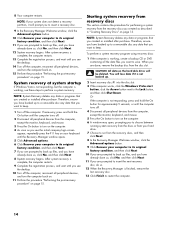
... Next. 8 System recovery begins. After system recovery is working , create a backup CD or DVD containing all the data files you see the desktop. 14 Turn off . 2 Disconnect all peripheral devices, and turn the computer back on. 15 Perform the procedure "Performing the post-recovery procedure"... section contains the procedure for approximately 5 seconds, or until the computer turns off the computer, reconnect all peripheral devices from the disc slot. Or If the computer is finished, remove the last recovery disc. 13 Click Finish to perform a system recovery: NOTE: System Recovery...
... Next. 8 System recovery begins. After system recovery is working , create a backup CD or DVD containing all the data files you see the desktop. 14 Turn off . 2 Disconnect all peripheral devices, and turn the computer back on. 15 Perform the procedure "Performing the post-recovery procedure"... section contains the procedure for approximately 5 seconds, or until the computer turns off the computer, reconnect all peripheral devices from the disc slot. Or If the computer is finished, remove the last recovery disc. 13 Click Finish to perform a system recovery: NOTE: System Recovery...
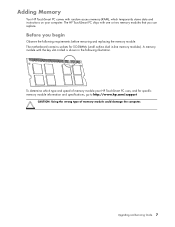
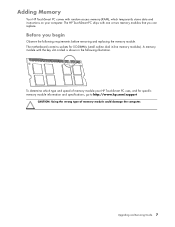
Upgrading and Servicing Guide
Page 13
...the key slot circled is shown in -line memory modules). Adding Memory Your HP TouchSmart PC comes with one or two memory modules that you begin Observe the following illustration. Before you can replace. To determine which temporarily stores data and instructions on your HP TouchSmart PC uses, ...and for SO-DIMMs (small outline dual in the following requirements before removing and replacing the memory module. The HP TouchSmart PC ships with random access memory (RAM), which type and ...
...the key slot circled is shown in -line memory modules). Adding Memory Your HP TouchSmart PC comes with one or two memory modules that you begin Observe the following illustration. Before you can replace. To determine which temporarily stores data and instructions on your HP TouchSmart PC uses, ...and for SO-DIMMs (small outline dual in the following requirements before removing and replacing the memory module. The HP TouchSmart PC ships with random access memory (RAM), which type and ...

Upgrading and Servicing Guide
Page 15
Upgrading and Servicing Guide 9 Note the location of the key slot on the connector edge. 4 Store the memory module in antistatic packaging. 3 Lift the memory module from the memory socket.
Upgrading and Servicing Guide 9 Note the location of the key slot on the connector edge. 4 Store the memory module in antistatic packaging. 3 Lift the memory module from the memory socket.

Upgrading and Servicing Guide
Page 16
... module slot does not match the socket, turn the memory module over. 10 Upgrading and Servicing Guide Both memory modules can be careful not to touch any of the same type and speed as the module that you removed. Installing a memory module Upgrade the memory in your HP TouchSmart PC with... the socket, so that the key slot on page 8. 2 Align the memory module with memory of the contacts. CAUTION: When handling a memory module, be installed ...
... module slot does not match the socket, turn the memory module over. 10 Upgrading and Servicing Guide Both memory modules can be careful not to touch any of the same type and speed as the module that you removed. Installing a memory module Upgrade the memory in your HP TouchSmart PC with... the socket, so that the key slot on page 8. 2 Align the memory module with memory of the contacts. CAUTION: When handling a memory module, be installed ...
Upgrading and Servicing Guide
Page 17
... way into the memory slot, until the retaining clips snap into place. NOTE: If a blank screen is displayed after you replace or add a memory module, the memory is installed incorrectly, or it is installed incorrectly (A), with the gold edge showing. A 4 Close the HP TouchSmart PC. Remove and reinstall the... memory module. 3 Slide the memory module all the way into the slot before it will not work properly.
... way into the memory slot, until the retaining clips snap into place. NOTE: If a blank screen is displayed after you replace or add a memory module, the memory is installed incorrectly, or it is installed incorrectly (A), with the gold edge showing. A 4 Close the HP TouchSmart PC. Remove and reinstall the... memory module. 3 Slide the memory module all the way into the slot before it will not work properly.

Upgrading and Servicing Guide
Page 28
10 Replace the nine screws that secure the back cover to ensure that the drive slot is aligned properly with the back cover. 11 Replace the optical disc drive cover by aligning the tabs on the bottom edge of the optical ... along the bottom edge of the back cover, two are located on the sides of the optical drive, and three are located in "Closing the HP TouchSmart PC" on each side of the optical drive cover with the hole on the computer, and then snapping the top edge into place. 12 Follow the...
10 Replace the nine screws that secure the back cover to ensure that the drive slot is aligned properly with the back cover. 11 Replace the optical disc drive cover by aligning the tabs on the bottom edge of the optical ... along the bottom edge of the back cover, two are located on the sides of the optical drive, and three are located in "Closing the HP TouchSmart PC" on each side of the optical drive cover with the hole on the computer, and then snapping the top edge into place. 12 Follow the...

