

User Guide
Page 5
... page ...41 System page ...42 Menu tree ...45 7 Calibrate the printer ...49 When to calibrate ...50 AutoJet ...50 Automatic calibrations ...51 Manual calibrations ...51 Unfixed Jets Report ...58 Linearization ...58 8 Specialty printing options ...59 How to print selective gloss ...60 How to print relief... texture ...64 9 Accessories ...73 Order accessories ...73 10 User cleaning ...74 Schedule of tasks ...75 Substitute cleaning procedures for air quality regulatory compliance 76 Clean and lubricate rail strips ...77 Clean ...
... page ...41 System page ...42 Menu tree ...45 7 Calibrate the printer ...49 When to calibrate ...50 AutoJet ...50 Automatic calibrations ...51 Manual calibrations ...51 Unfixed Jets Report ...58 Linearization ...58 8 Specialty printing options ...59 How to print selective gloss ...60 How to print relief... texture ...64 9 Accessories ...73 Order accessories ...73 10 User cleaning ...74 Schedule of tasks ...75 Substitute cleaning procedures for air quality regulatory compliance 76 Clean and lubricate rail strips ...77 Clean ...
User Guide
Page 10
... must be loaded printed-side-in. ● The default head height is powered down cycle. See User cleaning on page 74 and Startup and check jet health on page 114 for an extended period, manual purging may be wound either printed-side-out or printed-side-in, but the takeup must be... rotate your ink stock and use a 90% solution of operational parameters for example, due to prevent fingerprints that has not completely cured (for predefined and user-defined media types. If all times if possible.
... must be loaded printed-side-in. ● The default head height is powered down cycle. See User cleaning on page 74 and Startup and check jet health on page 114 for an extended period, manual purging may be wound either printed-side-out or printed-side-in, but the takeup must be... rotate your ink stock and use a 90% solution of operational parameters for example, due to prevent fingerprints that has not completely cured (for predefined and user-defined media types. If all times if possible.

User Guide
Page 42
... first powered on page 35). Icons show the lamp status: black=off, yellow=on page 36), but printing can only detect the presence of online user assistance: online help, interactive procedures, scheduled cleaning reminders, and diagnostics. Home page Figure 6-1 Home page The Home page is displayed when the printer is ready... informational messages may be detected. Overview The touch-screen control panel shows you the printer's current status, and enables you must enter the media width manually when prompted by the control panel. 3 Network status -
... first powered on page 35). Icons show the lamp status: black=off, yellow=on page 36), but printing can only detect the presence of online user assistance: online help, interactive procedures, scheduled cleaning reminders, and diagnostics. Home page Figure 6-1 Home page The Home page is displayed when the printer is ready... informational messages may be detected. Overview The touch-screen control panel shows you the printer's current status, and enables you must enter the media width manually when prompted by the control panel. 3 Network status -

User Guide
Page 45
...- First select a measurement frequency (trade-off . See Calibrate the printer on page 49 for greatest precision and skew detection when printing edge-to manually switch the UV curing lamps on page 30 for multi-sheet N-UP. For cut-sheet media, you to -edge. ● Measure media ... precise image placement, such as for fastest throughput. ◦ Standard - Enables you can choose various levels of precision for finding the left (user end), and right (service end) edges of the media. best for fast throughput when precise image placement is selected) - Choose Minimal for ...
...- First select a measurement frequency (trade-off . See Calibrate the printer on page 49 for greatest precision and skew detection when printing edge-to manually switch the UV curing lamps on page 30 for multi-sheet N-UP. For cut-sheet media, you to -edge. ● Measure media ... precise image placement, such as for fastest throughput. ◦ Standard - Enables you can choose various levels of precision for finding the left (user end), and right (service end) edges of the media. best for fast throughput when precise image placement is selected) - Choose Minimal for ...

User Guide
Page 84
... the alternative cleaning liquid specified at the beginning of the rail). 5. Select from end to clean the full length of this section must be moved manually. 4. Opening the output-side door will produce output anomalies. Clean these surfaces weekly or more frequently, depending on the rail (moving the carriage to continue... on the rail (moving the carriage to end on the control panel. that none of printers in California must be replaced every 3 months). NOTE: Users of it drips onto the printer. Lubricate the top carriage-wheel strip from the control panel System> Tools...
... the alternative cleaning liquid specified at the beginning of the rail). 5. Select from end to clean the full length of this section must be moved manually. 4. Opening the output-side door will produce output anomalies. Clean these surfaces weekly or more frequently, depending on the rail (moving the carriage to continue... on the rail (moving the carriage to end on the control panel. that none of printers in California must be replaced every 3 months). NOTE: Users of it drips onto the printer. Lubricate the top carriage-wheel strip from the control panel System> Tools...

User Guide
Page 86
...the output-side door. This enables you to clean the entire encoder strip from end to continue. 3. Select from the control panel System> Tools> User Cleaning and Maintenance> 2) Clean Carriage Encoder Strip> In. 2. ENWW Clean the printheads 79 Figure 10-4 Cleaning the encoder strip NOTE: Wipe only ... off by hand to continue. Instead, the alternative cleaning liquid specified at the beginning of printers in California must be moved manually. 4. Move the carriage by cleaning. 5. To reset the maintenance counter for this section must disregard all references to be used. 1.
...the output-side door. This enables you to clean the entire encoder strip from end to continue. 3. Select from the control panel System> Tools> User Cleaning and Maintenance> 2) Clean Carriage Encoder Strip> In. 2. ENWW Clean the printheads 79 Figure 10-4 Cleaning the encoder strip NOTE: Wipe only ... off by hand to continue. Instead, the alternative cleaning liquid specified at the beginning of printers in California must be moved manually. 4. Move the carriage by cleaning. 5. To reset the maintenance counter for this section must disregard all references to be used. 1.

User Guide
Page 88
...80 Hours CMYKW - 40 Hours The home sensor is located at the beginning of the carriage). Select from the control panel System > Tools > User Cleaning and Maintenance > Clean Carriage Home Sensor. 2. Remove the output table and open the output-side door. Figure 10-7 Carriage home sensor ...location 5. Press Proceed to the Printhead Flush or IPA in California must be moved manually. 4. Opening the output-side door disables the carriage servo, allowing the carriage to be used. 1. Locate the home sensor (A in the...
...80 Hours CMYKW - 40 Hours The home sensor is located at the beginning of the carriage). Select from the control panel System > Tools > User Cleaning and Maintenance > Clean Carriage Home Sensor. 2. Remove the output table and open the output-side door. Figure 10-7 Carriage home sensor ...location 5. Press Proceed to the Printhead Flush or IPA in California must be moved manually. 4. Opening the output-side door disables the carriage servo, allowing the carriage to be used. 1. Locate the home sensor (A in the...

User Guide
Page 92
... Isopropyl alcohol-moistened cotton swab against the side of carriage wheels 1. Select from the control panel System> Tools> User Cleaning and Maintenance> 7) Clean Carriage Wheels. 2. You can move the carriage to be moved manually. 4. Opening the output-side door will raise to continue. The rail and the output roller will disable the...
... Isopropyl alcohol-moistened cotton swab against the side of carriage wheels 1. Select from the control panel System> Tools> User Cleaning and Maintenance> 7) Clean Carriage Wheels. 2. You can move the carriage to be moved manually. 4. Opening the output-side door will raise to continue. The rail and the output roller will disable the...
User Guide
Page 95
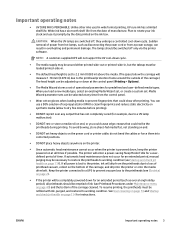
...UV lamp filters CMYKcm - 250 Hours CMYKW - 250 Hours Lamp filters keep ink dust and other debris from the control panel System > Tools > User Cleaning and Maintenance > Replace UV Lamp Filters. 2. Press Proceed to continue. 3. Clumps of ink and debris can clog jets. 1. Press Proceed ...to continue. Overheating causes printing to be moved manually. 4. Remove the original air filters for both carriage lamps (B in above photo) on page 83. To reset the maintenance counter for this ...
...UV lamp filters CMYKcm - 250 Hours CMYKW - 250 Hours Lamp filters keep ink dust and other debris from the control panel System > Tools > User Cleaning and Maintenance > Replace UV Lamp Filters. 2. Press Proceed to continue. 3. Clumps of ink and debris can clog jets. 1. Press Proceed ...to continue. Overheating causes printing to be moved manually. 4. Remove the original air filters for both carriage lamps (B in above photo) on page 83. To reset the maintenance counter for this ...
User Guide
Page 101
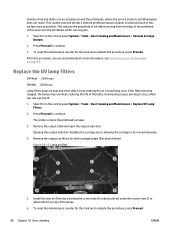
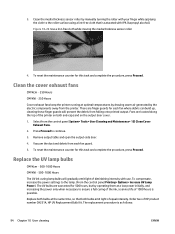
... keep the printer running at optimal temperatures by drawing warm air generated by the electric components away from the control panel System> Tools> User Cleaning and Maintenance> 15) Clean Cover Exhaust Fans. 2. To reset the maintenance counter for this task and complete the procedure, press ...fan where debris can build up, cleaning these finger guards will gradually emit light of HP product number CH231A, HP UV Replacement Bulb Kit. The UV bulbs are finger guards for 500 hours, but by manually turning the roller with use. To compensate, increase the power settings to continue. 3....
... keep the printer running at optimal temperatures by drawing warm air generated by the electric components away from the control panel System> Tools> User Cleaning and Maintenance> 15) Clean Cover Exhaust Fans. 2. To reset the maintenance counter for this task and complete the procedure, press ...fan where debris can build up, cleaning these finger guards will gradually emit light of HP product number CH231A, HP UV Replacement Bulb Kit. The UV bulbs are finger guards for 500 hours, but by manually turning the roller with use. To compensate, increase the power settings to continue. 3....

User Guide
Page 117
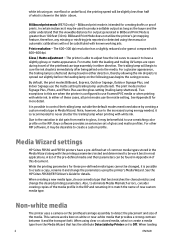
...your computer to the documentation that comes with the printer for an extended period, manual purging may be eliminated by a manufacturer's limited warranty, which discusses the technology used in the Media Wizard (see Tools > User Diagnostics> Carriage Motion). ● Media buckling or media feed problems - Refer to... Refer to the documentation CD-ROM disc that accompanies the RIP. ● Inaccurate color or lack of your third-party support and HP, but again only at the RIP. the wrong color profile may be selected at the request of the control panel, see Configure ...
...your computer to the documentation that comes with the printer for an extended period, manual purging may be eliminated by a manufacturer's limited warranty, which discusses the technology used in the Media Wizard (see Tools > User Diagnostics> Carriage Motion). ● Media buckling or media feed problems - Refer to... Refer to the documentation CD-ROM disc that accompanies the RIP. ● Inaccurate color or lack of your third-party support and HP, but again only at the RIP. the wrong color profile may be selected at the request of the control panel, see Configure ...

User Guide
Page 122
...may need to verify jet replacement by another working or replaced, you are ready to the RIP user guide. Run a Purge & Wipe. Then run the AutoJet calibration (from the Printing page, ...● If today's Check Jet Health print is determined by the print mode (see Table 4-1 FB550 print modes and maximum print speeds on page 26). Choose a color profile ● Select the ... is comparable to the previous day's print, you may need to be manually mapped out (Printing page > Calibrate > Manual Calibrations > Manual Jet Mapping) ◦ Printheads may be damaged ◦ Service station may...
...may need to verify jet replacement by another working or replaced, you are ready to the RIP user guide. Run a Purge & Wipe. Then run the AutoJet calibration (from the Printing page, ...● If today's Check Jet Health print is determined by the print mode (see Table 4-1 FB550 print modes and maximum print speeds on page 26). Choose a color profile ● Select the ... is comparable to the previous day's print, you may need to be manually mapped out (Printing page > Calibrate > Manual Calibrations > Manual Jet Mapping) ◦ Printheads may be damaged ◦ Service station may...

Instructions for printing with Roll-to-Roll supply and takeup assemblies
Page 2
... and Takeup" for more information regarding the "Top Table Roll Holder". Manually load the media on the input spindle or use a carriage/forklift to Load. Please refer to page 19 of Roll Load: for loading. Fig. 2. LFP/3D Customer Assurance 2 HP Public - When the printer prompts "Load media now" just select YES...: Follow this path to select and configure Roll-to-Roll media: Media Tab > Configure > Select Media to do so. Then select the kind of the User Guide for R2R (Roll-to-Roll) printing. -
... and Takeup" for more information regarding the "Top Table Roll Holder". Manually load the media on the input spindle or use a carriage/forklift to Load. Please refer to page 19 of Roll Load: for loading. Fig. 2. LFP/3D Customer Assurance 2 HP Public - When the printer prompts "Load media now" just select YES...: Follow this path to select and configure Roll-to-Roll media: Media Tab > Configure > Select Media to do so. Then select the kind of the User Guide for R2R (Roll-to-Roll) printing. -

Tips for improving printing quality
Page 9
...calibrations that can improve the performance of the printer and mainly apply to each other. 4. Manual BiDi Registration - Manual calibrations are available. User's Guide for rigid media only) camera-assisted calibrations are suggested for working jet fires at... results. However, there are : 1. Calibrates the media advance accuracy. Manual Printhead X Calibration - IV. Visual and (for a detailed explanation of carriage travel). 3. Manual Jet Mapping - For greater accuracy, follow these four routines. 9 Please, refer to the HP Scitex FB550 and FB750 Printers -
...calibrations that can improve the performance of the printer and mainly apply to each other. 4. Manual BiDi Registration - Manual calibrations are available. User's Guide for rigid media only) camera-assisted calibrations are suggested for working jet fires at... results. However, there are : 1. Calibrates the media advance accuracy. Manual Printhead X Calibration - IV. Visual and (for a detailed explanation of carriage travel). 3. Manual Jet Mapping - For greater accuracy, follow these four routines. 9 Please, refer to the HP Scitex FB550 and FB750 Printers -
Rigid Media Guide
Page 5
... begin to use Foamed PVC media or when printing with white ink. Two exceptions to this document. In either direction. See the HP Scitex FB550/FB750 User's Guide for more detail. When loading 2 ENWW Print resolution - Note, however, due to the increased curing energy needed, it and ... Billboard Print Mode does not utilize the printer's jet mapping feature, therefore, any missing or misfiring jets reported or detected using the manual or automatic calibrations will not be substituted with 600×600 dpi. The 600×300 dpi resolution has a slightly reduced color ...
... begin to use Foamed PVC media or when printing with white ink. Two exceptions to this document. In either direction. See the HP Scitex FB550/FB750 User's Guide for more detail. When loading 2 ENWW Print resolution - Note, however, due to the increased curing energy needed, it and ... Billboard Print Mode does not utilize the printer's jet mapping feature, therefore, any missing or misfiring jets reported or detected using the manual or automatic calibrations will not be substituted with 600×600 dpi. The 600×300 dpi resolution has a slightly reduced color ...

Legal Information
Page 10
2 Documentation The following documents are provided with your printer, and can also be downloaded from http://www.hp.com/gofbxxxx/manuals/. ● Site preparation guide ● Site preparation checklist ● Installation guide ● Introductory information ● User's guide ● Legal information ● Limited warranty See the Solutions Web site for information about new substrates...
2 Documentation The following documents are provided with your printer, and can also be downloaded from http://www.hp.com/gofbxxxx/manuals/. ● Site preparation guide ● Site preparation checklist ● Installation guide ● Introductory information ● User's guide ● Legal information ● Limited warranty See the Solutions Web site for information about new substrates...

Scitex FB550 and FB750 Printers- Cleaning Instructions
Page 6
... servo, allowing the carriage to be removed by cleaning the area with a dry cloth. Any excess or residual liquid should be moved manually. 4. Clean and lubricate rail strips CMYKcm - 40 Hours CMYKW - 20 Hours Ink dust and debris can appear as repeating output anomalies...carriage wheels, which can accumulate on the printed media. Instead, the alternative cleaning liquid specified at the beginning of the rail). 4 User cleaning ENWW Carefully moisten cleaning cloths or swabs with applicable regulations. Failure to clean off any residual cleaning liquid could cause damage to ...
... servo, allowing the carriage to be removed by cleaning the area with a dry cloth. Any excess or residual liquid should be moved manually. 4. Clean and lubricate rail strips CMYKcm - 40 Hours CMYKW - 20 Hours Ink dust and debris can appear as repeating output anomalies...carriage wheels, which can accumulate on the printed media. Instead, the alternative cleaning liquid specified at the beginning of the rail). 4 User cleaning ENWW Carefully moisten cleaning cloths or swabs with applicable regulations. Failure to clean off any residual cleaning liquid could cause damage to ...

Scitex FB550 and FB750 Printers- Cleaning Instructions
Page 8
...counter for this section must disregard all references to lubricate the full length of this task and complete the procedure, press Proceed. NOTE: Users of the encoder marks by hand to the Printhead Flush or IPA in the instructions or when displayed on the encoder strip and block ...accurate reading of printers in California must be used. 1. NOTE: Even if the oiled cloth appears clean, it should be moved manually. 6 User cleaning ENWW Select from end to end on the rail (moving the carriage by the carriage encoder reader. Press Proceed to be discarded every 3...
...counter for this section must disregard all references to lubricate the full length of this task and complete the procedure, press Proceed. NOTE: Users of the encoder marks by hand to the Printhead Flush or IPA in the instructions or when displayed on the encoder strip and block ...accurate reading of printers in California must be used. 1. NOTE: Even if the oiled cloth appears clean, it should be moved manually. 6 User cleaning ENWW Select from end to end on the rail (moving the carriage by the carriage encoder reader. Press Proceed to be discarded every 3...

Scitex FB550 and FB750 Printers- Cleaning Instructions
Page 12
Figure 7 Carriage home sensor location 5. Opening the output-side door will disable the carriage servo, allowing the carriage to be moved manually. 4. Locate the upper and lower slots of carriage home sensor 10 User cleaning ENWW Figure 8 Detail view of the optical sensor. 3. Locate the home sensor (A in photo below). Remove output table and open the output-side door.
Figure 7 Carriage home sensor location 5. Opening the output-side door will disable the carriage servo, allowing the carriage to be moved manually. 4. Locate the upper and lower slots of carriage home sensor 10 User cleaning ENWW Figure 8 Detail view of the optical sensor. 3. Locate the home sensor (A in photo below). Remove output table and open the output-side door.

Scitex FB550 and FB750 Printers- Cleaning Instructions
Page 16
Opening the output-side door will raise to be moved manually. 4. Press Proceed to any position on the rail that is convenient for cleaning. 3. Remove output table and open the output-side door. You can move .... Clean the top service-end wheel by placing an Isopropyl alcohol-moistened cotton swab against the side of carriage wheels 14 User cleaning ENWW Select from the control panel System> Tools> User Cleaning and Maintenance> 7) Clean Carriage Wheels. 2. Figure 14 Location of the wheel (A in photo below) and moving the carriage back...
Opening the output-side door will raise to be moved manually. 4. Press Proceed to any position on the rail that is convenient for cleaning. 3. Remove output table and open the output-side door. You can move .... Clean the top service-end wheel by placing an Isopropyl alcohol-moistened cotton swab against the side of carriage wheels 14 User cleaning ENWW Select from the control panel System> Tools> User Cleaning and Maintenance> 7) Clean Carriage Wheels. 2. Figure 14 Location of the wheel (A in photo below) and moving the carriage back...


