
HP ProtectTools Security Software 2010
Page 9
... point management tools into one console, organizations are authorized to log on legacy or non-HP PCs Keep security policies and settings the same across PCs Combine passwords, smart cards, fingerprints, face recognition Unlock pre-boot, disk encryption and PCs for forgotten passwords or smart cards Enable stronger security for password-based enterprise and web...
... point management tools into one console, organizations are authorized to log on legacy or non-HP PCs Keep security policies and settings the same across PCs Combine passwords, smart cards, fingerprints, face recognition Unlock pre-boot, disk encryption and PCs for forgotten passwords or smart cards Enable stronger security for password-based enterprise and web...
HP ProtectTools Security Software 2010
Page 24
...locked, there is the same as part of the questions that should be one of HP ProtectTools? The process is no way to be used on another PC. W here is a separate application with a PKCS#11 component. Firmware Security Features...they exist HP ProtectTools Security Embedded Security for HP ProtectTools File Sanitizer for HP ProtectTools Privacy Manager for HP ProtectTools requires HP ProtectTools to unlock it ? A. W hat is a feature built into every business notebook BIO S, 2 0 0 6 and later. . . Is the HP ProtectTools security software suite supported on ? A. hp. Q....
...locked, there is the same as part of the questions that should be one of HP ProtectTools? The process is no way to be used on another PC. W here is a separate application with a PKCS#11 component. Firmware Security Features...they exist HP ProtectTools Security Embedded Security for HP ProtectTools File Sanitizer for HP ProtectTools Privacy Manager for HP ProtectTools requires HP ProtectTools to unlock it ? A. W hat is a feature built into every business notebook BIO S, 2 0 0 6 and later. . . Is the HP ProtectTools security software suite supported on ? A. hp. Q....

HP ProBook User Guide - Windows 7
Page 114
...to install device drivers: ● Install only the device drivers for your device. CAUTION: To prevent damage to unlock it. 2. To insert an ExpressCard: 1. Like standard PC Cards, ExpressCards are instructed by the ExpressCard manufacturer. Do not move or transport the computer when an ExpressCard is ... International Association (PCMCIA). If you are designed to conform to the computer and external media cards, do not insert a PC Card into the ExpressCard slot. Press in use. Inserting an ExpressCard CAUTION: To prevent damage to the standard specifications of the slot (2).
...to install device drivers: ● Install only the device drivers for your device. CAUTION: To prevent damage to unlock it. 2. To insert an ExpressCard: 1. Like standard PC Cards, ExpressCards are instructed by the ExpressCard manufacturer. Do not move or transport the computer when an ExpressCard is ... International Association (PCMCIA). If you are designed to conform to the computer and external media cards, do not insert a PC Card into the ExpressCard slot. Press in use. Inserting an ExpressCard CAUTION: To prevent damage to the standard specifications of the slot (2).
HP ProBook User Guide - Windows 7
Page 115
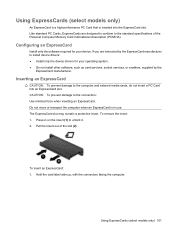
... Hardware and Eject Media icon, click the Show hidden icons icon (the arrow at the far right of the ExpressCard in on the ExpressCard (1) to unlock it is safe to let you insert an ExpressCard, a message is displayed in the notification area to remove the hardware device. 4.
... Hardware and Eject Media icon, click the Show hidden icons icon (the arrow at the far right of the ExpressCard in on the ExpressCard (1) to unlock it is safe to let you insert an ExpressCard, a message is displayed in the notification area to remove the hardware device. 4.

HP ProBook User Guide - Windows 7
Page 134
... password and a DriveLock master password will be created for Startup Menu" message is displayed at the bottom of the screen. 2. Use the arrow keys to unlock the drive. Removing DriveLock protection To remove DriveLock protection in Computer Setup, follow these steps: 1.
... password and a DriveLock master password will be created for Startup Menu" message is displayed at the bottom of the screen. 2. Use the arrow keys to unlock the drive. Removing DriveLock protection To remove DriveLock protection in Computer Setup, follow these steps: 1.

HP ProBook User Guide - Windows Vista
Page 111
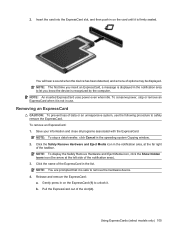
.... To remove the insert: 1. Using ExpressCards (select models only) An ExpressCard is a high-performance PC Card that is in on the insert (1) to the standard specifications of the slot (2). Pull the ...facing the computer. Using ExpressCards (select models only) 101 Press in use. To insert an ExpressCard: 1. Like standard PC Cards, ExpressCards are instructed by the ExpressCard manufacturer. Do not move or transport the computer when an ExpressCard is inserted into.... The ExpressCard slot may contain a protective insert. If you are designed to conform to unlock it. 2.
.... To remove the insert: 1. Using ExpressCards (select models only) An ExpressCard is a high-performance PC Card that is in on the insert (1) to the standard specifications of the slot (2). Pull the ...facing the computer. Using ExpressCards (select models only) 101 Press in use. To insert an ExpressCard: 1. Like standard PC Cards, ExpressCards are instructed by the ExpressCard manufacturer. Do not move or transport the computer when an ExpressCard is inserted into.... The ExpressCard slot may contain a protective insert. If you are designed to conform to unlock it. 2.

HP ProBook User Guide - Windows Vista
Page 112
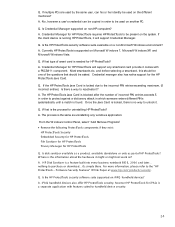
NOTE: The first time you insert an ExpressCard, a message is displayed in the notification area to let you know the device is firmly seated. Save your information and close all programs associated with the ExpressCard. NOTE: To display the Safely Remove Hardware icon, click the Show Hidden Icons icon (< or You will hear a sound when the device has been detected, and a menu of the taskbar. Stopping and removing an ExpressCard CAUTION: To prevent loss of data or an unresponsive system, stop an ExpressCard before removing it is not in the operating system Copying window. 2. 2. ...
NOTE: The first time you insert an ExpressCard, a message is displayed in the notification area to let you know the device is firmly seated. Save your information and close all programs associated with the ExpressCard. NOTE: To display the Safely Remove Hardware icon, click the Show Hidden Icons icon (< or You will hear a sound when the device has been detected, and a menu of the taskbar. Stopping and removing an ExpressCard CAUTION: To prevent loss of data or an unresponsive system, stop an ExpressCard before removing it is not in the operating system Copying window. 2. 2. ...

HP ProBook User Guide - Windows Vista
Page 131
..." message is displayed at the bottom of the screen, and then follow the on -screen instructions. - or - Use a pointing device or the arrow keys to unlock the drive. or - When the Automatic DriveLock password is displayed at the bottom of the screen, and then follow the on -screen instructions. - Type your...
..." message is displayed at the bottom of the screen, and then follow the on -screen instructions. - or - Use a pointing device or the arrow keys to unlock the drive. or - When the Automatic DriveLock password is displayed at the bottom of the screen, and then follow the on -screen instructions. - Type your...
HP ProBook User Guide - Windows XP
Page 111
... an ExpressCard. Inserting an ExpressCard CAUTION: To prevent damage to the computer and external media cards, do not insert a PC Card into the ExpressCard slot. Press in use. Configuring an ExpressCard Install only the software required for your device. If you...remove the insert: 1. Using ExpressCards (select models only) 101 Like standard PC Cards, ExpressCards are instructed by the ExpressCard manufacturer to the standard specifications of the slot (2). CAUTION: To prevent damage to unlock it. 2. The ExpressCard slot may contain a protective insert. Pull the...
... an ExpressCard. Inserting an ExpressCard CAUTION: To prevent damage to the computer and external media cards, do not insert a PC Card into the ExpressCard slot. Press in use. Configuring an ExpressCard Install only the software required for your device. If you...remove the insert: 1. Using ExpressCards (select models only) 101 Like standard PC Cards, ExpressCards are instructed by the ExpressCard manufacturer to the standard specifications of the slot (2). CAUTION: To prevent damage to unlock it. 2. The ExpressCard slot may contain a protective insert. Pull the...

HP ProBook User Guide - Windows XP
Page 112
2. NOTE: An inserted ExpressCard uses power even when idle. NOTE: To display the Safely Remove Hardware icon, click the Show Hidden Icons icon (< or Insert the card into the ExpressCard slot, and then push in on the card until it is recognized by the computer. Save your information and close all programs associated with the ExpressCard. Stop the ExpressCard: a. Stopping and removing an ExpressCard CAUTION: To prevent loss of options may be displayed. NOTE: To stop or remove an ExpressCard when it . 1. You will hear a sound when the device has been detected, and a menu of data...
2. NOTE: An inserted ExpressCard uses power even when idle. NOTE: To display the Safely Remove Hardware icon, click the Show Hidden Icons icon (< or Insert the card into the ExpressCard slot, and then push in on the card until it is recognized by the computer. Save your information and close all programs associated with the ExpressCard. Stop the ExpressCard: a. Stopping and removing an ExpressCard CAUTION: To prevent loss of options may be displayed. NOTE: To stop or remove an ExpressCard when it . 1. You will hear a sound when the device has been detected, and a menu of data...

HP ProBook User Guide - Windows XP
Page 133
... the ESC key for Startup Menu" message is displayed at the bottom of the screen, and then follow the on -screen instructions. - Press f10 to unlock the drive. Read the warning. To continue, select YES. 6. To save your changes and exit Computer Setup, click Save in the lower-left corner of...
... the ESC key for Startup Menu" message is displayed at the bottom of the screen, and then follow the on -screen instructions. - Press f10 to unlock the drive. Read the warning. To continue, select YES. 6. To save your changes and exit Computer Setup, click Save in the lower-left corner of...


