
HP ProBook User Guide - Windows 7
Page 29
Additional hardware components Component Description (1) Power cord* Connects an AC adapter to an AC outlet. (2) AC adapter Converts AC power to the computer provide information you may need when you troubleshoot system problems or travel internationally with the computer.... information, including the following: Component (1) Product name Identifying the labels 19 Identifying the labels The labels affixed to DC power. (3) Battery* Powers the computer when the computer is not plugged into external power. *Batteries and power cords vary in appearance by region and country.
Additional hardware components Component Description (1) Power cord* Connects an AC adapter to an AC outlet. (2) AC adapter Converts AC power to the computer provide information you may need when you troubleshoot system problems or travel internationally with the computer.... information, including the following: Component (1) Product name Identifying the labels 19 Identifying the labels The labels affixed to DC power. (3) Battery* Powers the computer when the computer is not plugged into external power. *Batteries and power cords vary in appearance by region and country.
HP ProBook User Guide - Windows 7
Page 38
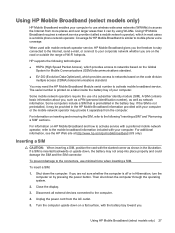
... service, HP Mobile Broadband gives you the freedom to stay connected to the Internet, send e-mail, or connect to your corporate network whether you . 28 Chapter 2 Wireless, modem, and local area network Some computers include a SIM that is off or in the battery bay. Unplug the power cord from the... battery bay toward you are not sure whether the computer is preinstalled in Hibernation, turn the computer on the Global System for HP Mobile Broadband is not preinstalled, it can by pressing the power button. When used with your computer or the mobile network operator may need the...
... service, HP Mobile Broadband gives you the freedom to stay connected to the Internet, send e-mail, or connect to your corporate network whether you . 28 Chapter 2 Wireless, modem, and local area network Some computers include a SIM that is off or in the battery bay. Unplug the power cord from the... battery bay toward you are not sure whether the computer is preinstalled in Hibernation, turn the computer on the Global System for HP Mobile Broadband is not preinstalled, it can by pressing the power button. When used with your computer or the mobile network operator may need the...

HP ProBook User Guide - Windows 7
Page 39
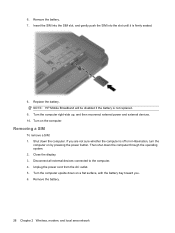
... not replaced. 9. Then shut down the computer. Unplug the power cord from the AC outlet. 5. Turn the computer upside down on by pressing the power button. Turn the computer right-side up, and then reconnect external power and external devices. 10. If you are not sure whether ... flat surface, with the battery bay toward you. 6. Remove the battery. Removing a SIM To remove a SIM: 1. Using HP Mobile Broadband (select models only) 29 NOTE: HP Mobile Broadband will be disabled if the battery is firmly seated. 8. Disconnect all external devices connected to the computer. 4. Close ...
... not replaced. 9. Then shut down the computer. Unplug the power cord from the AC outlet. 5. Turn the computer upside down on by pressing the power button. Turn the computer right-side up, and then reconnect external power and external devices. 10. If you are not sure whether ... flat surface, with the battery bay toward you. 6. Remove the battery. Removing a SIM To remove a SIM: 1. Using HP Mobile Broadband (select models only) 29 NOTE: HP Mobile Broadband will be disabled if the battery is firmly seated. 8. Disconnect all external devices connected to the computer. 4. Close ...

HP ProBook User Guide - Windows 7
Page 78
... (2). 3. The grounding pin is an important safety feature. To connect the computer to save battery life. Connecting the AC adapter WARNING! Disconnect power from the computer by unplugging the power cord from the AC outlet (not by attaching a 2-pin adapter. Plug the AC adapter into an AC outlet that is easily accessible at...
... (2). 3. The grounding pin is an important safety feature. To connect the computer to save battery life. Connecting the AC adapter WARNING! Disconnect power from the computer by unplugging the power cord from the AC outlet (not by attaching a 2-pin adapter. Plug the AC adapter into an AC outlet that is easily accessible at...

HP ProBook User Guide - Windows 7
Page 95
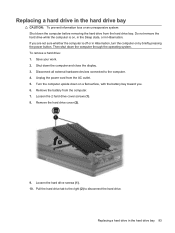
...you. 6. Save your work. 2. Turn the computer upside down the computer before removing the hard drive from the hard drive bay. Unplug the power cord from the computer. 7. Remove the battery from the AC outlet. 5. Remove the hard drive cover (2). 9. Disconnect all external hardware devices connected to... a hard drive in the hard drive bay CAUTION: To prevent information loss or an unresponsive system: Shut down on by briefly pressing the power button. Replacing a hard drive in the hard drive bay 85 Then shut down the computer and close the display. 3. Shut down the ...
...you. 6. Save your work. 2. Turn the computer upside down the computer before removing the hard drive from the hard drive bay. Unplug the power cord from the computer. 7. Remove the battery from the AC outlet. 5. Remove the hard drive cover (2). 9. Disconnect all external hardware devices connected to... a hard drive in the hard drive bay CAUTION: To prevent information loss or an unresponsive system: Shut down on by briefly pressing the power button. Replacing a hard drive in the hard drive bay 85 Then shut down the computer and close the display. 3. Shut down the ...
HP ProBook User Guide - Windows 7
Page 98
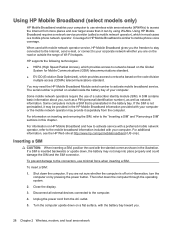
... the protective insert (2). 8. Using a flat-bladed screwdriver, gently push the tab to the computer. 4. Replacing a drive in Hibernation, turn the computer on by pressing the power button. Turn the computer upside down the computer before inserting a drive into the upgrade bay. Loosen the upgrade bay screw (1). 7. Remove the protective insert (3) from... sure whether the computer is off or in the upgrade bay The upgrade bay can hold either a hard drive or an optical drive. Unplug the power cord from the upgrade bay. If you . 6.
... the protective insert (2). 8. Using a flat-bladed screwdriver, gently push the tab to the computer. 4. Replacing a drive in Hibernation, turn the computer on by pressing the power button. Turn the computer upside down the computer before inserting a drive into the upgrade bay. Loosen the upgrade bay screw (1). 7. Remove the protective insert (3) from... sure whether the computer is off or in the upgrade bay The upgrade bay can hold either a hard drive or an optical drive. Unplug the power cord from the upgrade bay. If you . 6.

HP ProBook User Guide - Windows 7
Page 99
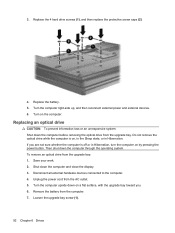
Unplug the power cord from the upgrade bay: 1. To remove a hard drive from the AC outlet. 5. Shut down on a flat surface, with the upgrade bay toward you. 6. Turn the computer upside down the computer and close the display. 3. Replacing a drive in the upgrade bay 89 Disconnect all external hardware devices connected to the computer. 4. Remove the battery from the computer. 7. Remove the protective screw caps (1), and then remove the 4 hard drive screws (2). 8. Save your work. 2. Loosen the upgrade bay screw (1).
Unplug the power cord from the upgrade bay: 1. To remove a hard drive from the AC outlet. 5. Shut down on a flat surface, with the upgrade bay toward you. 6. Turn the computer upside down the computer and close the display. 3. Replacing a drive in the upgrade bay 89 Disconnect all external hardware devices connected to the computer. 4. Remove the battery from the computer. 7. Remove the protective screw caps (1), and then remove the 4 hard drive screws (2). 8. Save your work. 2. Loosen the upgrade bay screw (1).
HP ProBook User Guide - Windows 7
Page 102
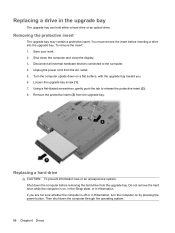
... the battery. 5. Turn the computer upside down the computer before removing the optical drive from the upgrade bay: 1. If you . 6. Unplug the power cord from the computer. 7. Loosen the upgrade bay screw (1). 92 Chapter 6 Drives Turn on a flat surface, with the upgrade bay toward you are ... connected to the computer. 4. Remove the battery from the AC outlet. 5. Turn the computer right-side up, and then reconnect external power and external devices. 6. To remove an optical drive from the upgrade bay. Shut down the computer through the operating system. Save your work...
... the battery. 5. Turn the computer upside down the computer before removing the optical drive from the upgrade bay: 1. If you . 6. Unplug the power cord from the computer. 7. Loosen the upgrade bay screw (1). 92 Chapter 6 Drives Turn on a flat surface, with the upgrade bay toward you are ... connected to the computer. 4. Remove the battery from the AC outlet. 5. Turn the computer right-side up, and then reconnect external power and external devices. 6. To remove an optical drive from the upgrade bay. Shut down the computer through the operating system. Save your work...
HP ProBook User Guide - Windows 7
Page 110
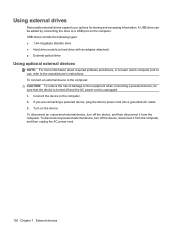
... the computer. To disconnect an unpowered external device, turn off the device, disconnect it from the computer, and then unplug the AC power cord. 100 Chapter 7 External devices To connect an external device to the computer: CAUTION: To reduce the risk of damage to the equipment when... connecting a powered device, be added by connecting the drive to a USB port on the device. If you are connecting a powered device, plug the device power cord into a grounded AC outlet. 3. A USB drive can be sure that the...
... the computer. To disconnect an unpowered external device, turn off the device, disconnect it from the computer, and then unplug the AC power cord. 100 Chapter 7 External devices To connect an external device to the computer: CAUTION: To reduce the risk of damage to the equipment when... connecting a powered device, be added by connecting the drive to a USB port on the device. If you are connecting a powered device, plug the device power cord into a grounded AC outlet. 3. A USB drive can be sure that the...

HP ProBook User Guide - Windows 7
Page 118
... memory capacity of the computer. Before beginning any procedure, touch a grounded metal object to be upgraded by adding a memory module to the equipment, unplug the power cord and remove all batteries before installing a memory module. The expansion memory module compartment is located under the keyboard. WARNING! To reduce the risk of static...
... memory capacity of the computer. Before beginning any procedure, touch a grounded metal object to be upgraded by adding a memory module to the equipment, unplug the power cord and remove all batteries before installing a memory module. The expansion memory module compartment is located under the keyboard. WARNING! To reduce the risk of static...

HP ProBook User Guide - Windows 7
Page 119
... Hibernation, turn the computer on by the edges only. Remove all external devices connected to the memory module, hold the memory module by pressing the power button. Loosen the memory module compartment cover screw (1). 8. Adding or replacing a memory module in the expansion memory module slot 109 Disconnect all batteries from the...
... Hibernation, turn the computer on by the edges only. Remove all external devices connected to the memory module, hold the memory module by pressing the power button. Loosen the memory module compartment cover screw (1). 8. Adding or replacing a memory module in the expansion memory module slot 109 Disconnect all batteries from the...
HP ProBook User Guide - Windows 7
Page 122
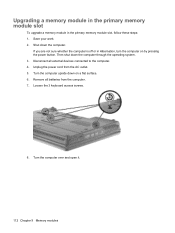
If you are not sure whether the computer is off or in the primary memory module slot, follow these steps: 1. Unplug the power cord from the computer. 7. Upgrading a memory module in the primary memory module slot To upgrade a memory module in Hibernation, turn the computer on...Disconnect all batteries from the AC outlet. 5. Save your work. 2. Then shut down the computer. Turn the computer upside down on by pressing the power button. Shut down the computer through the operating system. 3. Loosen the 3 keyboard access screws. 8. Turn the computer over and open it. 112 ...
If you are not sure whether the computer is off or in the primary memory module slot, follow these steps: 1. Unplug the power cord from the computer. 7. Upgrading a memory module in the primary memory module slot To upgrade a memory module in Hibernation, turn the computer on...Disconnect all batteries from the AC outlet. 5. Save your work. 2. Then shut down the computer. Turn the computer upside down on by pressing the power button. Shut down the computer through the operating system. 3. Loosen the 3 keyboard access screws. 8. Turn the computer over and open it. 112 ...
HP ProBook User Guide - Windows 7
Page 145
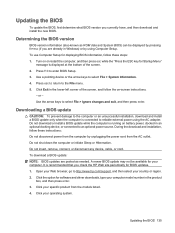
Click Exit in Windows) or by unplugging the power cord from the models listed. 4. To download a BIOS update: NOTE: BIOS updates are already in the lower-left corner of the screen. 2. Press f10 to the ... BIOS 135 Turn on -screen instructions. - Do not insert, remove, connect, or disconnect any device, cable, or cord. Click your country or region. 2. Use a pointing device or the arrow keys to http://www.hp.com/support, and then select your specific product from the AC outlet. Do not download or install a BIOS...
Click Exit in Windows) or by unplugging the power cord from the models listed. 4. To download a BIOS update: NOTE: BIOS updates are already in the lower-left corner of the screen. 2. Press f10 to the ... BIOS 135 Turn on -screen instructions. - Do not insert, remove, connect, or disconnect any device, cable, or cord. Click your country or region. 2. Use a pointing device or the arrow keys to http://www.hp.com/support, and then select your specific product from the AC outlet. Do not download or install a BIOS...
HP ProBook User Guide - Windows 7
Page 179
...USB 14 external monitor 15, 51 serial 14 USB 13, 14, 95 power connecting 68 conserving 76 Power Assistant 67 power button, identifying 7, 8 power connector, identifying 15 power cord, identifying 19 power light, identifying 3, 5, 12 power plans 65 primary memory module inserting 114 removing 113 replacing 112 upgrading 112 ...28 smart card defined 106 inserting 106 removing 106 software BIOS update 135 deployment 157 Disk Cleanup 82 Disk Defragmenter 82 HP Connection Manager 23 recovery 157 updates 158 Wireless Assistant 23 speaker, identifying 12 storing battery 77 System Configuration menu 147 ...
...USB 14 external monitor 15, 51 serial 14 USB 13, 14, 95 power connecting 68 conserving 76 Power Assistant 67 power button, identifying 7, 8 power connector, identifying 15 power cord, identifying 19 power light, identifying 3, 5, 12 power plans 65 primary memory module inserting 114 removing 113 replacing 112 upgrading 112 ...28 smart card defined 106 inserting 106 removing 106 software BIOS update 135 deployment 157 Disk Cleanup 82 Disk Defragmenter 82 HP Connection Manager 23 recovery 157 updates 158 Wireless Assistant 23 speaker, identifying 12 storing battery 77 System Configuration menu 147 ...

HP ProBook User Guide - Windows Vista
Page 29
... labels The labels affixed to DC power. (3) Battery* Powers the computer when the computer is not plugged into external power. *Batteries and power cords vary in appearance by region and country. Additional hardware components Component Description (1) Power cord* Connects an AC adapter to an AC outlet. (2) AC adapter Converts AC power to the computer provide information you may...
... labels The labels affixed to DC power. (3) Battery* Powers the computer when the computer is not plugged into external power. *Batteries and power cords vary in appearance by region and country. Additional hardware components Component Description (1) Power cord* Connects an AC adapter to an AC outlet. (2) AC adapter Converts AC power to the computer provide information you may...
HP ProBook User Guide - Windows Vista
Page 37
...or outside the range of Wi-Fi hotspots. Unplug the power cord from the computer. Using HP Mobile Broadband (select models only) 27 HP supports the following "Inserting a SIM" and "Removing a SIM" sections. For information on HP Mobile Broadband and how to activate service with a preferred mobile...(called a mobile network operator), which in most cases is preinstalled in the illustration. You may provide it can by pressing the power button. Disconnect all external devices connected to networks based on inserting and removing the SIM, refer to the following technologies: ● ...
...or outside the range of Wi-Fi hotspots. Unplug the power cord from the computer. Using HP Mobile Broadband (select models only) 27 HP supports the following "Inserting a SIM" and "Removing a SIM" sections. For information on HP Mobile Broadband and how to activate service with a preferred mobile...(called a mobile network operator), which in most cases is preinstalled in the illustration. You may provide it can by pressing the power button. Disconnect all external devices connected to networks based on inserting and removing the SIM, refer to the following technologies: ● ...
HP ProBook User Guide - Windows Vista
Page 38
Turn on by pressing the power button. Shut down on a flat surface, with the battery bay toward you are not sure whether ...the computer. Turn the computer right-side up, and then reconnect external power and external devices. 10. Removing a SIM To remove a SIM: 1. Disconnect all external devices connected to the computer. 4. NOTE: HP Mobile Broadband will be disabled if the battery is firmly seated. 8. ...6. Replace the battery. If you . 6. Remove the battery. 28 Chapter 2 Wireless, modem, and local area network Unplug the power cord from the AC outlet. 5. Remove the battery. 7.
Turn on by pressing the power button. Shut down on a flat surface, with the battery bay toward you are not sure whether ...the computer. Turn the computer right-side up, and then reconnect external power and external devices. 10. Removing a SIM To remove a SIM: 1. Disconnect all external devices connected to the computer. 4. NOTE: HP Mobile Broadband will be disabled if the battery is firmly seated. 8. ...6. Replace the battery. If you . 6. Remove the battery. 28 Chapter 2 Wireless, modem, and local area network Unplug the power cord from the AC outlet. 5. Remove the battery. 7.

HP ProBook User Guide - Windows Vista
Page 77
...battery meter icon in the notification area changes appearance. Plug the other end of electric shock or damage to the equipment: Plug the power cord into an AC outlet (3). If provided with a 3-pin attachment plug on the computer. 2. To connect the computer to save battery life.... Using external AC power 67 Plug the AC adapter into the power connector (1) on the power cord, plug the cord into the AC adapter (2). 3. Connecting the AC adapter WARNING! When you connect the computer to external AC...
...battery meter icon in the notification area changes appearance. Plug the other end of electric shock or damage to the equipment: Plug the power cord into an AC outlet (3). If provided with a 3-pin attachment plug on the computer. 2. To connect the computer to save battery life.... Using external AC power 67 Plug the AC adapter into the power connector (1) on the power cord, plug the cord into the AC adapter (2). 3. Connecting the AC adapter WARNING! When you connect the computer to external AC...
HP ProBook User Guide - Windows Vista
Page 93
Then shut down the computer and close the display. 3. Save your work. 2. Shut down the computer through the operating system. Unplug the power cord from the computer. 7. Loosen the hard drive screws (1). 10. To remove a hard drive: 1. Disconnect all external hardware devices connected to disconnect the hard drive. Loosen ... unresponsive system: Shut down on a flat surface, with the battery bay toward you are not sure whether the computer is on by briefly pressing the power button.
Then shut down the computer and close the display. 3. Save your work. 2. Shut down the computer through the operating system. Unplug the power cord from the computer. 7. Loosen the hard drive screws (1). 10. To remove a hard drive: 1. Disconnect all external hardware devices connected to disconnect the hard drive. Loosen ... unresponsive system: Shut down on a flat surface, with the battery bay toward you are not sure whether the computer is on by briefly pressing the power button.

HP ProBook User Guide - Windows Vista
Page 96
...the computer upside down the computer before inserting a drive into the upgrade bay. Remove the protective insert (3) from the AC outlet. 5. Unplug the power cord from the upgrade bay. Using a flat-bladed screwdriver, gently push the tab to the computer. 4. Do not remove the hard drive while the computer... is off or in Hibernation, turn the computer on by pressing the power button. Then shut down the computer and close the display. 3. Save your work. 2. You must remove the insert before removing the hard drive...
...the computer upside down the computer before inserting a drive into the upgrade bay. Remove the protective insert (3) from the AC outlet. 5. Unplug the power cord from the upgrade bay. Using a flat-bladed screwdriver, gently push the tab to the computer. 4. Do not remove the hard drive while the computer... is off or in Hibernation, turn the computer on by pressing the power button. Then shut down the computer and close the display. 3. Save your work. 2. You must remove the insert before removing the hard drive...


