Security - Window Vista and Windows 7
Page 17
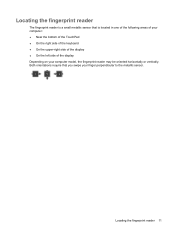
Locating the fingerprint reader The fingerprint reader is located in one of the following areas of your computer: ● Near the bottom of the TouchPad ● On the right side of the keyboard ● On the upper-right side of the display ● On the left side of the display Depending on your finger perpendicular to the metallic sensor. Both orientations require that is a small metallic sensor that you swipe your computer model, the fingerprint reader may be oriented horizontally or vertically. Locating the fingerprint reader 11
Locating the fingerprint reader The fingerprint reader is located in one of the following areas of your computer: ● Near the bottom of the TouchPad ● On the right side of the keyboard ● On the upper-right side of the display ● On the left side of the display Depending on your finger perpendicular to the metallic sensor. Both orientations require that is a small metallic sensor that you swipe your computer model, the fingerprint reader may be oriented horizontally or vertically. Locating the fingerprint reader 11

Setup Utility - Windows Vista and Windows 7
Page 6
... menu display, press esc. ● To display additional navigation and selection information while the Setup Utility is not Windows based, it does not support the TouchPad. 2 Using the Setup Utility Changing the language of the Setup Utility The following procedure explains how to change the language of the screen, press f10...
... menu display, press esc. ● To display additional navigation and selection information while the Setup Utility is not Windows based, it does not support the TouchPad. 2 Using the Setup Utility Changing the language of the Setup Utility The following procedure explains how to change the language of the screen, press f10...
Notebook Tour - Windows Vista
Page 5
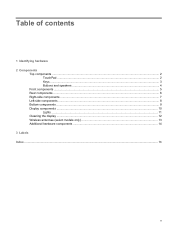
Table of contents 1 Identifying hardware 2 Components Top components ...2 TouchPad ...2 Keys ...3 Buttons and speakers ...4 Front components ...5 Rear components ...6 Right-side components ...7 Left-side components ...8 Bottom components ...9 Display components ...10 Lights ...11 Cleaning the display ...12 Wireless antennae (select models only 13 Additional hardware components ...14 3 Labels Index ...16 v
Table of contents 1 Identifying hardware 2 Components Top components ...2 TouchPad ...2 Keys ...3 Buttons and speakers ...4 Front components ...5 Rear components ...6 Right-side components ...7 Left-side components ...8 Bottom components ...9 Display components ...10 Lights ...11 Cleaning the display ...12 Wireless antennae (select models only 13 Additional hardware components ...14 3 Labels Index ...16 v
Notebook Tour - Windows Vista
Page 8
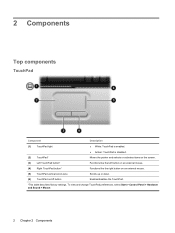
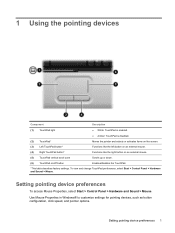
... and Sound > Mouse. 2 Chapter 2 Components 2 Components Top components TouchPad Component Description (1) TouchPad light ● White: TouchPad is enabled. ● Amber: TouchPad is disabled. (2) TouchPad* Moves the pointer and selects or activates items on the screen. (3) Left TouchPad button* Functions like the left button on an external mouse. (4) Right TouchPad button* Functions like the right button on an...
... and Sound > Mouse. 2 Chapter 2 Components 2 Components Top components TouchPad Component Description (1) TouchPad light ● White: TouchPad is enabled. ● Amber: TouchPad is disabled. (2) TouchPad* Moves the pointer and selects or activates items on the screen. (3) Left TouchPad button* Functions like the left button on an external mouse. (4) Right TouchPad button* Functions like the right button on an...
Notebook Tour - Windows Vista
Page 18
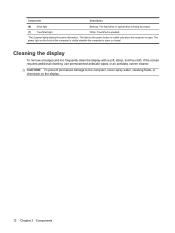
... lint, frequently clean the display with a soft, damp, lint-free cloth. Component Description (6) Drive light Blinking: The hard drive or optical drive is being accessed. (7) TouchPad light White: TouchPad is enabled. *The 2 power lights display the same information.
... lint, frequently clean the display with a soft, damp, lint-free cloth. Component Description (6) Drive light Blinking: The hard drive or optical drive is being accessed. (7) TouchPad light White: TouchPad is enabled. *The 2 power lights display the same information.
Notebook Tour - Windows Vista
Page 22
...11 battery release latch, identifying 9 battery, identifying 14 bays battery 9, 15 hard drive 9 Bluetooth label 15 buttons power 4 TouchPad 2 TouchPad on/off 2 C caps lock, lights 11 Certificate of Authenticity label 15 cleaning the display 12 compartments memory module 9 WLAN ... F fn key, identifying 3 function keys, identifying 3 H hard drive bay, identifying 9 HDMI port, identifying 8 headphone (audio-out) jack 5 HP Broadband Wireless Module serial number label 15 I integrated webcam, identifying 10 internal display switch, identifying 10 internal microphone, identifying 10 J jacks audio-in ...
...11 battery release latch, identifying 9 battery, identifying 14 bays battery 9, 15 hard drive 9 Bluetooth label 15 buttons power 4 TouchPad 2 TouchPad on/off 2 C caps lock, lights 11 Certificate of Authenticity label 15 cleaning the display 12 compartments memory module 9 WLAN ... F fn key, identifying 3 function keys, identifying 3 H hard drive bay, identifying 9 HDMI port, identifying 8 headphone (audio-out) jack 5 HP Broadband Wireless Module serial number label 15 I integrated webcam, identifying 10 internal display switch, identifying 10 internal microphone, identifying 10 J jacks audio-in ...
Notebook Tour - Windows Vista
Page 23
... labels 15 RJ-11 (modem) jack, identifying 7 RJ-45 (network) jack, identifying 8 T TouchPad buttons, identifying 2 TouchPad light, identifying 2 TouchPad on/off button 2 TouchPad scrolling zones, identifying 2 TouchPad, identifying 2 traveling with the computer modem approval label 15 wireless certification labels 15 U USB ports, ...label 15 wireless light, identifying 11 WLAN device 15 WLAN label 15 WLAN module compartment, identifying 9 S scrolling zones, TouchPad 2 security cable slot, identifying 7 serial number, computer 15 service tag 15 SIM label 15 slots Digital Media 8 memory...
... labels 15 RJ-11 (modem) jack, identifying 7 RJ-45 (network) jack, identifying 8 T TouchPad buttons, identifying 2 TouchPad light, identifying 2 TouchPad on/off button 2 TouchPad scrolling zones, identifying 2 TouchPad, identifying 2 traveling with the computer modem approval label 15 wireless certification labels 15 U USB ports, ...label 15 wireless light, identifying 11 WLAN device 15 WLAN label 15 WLAN module compartment, identifying 9 S scrolling zones, TouchPad 2 security cable slot, identifying 7 serial number, computer 15 service tag 15 SIM label 15 slots Digital Media 8 memory...
Pointing Devices and Keyboard - Windows Vista
Page 3
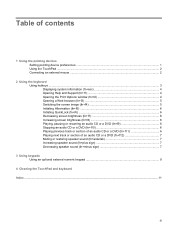
Table of contents 1 Using the pointing devices Setting pointing device preferences ...1 Using the TouchPad ...2 Connecting an external mouse ...2 2 Using the keyboard Using hotkeys ...3 Displaying system information (fn+esc 4 Opening Help and Support (fn+f1 4 Opening the Print Options window (... sound (fn+asterisk 7 Increasing speaker sound (fn+plus sign 7 Decreasing speaker sound (fn+minus sign 7 3 Using keypads Using an optional external numeric keypad 9 4 Cleaning the TouchPad and keyboard Index ...11 iii
Table of contents 1 Using the pointing devices Setting pointing device preferences ...1 Using the TouchPad ...2 Connecting an external mouse ...2 2 Using the keyboard Using hotkeys ...3 Displaying system information (fn+esc 4 Opening Help and Support (fn+f1 4 Opening the Print Options window (... sound (fn+asterisk 7 Increasing speaker sound (fn+plus sign 7 Decreasing speaker sound (fn+minus sign 7 3 Using keypads Using an optional external numeric keypad 9 4 Cleaning the TouchPad and keyboard Index ...11 iii
Pointing Devices and Keyboard - Windows Vista
Page 5
Use Mouse Properties in Windows® to customize settings for pointing devices, such as button configuration, click speed, and pointer options. To view and change TouchPad preferences, select Start > Control Panel > Hardware and Sound > Mouse. Setting pointing device preferences To access Mouse Properties, select Start > Control Panel > Hardware and Sound > Mouse. ...
Use Mouse Properties in Windows® to customize settings for pointing devices, such as button configuration, click speed, and pointer options. To view and change TouchPad preferences, select Start > Control Panel > Hardware and Sound > Mouse. Setting pointing device preferences To access Mouse Properties, select Start > Control Panel > Hardware and Sound > Mouse. ...
Pointing Devices and Keyboard - Windows Vista
Page 6
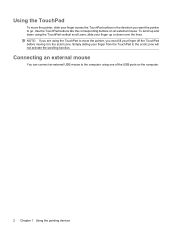
... devices To scroll up or down over the lines. NOTE: If you are using the TouchPad to move the pointer, slide your finger across the TouchPad surface in the direction you must lift your finger off the TouchPad before moving it to the scroll zone. Simply sliding your finger up and down using... one of the USB ports on an external mouse. Using the TouchPad To move the pointer, you want the pointer to go. Connecting an external mouse You can connect an external USB mouse to the computer using...
... devices To scroll up or down over the lines. NOTE: If you are using the TouchPad to move the pointer, slide your finger across the TouchPad surface in the direction you must lift your finger off the TouchPad before moving it to the scroll zone. Simply sliding your finger up and down using... one of the USB ports on an external mouse. Using the TouchPad To move the pointer, you want the pointer to go. Connecting an external mouse You can connect an external USB mouse to the computer using...
Pointing Devices and Keyboard - Windows Vista
Page 14
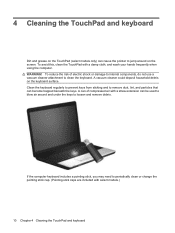
A vacuum cleaner could deposit household debris on the screen. To avoid this, clean the TouchPad with select models.) 10 Chapter 4 Cleaning the TouchPad and keyboard If the computer keyboard includes a pointing stick, you may need to periodically clean or change the pointing stick cap. (Pointing ... and to remove dust, lint, and particles that can be used to blow air around on the keyboard surface. 4 Cleaning the TouchPad and keyboard Dirt and grease on the TouchPad (select models only) can cause the pointer to jump around and under the keys to loosen and remove debris.
A vacuum cleaner could deposit household debris on the screen. To avoid this, clean the TouchPad with select models.) 10 Chapter 4 Cleaning the TouchPad and keyboard If the computer keyboard includes a pointing stick, you may need to periodically clean or change the pointing stick cap. (Pointing ... and to remove dust, lint, and particles that can be used to blow air around on the keyboard surface. 4 Cleaning the TouchPad and keyboard Dirt and grease on the TouchPad (select models only) can cause the pointer to jump around and under the keys to loosen and remove debris.
Pointing Devices and Keyboard - Windows Vista
Page 15
... 4 opening Web browser 5 switching screen image 5 using 4 K keyboard 3, 10 keyboard hotkeys, identifying 3 keypad, external num lock 9 using 9 keypad, integrated identifying 8 L lights num lock 8 TouchPad 1 M maintenance keyboard 10 TouchPad 10 media controls, hotkeys 6 minus (-) key 7 mouse, external connecting 2 setting preferences 1 N num lock light, identifying 8 num lock, external keypad 9 P plus (+) key 7 pointing device setting...
... 4 opening Web browser 5 switching screen image 5 using 4 K keyboard 3, 10 keyboard hotkeys, identifying 3 keypad, external num lock 9 using 9 keypad, integrated identifying 8 L lights num lock 8 TouchPad 1 M maintenance keyboard 10 TouchPad 10 media controls, hotkeys 6 minus (-) key 7 mouse, external connecting 2 setting preferences 1 N num lock light, identifying 8 num lock, external keypad 9 P plus (+) key 7 pointing device setting...
Power Management - Windows Vista
Page 5
... minutes of inactivity when running on battery power and 25 minutes of inactivity when running on the remote control (select models only). ● Activate the TouchPad. Initiating and exiting Sleep The system is in the Sleep state or in Windows® Control Panel. If the computer is initiated, the power lights...
... minutes of inactivity when running on battery power and 25 minutes of inactivity when running on the remote control (select models only). ● Activate the TouchPad. Initiating and exiting Sleep The system is in the Sleep state or in Windows® Control Panel. If the computer is initiated, the power lights...


