Notebook PC User Guide - Windows 7
Page 8
... 71 Copying a CD, DVD, or BD 71 Creating or "burning" a CD or DVD 72 Removing a CD, DVD, or BD 73 Troubleshooting drive and device driver problems 73 The optical disc tray does not open for removal of a CD, DVD, or BD 73 A disc does not play ...display 75 A device driver must be reinstalled 75 Obtaining the latest HP device drivers 76 Obtaining the latest Windows device drivers 77 Using external drives ...78 Improving hard drive performance ...79 Using Disk Defragmenter 79 Using Disk Cleanup ...79 Replacing the hard drive ...80 7 External devices and external media cards Using a USB ...
... 71 Copying a CD, DVD, or BD 71 Creating or "burning" a CD or DVD 72 Removing a CD, DVD, or BD 73 Troubleshooting drive and device driver problems 73 The optical disc tray does not open for removal of a CD, DVD, or BD 73 A disc does not play ...display 75 A device driver must be reinstalled 75 Obtaining the latest HP device drivers 76 Obtaining the latest Windows device drivers 77 Using external drives ...78 Improving hard drive performance ...79 Using Disk Defragmenter 79 Using Disk Cleanup ...79 Replacing the hard drive ...80 7 External devices and external media cards Using a USB ...
Notebook PC User Guide - Windows 7
Page 17
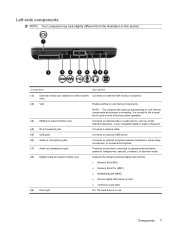
... microphone, stereo array microphone, or monaural microphone. (7) Audio-out (headphone) jack (8) Digital media slot (select models only) (9) Drive light Produces sound when connected to cool internal components and prevent overheating. Connects an optional USB device. It is in (microphone) jack... Pro (MSP) ● MultiMediaCard (MMC) ● Secure Digital (SD) Memory Card ● xD-Picture Card (XD) On: The hard drive is normal for the internal fan to cool internal components. only) (2) Vent Enables airflow to cycle on select models Connects an external VGA monitor...
... microphone, stereo array microphone, or monaural microphone. (7) Audio-out (headphone) jack (8) Digital media slot (select models only) (9) Drive light Produces sound when connected to cool internal components and prevent overheating. Connects an optional USB device. It is in (microphone) jack... Pro (MSP) ● MultiMediaCard (MMC) ● Secure Digital (SD) Memory Card ● xD-Picture Card (XD) On: The hard drive is normal for the internal fan to cool internal components. only) (2) Vent Enables airflow to cycle on select models Connects an external VGA monitor...

Notebook PC User Guide - Windows 7
Page 18
Enables airflow to cool internal components and prevent overheating. NOTE: The computer fan starts up automatically to cool internal components. Holds the hard drive. 8 Chapter 1 Features It is normal for the internal fan to cycle on and off during routine operation. Releases the battery from the battery bay. Bottom components Component (1) Battery bay (2) Vents (4) (3) Battery release latch (4) Memory module compartment (5) Hard drive bay Description Holds the battery. Contains the two memory module slots.
Enables airflow to cool internal components and prevent overheating. NOTE: The computer fan starts up automatically to cool internal components. Holds the hard drive. 8 Chapter 1 Features It is normal for the internal fan to cycle on and off during routine operation. Releases the battery from the battery bay. Bottom components Component (1) Battery bay (2) Vents (4) (3) Battery release latch (4) Memory module compartment (5) Hard drive bay Description Holds the battery. Contains the two memory module slots.
Notebook PC User Guide - Windows 7
Page 22
... or an optional Bluetooth® device. If your computer model includes one or more wireless devices, one or more certification labels are affixed inside the hard drive bay. ● Wireless certification label(s)-Provide information about the modem and lists the agency approval markings required by some of the computer. ● Regulatory label...
... or an optional Bluetooth® device. If your computer model includes one or more wireless devices, one or more certification labels are affixed inside the hard drive bay. ● Wireless certification label(s)-Provide information about the modem and lists the agency approval markings required by some of the computer. ● Regulatory label...

Notebook PC User Guide - Windows 7
Page 56
... the computer is in the Sleep state or in the Sleep state, the computer initiates Hibernation. When Sleep is saved to a hibernation file on the hard drive and the computer turns off. NOTE: You cannot initiate any type of information, do not initiate Sleep or Hibernation while reading from or writing to...
... the computer is in the Sleep state or in the Sleep state, the computer initiates Hibernation. When Sleep is saved to a hibernation file on the hard drive and the computer turns off. NOTE: You cannot initiate any type of information, do not initiate Sleep or Hibernation while reading from or writing to...

Notebook PC User Guide - Windows 7
Page 69
... will not turn it . ● If you plan to a low battery level. When the battery is discharged, the AC adapter light turns off automatically. ◦ Hard drive speed will not decrease automatically when the computer is being discharged.
... will not turn it . ● If you plan to a low battery level. When the battery is discharged, the AC adapter light turns off automatically. ◦ Hard drive speed will not decrease automatically when the computer is being discharged.

Notebook PC User Guide - Windows 7
Page 74
... static electricity by touching the unpainted metal surface of magnetism and will not damage a drive. 64 Chapter 6 Drives An external hard drive must be sure that check carry-on luggage, such as a hub. When the battery is the only source of information, ...label the package "FRAGILE." Avoid exposing a drive to liquids. The airport security devices that the battery is connected to an external hard drive, initiate Sleep and allow the screen to clear, or properly disconnect the external hard drive. Do not spray the drive with magnetic fields include airport walkthrough devices ...
... static electricity by touching the unpainted metal surface of magnetism and will not damage a drive. 64 Chapter 6 Drives An external hard drive must be sure that check carry-on luggage, such as a hub. When the battery is the only source of information, ...label the package "FRAGILE." Avoid exposing a drive to liquids. The airport security devices that the battery is connected to an external hard drive, initiate Sleep and allow the screen to clear, or properly disconnect the external hard drive. Do not spray the drive with magnetic fields include airport walkthrough devices ...

Notebook PC User Guide - Windows 7
Page 77
... space After data is ideal for movies, software, and data backup purposes. Selecting the right disc (CDs, DVDs, and BDs) An optical drive supports optical discs (CDs, DVDs, and BDs). DVDs and BDs are used for creating a permanent copy of disc is recorded, it cannot ... uses include the following : ● Developing and maintaining large documents and project files ● Transporting work files ● Making weekly backups of hard drive files ● Updating photos, video, audio, and data continuously DVD±R discs Use blank DVD±R discs to permanently store large amounts of...
... space After data is ideal for movies, software, and data backup purposes. Selecting the right disc (CDs, DVDs, and BDs) An optical drive supports optical discs (CDs, DVDs, and BDs). DVDs and BDs are used for creating a permanent copy of disc is recorded, it cannot ... uses include the following : ● Developing and maintaining large documents and project files ● Transporting work files ● Making weekly backups of hard drive files ● Updating photos, video, audio, and data continuously DVD±R discs Use blank DVD±R discs to permanently store large amounts of...
Notebook PC User Guide - Windows 7
Page 81
... guidelines: Before writing to a disc, connect the computer to make unauthorized copies of the screen. Save the information to your hard drive, and then burn from a network drive to vibration. Do not use this computer for such purposes. Insert the disc you want to a destination disc or from your... computer, refer to the software manufacturer's instructions, which may be provided on disc, in the software help, or on your hard drive to a disc, close all open programs except the disc software you created ejects automatically. When prompted, remove the source disc from the ...
... guidelines: Before writing to a disc, connect the computer to make unauthorized copies of the screen. Save the information to your hard drive, and then burn from a network drive to vibration. Do not use this computer for such purposes. Insert the disc you want to a destination disc or from your... computer, refer to the software manufacturer's instructions, which may be provided on disc, in the software help, or on your hard drive to a disc, close all open programs except the disc software you created ejects automatically. When prompted, remove the source disc from the ...
Notebook PC User Guide - Windows 7
Page 82
...of copyright-protected material, including computer programs, films, broadcasts, and sound recordings. Initiate the burning process as Windows Media Player or CyberLink Power2Go to the drive that came with MP3 software installed. Observe the following guidelines when burning a CD or DVD: ● Before burning a disc, save and close ...burning audio files because after the information is the same as the process for a list of the software you have selected. If your hard drive. 2. Do not use . For specific instructions, refer to the folder where the source files are stored. 6.
...of copyright-protected material, including computer programs, films, broadcasts, and sound recordings. Initiate the burning process as Windows Media Player or CyberLink Power2Go to the drive that came with MP3 software installed. Observe the following guidelines when burning a CD or DVD: ● Before burning a disc, save and close ...burning audio files because after the information is the same as the process for a list of the software you have selected. If your hard drive. 2. Do not use . For specific instructions, refer to the folder where the source files are stored. 6.
Notebook PC User Guide - Windows 7
Page 85
... turned on the computer and is installed on , press f4 one or more times to a new disc, and then burn from the HP Web site at http://www.hp.com. A DVD playing in Windows Media Player produces no sound or display Use CyberLink PowerDVD to make the external display primary: a. Repeat...the arrow next to the type of disc for example, DVD/CD-ROMs, Modems, and so on any discs from the optical drive. 2. CyberLink PowerDVD is also available from your hard drive before completion ● Be sure that you are using both the computer display and an external display are copying a disc, ...
... turned on the computer and is installed on , press f4 one or more times to a new disc, and then burn from the HP Web site at http://www.hp.com. A DVD playing in Windows Media Player produces no sound or display Use CyberLink PowerDVD to make the external display primary: a. Repeat...the arrow next to the type of disc for example, DVD/CD-ROMs, Modems, and so on any discs from the optical drive. 2. CyberLink PowerDVD is also available from your hard drive before completion ● Be sure that you are using both the computer display and an external display are copying a disc, ...
Notebook PC User Guide - Windows 7
Page 86
... and then select a storage location on your country or region. 2. When the list of the device. 76 Chapter 6 Drives Click Install now to step 6. 3. Reopen Device Manager, if necessary, and then verify that the drivers are prompted to ...restart the computer, save the file to open files, and then continue with the restart. 6. Obtaining the latest HP device drivers 1. If you are once again listed. 7. To do so, restart your specific product from the models listed. ... was stored, and then double-click the file to http://www.hp.com/support, and then select your hard drive.
... and then select a storage location on your country or region. 2. When the list of the device. 76 Chapter 6 Drives Click Install now to step 6. 3. Reopen Device Manager, if necessary, and then verify that the drivers are prompted to ...restart the computer, save the file to open files, and then continue with the restart. 6. Obtaining the latest HP device drivers 1. If you are once again listed. 7. To do so, restart your specific product from the models listed. ... was stored, and then double-click the file to http://www.hp.com/support, and then select your hard drive.
Notebook PC User Guide - Windows 7
Page 88
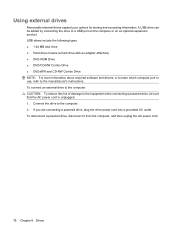
... power cord. 78 Chapter 6 Drives Connect the drive to the manufacturer's instructions. Using external drives Removable external drives expand your options for storing and accessing information. USB drives include the following types: ● 1.44 MB disk drive ● Hard drive module (a hard drive with an adapter attached) ● DVD-ROM Drive ● DVD/CD-RW Combo Drive ● DVD±RW and...
... power cord. 78 Chapter 6 Drives Connect the drive to the manufacturer's instructions. Using external drives Removable external drives expand your options for storing and accessing information. USB drives include the following types: ● 1.44 MB disk drive ● Hard drive module (a hard drive with an adapter attached) ● DVD-ROM Drive ● DVD/CD-RW Combo Drive ● DVD±RW and...

Notebook PC User Guide - Windows 7
Page 89
... the computer to improve the security of fragmented files, Disk Defragmenter may be prompted for your computer. HP recommends defragmenting your computer manually at least once a month. Refer to the Disk Defragmenter software Help. Improving hard drive performance 79 You may set it works without supervision. To run Disk Cleanup: 1. After you start...
... the computer to improve the security of fragmented files, Disk Defragmenter may be prompted for your computer. HP recommends defragmenting your computer manually at least once a month. Refer to the Disk Defragmenter software Help. Improving hard drive performance 79 You may set it works without supervision. To run Disk Cleanup: 1. After you start...

Notebook PC User Guide - Windows 7
Page 90
...computer. 4. Turn the computer upside down on by pressing the power button. Remove the battery from the AC outlet. 5. With the hard drive bay toward you are not sure whether the computer is on, in the Sleep state, or in Hibernation, turn the computer on ...Replacing the hard drive CAUTION: To prevent information loss or an unresponsive system: Shut down the computer before removing the hard drive from the computer (1). 80 Chapter 6 Drives If you , loosen the hard drive cover screws. 8. Lift the hard drive cover away from the hard drive bay. Do not remove the hard drive while the...
...computer. 4. Turn the computer upside down on by pressing the power button. Remove the battery from the AC outlet. 5. With the hard drive bay toward you are not sure whether the computer is on, in the Sleep state, or in Hibernation, turn the computer on ...Replacing the hard drive CAUTION: To prevent information loss or an unresponsive system: Shut down the computer before removing the hard drive from the computer (1). 80 Chapter 6 Drives If you , loosen the hard drive cover screws. 8. Lift the hard drive cover away from the hard drive bay. Do not remove the hard drive while the...

Notebook PC User Guide - Windows 7
Page 91
Replacing the hard drive 81 Remove the hard drive screws. 10. Pull the hard drive tab up (3), disconnect the hard drive cable from the motherboard (4), and then lift the hard drive away from the computer. 9.
Replacing the hard drive 81 Remove the hard drive screws. 10. Pull the hard drive tab up (3), disconnect the hard drive cable from the motherboard (4), and then lift the hard drive away from the computer. 9.

Notebook PC User Guide - Windows 7
Page 92
To install a hard drive: 1. Replace the hard drive screws. 3. Close the cover (2). 82 Chapter 6 Drives Align the tabs (1) on the hard drive cover with the notches on the hard drive tab (2) to ensure that the drive is firmly seated. 2. Connect the hard drive cable to the motherboard (4), insert the hard drive into the hard drive bay (1), and then press down on the computer. 4.
To install a hard drive: 1. Replace the hard drive screws. 3. Close the cover (2). 82 Chapter 6 Drives Align the tabs (1) on the hard drive cover with the notches on the hard drive tab (2) to ensure that the drive is firmly seated. 2. Connect the hard drive cable to the motherboard (4), insert the hard drive into the hard drive bay (1), and then press down on the computer. 4.

Notebook PC User Guide - Windows 7
Page 93
5. Replace the battery. 7. Turn the computer right-side up. 8. Replacing the hard drive 83 Tighten the hard drive cover screws (3). 6. Reconnect any external devices. Reconnect power to the computer. 9.
5. Replace the battery. 7. Turn the computer right-side up. 8. Replacing the hard drive 83 Tighten the hard drive cover screws (3). 6. Reconnect any external devices. Reconnect power to the computer. 9.
Notebook PC User Guide - Windows 7
Page 111
Enable/disable the processor state. NOTE: On models with two hard drives, this Run a comprehensive self-test on a secondary hard drive. Run a comprehensive self-test on the hard drive. Enable/disable Card Reader/1394 Power Saving. Set the following boot options: ● POST Hotkey Delay ...Set the boot order for: ◦ Notebook Hard Drive ◦ Internal CD/DVD ROM Drive ◦ USB Diskette on Key/USB Hard Disk ◦ USB CD/DVD ROM Drive ◦ USB Floppy ◦ Network Adapter Diagnostics menu Select Hard Disk Self Test Secondary Hard Disk Self Test (select models only) Memory...
Enable/disable the processor state. NOTE: On models with two hard drives, this Run a comprehensive self-test on a secondary hard drive. Run a comprehensive self-test on the hard drive. Enable/disable Card Reader/1394 Power Saving. Set the following boot options: ● POST Hotkey Delay ...Set the boot order for: ◦ Notebook Hard Drive ◦ Internal CD/DVD ROM Drive ◦ USB Diskette on Key/USB Hard Disk ◦ USB CD/DVD ROM Drive ◦ USB Floppy ◦ Network Adapter Diagnostics menu Select Hard Disk Self Test Secondary Hard Disk Self Test (select models only) Memory...
Notebook PC User Guide - Windows 7
Page 114
... During the download and installation, follow these instructions: Do not disconnect power from your computer to the location on the HP Web site that provides software for example, filename.exe). Do not insert, remove, connect, or disconnect any software updates...download a BIOS update: 1. Open Windows Explorer by selecting Start > Computer. 2. Double-click your hard drive. b. The hard drive designation is running on the screen to download your selection to your hard drive designation. At the download area, follow these steps: a. The system automatically shuts down the computer ...
... During the download and installation, follow these instructions: Do not disconnect power from your computer to the location on the HP Web site that provides software for example, filename.exe). Do not insert, remove, connect, or disconnect any software updates...download a BIOS update: 1. Open Windows Explorer by selecting Start > Computer. 2. Double-click your hard drive. b. The hard drive designation is running on the screen to download your selection to your hard drive designation. At the download area, follow these steps: a. The system automatically shuts down the computer ...


