
HP USB Digital Drive
Page 8
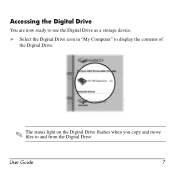
Accessing the Digital Drive You are now ready to use the Digital Drive as a storage device. » Select the Digital Drive icon in "My Computer" to display the contents of the Digital Drive. ✎ The status light on the Digital Drive flashes when you copy and move files to and from the Digital Drive. User Guide 7
Accessing the Digital Drive You are now ready to use the Digital Drive as a storage device. » Select the Digital Drive icon in "My Computer" to display the contents of the Digital Drive. ✎ The status light on the Digital Drive flashes when you copy and move files to and from the Digital Drive. User Guide 7

HP USB Digital Drive
Page 9
Gently unplug the Digital Drive from the USB port. ✎ If the USB connector cable is flashing. 1. A dialog box displays a list of connected devices. 2. Select the Digital Drive and wait until the "Safe to remove the Digital Drive when the status light on the Digital Drive is in the extended position, return it on its track for safe storage. 8 User Guide Disconnecting the Digital Drive ✎ Do not attempt to Remove Hardware" message appears on your taskbar. Select the "Safely Remove Hardware" icon on your screen. 3.
Gently unplug the Digital Drive from the USB port. ✎ If the USB connector cable is flashing. 1. A dialog box displays a list of connected devices. 2. Select the Digital Drive and wait until the "Safe to remove the Digital Drive when the status light on the Digital Drive is in the extended position, return it on its track for safe storage. 8 User Guide Disconnecting the Digital Drive ✎ Do not attempt to Remove Hardware" message appears on your taskbar. Select the "Safely Remove Hardware" icon on your screen. 3.
Wireless Setup Guide
Page 4
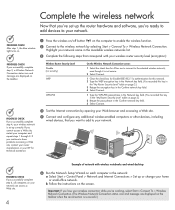
...wireless router security level (encryption): PROGRESS CHECK If you successfully complete step 3, a Wireless Network Connection status icon and message are displayed on the screen. Example of network with your network. Important: If you lose your wireless connection while you're working, select ...on page 2.) 2 Retype the pass phrase in the Available wireless networks list. 3 Complete the following steps that correspond with wireless notebooks and wired desktop PROGRESS CHECK If you successfully complete step 6, all computers on your computer and repeat steps 1 through 3. Complete...
...wireless router security level (encryption): PROGRESS CHECK If you successfully complete step 3, a Wireless Network Connection status icon and message are displayed on the screen. Example of network with your network. Important: If you lose your wireless connection while you're working, select ...on page 2.) 2 Retype the pass phrase in the Available wireless networks list. 3 Complete the following steps that correspond with wireless notebooks and wired desktop PROGRESS CHECK If you successfully complete step 6, all computers on your computer and repeat steps 1 through 3. Complete...
Wireless Setup Guide
Page 5
... to the cable television network, which is an essential security solution that provides a wireless link between a wireless-enabled device and a wired network. A unique key is displayed.) c Select the Wireless Networks tab.
... to the cable television network, which is an essential security solution that provides a wireless link between a wireless-enabled device and a wired network. A unique key is displayed.) c Select the Wireless Networks tab.
Wireless Setup Guide
Page 6
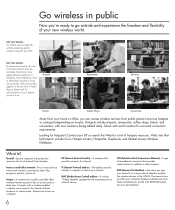
... in hazardous locations. Go wireless in public Now you give your network. DID YOU KNOW... 31 million users worldwide will be restricted. Contact your computer displays available networks.
... in hazardous locations. Go wireless in public Now you give your network. DID YOU KNOW... 31 million users worldwide will be restricted. Contact your computer displays available networks.
Backup and Recovery - Windows 7
Page 7
... the number of recovery discs required. ● When backing up to discs, number each disc before inserting it into the optical drive of the computer. 3 Display the screen. 2. The screen shot can back up your information to an optional external hard drive, a network drive, or discs. ● When backing up to...
... the number of recovery discs required. ● When backing up to discs, number each disc before inserting it into the optical drive of the computer. 3 Display the screen. 2. The screen shot can back up your information to an optional external hard drive, a network drive, or discs. ● When backing up to...

Backup and Recovery - Windows 7
Page 11
...9679; Turn on the screen. 2. Access Recovery Manager in the Recovery Manager window. 3. Then, press f11 while the "Press for recovery" message is displayed at the bottom of the following ways: ● Select Start > All Programs > Recovery Manager > Recovery Manager. - Recovering from the partition, follow ...these discs to its factory condition. Recovery discs have been included for Startup Menu" message is displayed on or restart the computer, and then press esc while the "Press the ESC key for computers that do not have a recovery ...
...9679; Turn on the screen. 2. Access Recovery Manager in the Recovery Manager window. 3. Then, press f11 while the "Press for recovery" message is displayed at the bottom of the following ways: ● Select Start > All Programs > Recovery Manager > Recovery Manager. - Recovering from the partition, follow ...these discs to its factory condition. Recovery discs have been included for Startup Menu" message is displayed on or restart the computer, and then press esc while the "Press the ESC key for computers that do not have a recovery ...

Security - Window Vista and Windows 7
Page 8
... of up to your computer information. Use the following sections list Windows and Setup Utility passwords and describe their functions. Because most passwords are not displayed as screen-saver passwords, select Start > Help and Support. 2 Chapter 2 Using passwords 2 Using passwords A password is a group of characters that could be entered at a Setup...
... of up to your computer information. Use the following sections list Windows and Setup Utility passwords and describe their functions. Because most passwords are not displayed as screen-saver passwords, select Start > Help and Support. 2 Chapter 2 Using passwords 2 Using passwords A password is a group of characters that could be entered at a Setup...

Security - Window Vista and Windows 7
Page 9
... entered each of these steps: 1. It also protects access to the following topics. CAUTION: If you exit Sleep or Hibernation. After this password is it displayed as it in a safe place. NOTE: This password cannot be entered when you forget your Windows user or administrator password. Setting passwords in Windows Password...
... entered each of these steps: 1. It also protects access to the following topics. CAUTION: If you exit Sleep or Hibernation. After this password is it displayed as it in a safe place. NOTE: This password cannot be entered when you forget your Windows user or administrator password. Setting passwords in Windows Password...

Security - Window Vista and Windows 7
Page 10
... delete an administrator password, type your administrator password, and then press enter. While the "Press the ESC key for Startup Menu" message is displayed in the Enter Password field, and then press enter 4 times. 3. Entering an administrator password At the Enter Password prompt, type your current password... entered each time you turn on or restart the computer, or exit Hibernation. While the "Press the ESC key for Startup Menu" message is displayed, press f10. 2. A power-on or restarting the computer. To save your changes and exit the Setup Utility, use of the screen, press...
... delete an administrator password, type your administrator password, and then press enter. While the "Press the ESC key for Startup Menu" message is displayed in the Enter Password field, and then press enter 4 times. 3. Entering an administrator password At the Enter Password prompt, type your current password... entered each time you turn on or restart the computer, or exit Hibernation. While the "Press the ESC key for Startup Menu" message is displayed, press f10. 2. A power-on or restarting the computer. To save your changes and exit the Setup Utility, use of the screen, press...

Security - Window Vista and Windows 7
Page 11
... the lower-left corner of the screen, press esc. While the "Press the ESC key for Startup Menu" message is displayed in the lower-left corner of the screen, press f10. - Your changes go into effect when the computer restarts. After 3 unsuccessful attempts to select ... press enter. Open the Setup Utility by turning on or restarting the computer. Managing a power-on or restarting the computer. When the Startup Menu is displayed, press f10. 2. Use the arrow keys to select Security > Set Power-On Password, and then press enter. ● To set , change a power-on password...
... the lower-left corner of the screen, press esc. While the "Press the ESC key for Startup Menu" message is displayed in the lower-left corner of the screen, press f10. - Your changes go into effect when the computer restarts. After 3 unsuccessful attempts to select ... press enter. Open the Setup Utility by turning on or restarting the computer. Managing a power-on or restarting the computer. When the Startup Menu is displayed, press f10. 2. Use the arrow keys to select Security > Set Power-On Password, and then press enter. ● To set , change a power-on password...
Security - Window Vista and Windows 7
Page 17
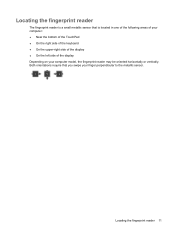
Locating the fingerprint reader 11 Locating the fingerprint reader The fingerprint reader is a small metallic sensor that you swipe your computer model, the fingerprint reader may be oriented horizontally or vertically. Both orientations require that is located in one of the following areas of your computer: ● Near the bottom of the TouchPad ● On the right side of the keyboard ● On the upper-right side of the display ● On the left side of the display Depending on your finger perpendicular to the metallic sensor.
Locating the fingerprint reader 11 Locating the fingerprint reader The fingerprint reader is a small metallic sensor that you swipe your computer model, the fingerprint reader may be oriented horizontally or vertically. Both orientations require that is located in one of the following areas of your computer: ● Near the bottom of the TouchPad ● On the right side of the keyboard ● On the upper-right side of the display ● On the left side of the display Depending on your finger perpendicular to the metallic sensor.

Software Update - Windows Vista and Windows 7
Page 6
...a. Identify the BIOS update that provides software for your selection to download. 3. If the Setup Utility does not open with the system information displayed, use the arrow keys to an optional power source. Follow the instructions on or restarting the computer. During the download and installation, follow ... the version of the date, name, or other system information is connected to select the Main menu. Access the page on the HP Web site that is running on your computer and access the BIOS update you currently have and then download and install the new BIOS...
...a. Identify the BIOS update that provides software for your selection to download. 3. If the Setup Utility does not open with the system information displayed, use the arrow keys to an optional power source. Follow the instructions on or restarting the computer. During the download and installation, follow ... the version of the date, name, or other system information is connected to select the Main menu. Access the page on the HP Web site that is running on your computer and access the BIOS update you currently have and then download and install the new BIOS...
Software Update - Windows Vista and Windows 7
Page 7
...will need to access this path when you connect your computer to a network, consult the network administrator before installing any instructions that are displayed, follow these steps: 1. You will be downloaded. Follow any software updates, especially system BIOS updates. If no instructions are... displayed on the screen after the BIOS has successfully updated. The system automatically shuts down after the download is typically Local Disk (C:). 3. NOTE: ...
...will need to access this path when you connect your computer to a network, consult the network administrator before installing any instructions that are displayed, follow these steps: 1. You will be downloaded. Follow any software updates, especially system BIOS updates. If no instructions are... displayed on the screen after the BIOS has successfully updated. The system automatically shuts down after the download is typically Local Disk (C:). 3. NOTE: ...
Software Update - Windows Vista and Windows 7
Page 8
... software and driver downloads, type your computer. Proceed to install the updated driver. To do so, restart your hard drive. After the file is displayed, click an updated driver to open a window containing additional information. 6. Open your Internet browser, go to install. 7. If you may be able... to your computer model number in the Search box, press enter, and follow these steps: To use the HP Web site: 1. Select your country or region. 2. Click Install now to step 6. 3. Updating programs and drivers To download and install software other ...
... software and driver downloads, type your computer. Proceed to install the updated driver. To do so, restart your hard drive. After the file is displayed, click an updated driver to open a window containing additional information. 6. Open your Internet browser, go to install. 7. If you may be able... to your computer model number in the Search box, press enter, and follow these steps: To use the HP Web site: 1. Select your country or region. 2. Click Install now to step 6. 3. Updating programs and drivers To download and install software other ...
Wireless (Select Models Only) - Windows 7
Page 3
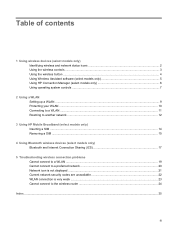
...Identifying wireless and network status icons 2 Using the wireless controls ...3 Using the wireless button ...4 Using Wireless Assistant software (select models only 5 Using HP Connection Manager (select models only 6 Using operating system controls ...7 2 Using a WLAN Setting up a WLAN ...9 Protecting your WLAN ...10 Connecting...wireless connection problems Cannot connect to a WLAN ...19 Cannot connect to a preferred network 20 Network icon is not displayed ...21 Current network security codes are unavailable 22 WLAN connection is very weak ...23 Cannot connect to the wireless router 24 ...
...Identifying wireless and network status icons 2 Using the wireless controls ...3 Using the wireless button ...4 Using Wireless Assistant software (select models only 5 Using HP Connection Manager (select models only 6 Using operating system controls ...7 2 Using a WLAN Setting up a WLAN ...9 Protecting your WLAN ...10 Connecting...wireless connection problems Cannot connect to a WLAN ...19 Cannot connect to a preferred network 20 Network icon is not displayed ...21 Current network security codes are unavailable 22 WLAN connection is very weak ...23 Cannot connect to the wireless router 24 ...

Wireless (Select Models Only) - Windows 7
Page 9
...Click the wireless icon in the Wireless Assistant tile, which is located in notification area. 5. Click Apply. 6. For more information, refer to HP Wireless Assistant icon in the bottom row of the notification area, and position the mouse pointer over the wireless icon. Click Properties. 4. Click... Close. If a wireless device is not displayed in Windows Mobility Center. 2. To view the state of the wireless devices, click the Show hidden icons icon, the arrow at the left of...
...Click the wireless icon in the Wireless Assistant tile, which is located in notification area. 5. Click Apply. 6. For more information, refer to HP Wireless Assistant icon in the bottom row of the notification area, and position the mouse pointer over the wireless icon. Click Properties. 4. Click... Close. If a wireless device is not displayed in Windows Mobility Center. 2. To view the state of the wireless devices, click the Show hidden icons icon, the arrow at the left of...
Wireless (Select Models Only) - Windows 7
Page 15
... and connect to a network or to manually search for cost and connection requirements. You can choose to create a new network connection. After the connection is displayed. Connecting to a WLAN To connect to verify the name and status of the connection. NOTE: If no WLANs are out of range of a wireless router...
... and connect to a network or to manually search for cost and connection requirements. You can choose to create a new network connection. After the connection is displayed. Connecting to a WLAN To connect to verify the name and status of the connection. NOTE: If no WLANs are out of range of a wireless router...
Wireless (Select Models Only) - Windows 7
Page 18
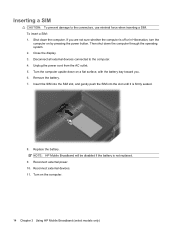
...the battery. Turn on by pressing the power button. Shut down the computer through the operating system. 2. Close the display. 3. Unplug the power cord from the AC outlet. 5. NOTE: HP Mobile Broadband will be disabled if the battery is firmly seated. 8. If you . 6. Insert the SIM into ... bay toward you are not sure whether the computer is off or in Hibernation, turn the computer on the computer. 14 Chapter 3 Using HP Mobile Broadband (select models only) Disconnect all external devices connected to the connectors, use minimal force when inserting a SIM. Reconnect external power...
...the battery. Turn on by pressing the power button. Shut down the computer through the operating system. 2. Close the display. 3. Unplug the power cord from the AC outlet. 5. NOTE: HP Mobile Broadband will be disabled if the battery is firmly seated. 8. If you . 6. Insert the SIM into ... bay toward you are not sure whether the computer is off or in Hibernation, turn the computer on the computer. 14 Chapter 3 Using HP Mobile Broadband (select models only) Disconnect all external devices connected to the connectors, use minimal force when inserting a SIM. Reconnect external power...
Wireless (Select Models Only) - Windows 7
Page 19
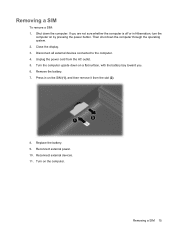
... in Hibernation, turn the computer on the SIM (1), and then remove it from the AC outlet. 5. Reconnect external devices. 11. Removing a SIM 15 Close the display. 3. Reconnect external power. 10. Turn on a flat surface, with the battery bay toward you are not sure whether the computer is off or in on...
... in Hibernation, turn the computer on the SIM (1), and then remove it from the AC outlet. 5. Reconnect external devices. 11. Removing a SIM 15 Close the display. 3. Reconnect external power. 10. Turn on a flat surface, with the battery bay toward you are not sure whether the computer is off or in on...


