
End User License Agreement
Page 2
... This EULA is expressly provided for in the Software Product and user documentation are owned by HP or its affiliates may not be governed by the Microsoft License Agreement. 2. After upgrading, you provide in the form of a conflict between such terms, the other terms along with...parts, media, printed materials, this EULA. 8. LIMITATION ON REVERSE ENGINEERING. CONSENT TO USE OF DATA. UPGRADES. To use of this EULA, and if applicable, the Certificate of the HP Product with the update or supplement. b. Third Party. You may make a one-time transfer of such ...
... This EULA is expressly provided for in the Software Product and user documentation are owned by HP or its affiliates may not be governed by the Microsoft License Agreement. 2. After upgrading, you provide in the form of a conflict between such terms, the other terms along with...parts, media, printed materials, this EULA. 8. LIMITATION ON REVERSE ENGINEERING. CONSENT TO USE OF DATA. UPGRADES. To use of this EULA, and if applicable, the Certificate of the HP Product with the update or supplement. b. Third Party. You may make a one-time transfer of such ...
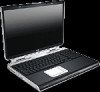
Using LightScribe (Select Models Only)
Page 4
... LightScribe discs are LightScribe discs sold separately) ■ How long does it will display the LightScribe logo (shown above). ■ Can I upgrade my current DVD-RW drive to finish burning the label. Currently, LightScribe technology creates a grayscale image, similar to the image mode (Draft, ...amount of time it take to complete the label. In most cases, the less area you use LightScribe? Creating Disc Labels on Your Notebook Using LightScribe Frequently asked questions ■ How do I have a LightScribe drive? It will take to burn a LightScribe label? A ...
... LightScribe discs are LightScribe discs sold separately) ■ How long does it will display the LightScribe logo (shown above). ■ Can I upgrade my current DVD-RW drive to finish burning the label. Currently, LightScribe technology creates a grayscale image, similar to the image mode (Draft, ...amount of time it take to complete the label. In most cases, the less area you use LightScribe? Creating Disc Labels on Your Notebook Using LightScribe Frequently asked questions ■ How do I have a LightScribe drive? It will take to burn a LightScribe label? A ...
Hardware Software Guide
Page 6
... HP Administrator Setup Password 5-13 Using DriveLock 5-17 Setting DriveLock Passwords 5-17 Entering DriveLock Passwords 5-18 Changing DriveLock Passwords 5-18 Deleting DriveLock Protection 5-19 Device Disabling 5-20 Security Cable 5-21 6 Hardware Options and Upgrades External Devices 6-1 Connecting a Monitor or Projector 6-2 Connecting a USB Device 6-2 Using a USB Device 6-3 Connecting a 1394 Device 6-4 Using a PC Card 6-5 Selecting a PC...
... HP Administrator Setup Password 5-13 Using DriveLock 5-17 Setting DriveLock Passwords 5-17 Entering DriveLock Passwords 5-18 Changing DriveLock Passwords 5-18 Deleting DriveLock Protection 5-19 Device Disabling 5-20 Security Cable 5-21 6 Hardware Options and Upgrades External Devices 6-1 Connecting a Monitor or Projector 6-2 Connecting a USB Device 6-2 Using a USB Device 6-3 Connecting a 1394 Device 6-4 Using a PC Card 6-5 Selecting a PC...
Hardware Software Guide
Page 108
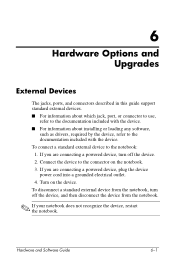
...into a grounded electrical outlet. 4. Turn on the notebook. 3. To disconnect a standard external device from the notebook, turn off the device, and then disconnect the device from the notebook. ✎ If your notebook does not recognize the device, restart the notebook. 6 Hardware Options and Upgrades External Devices The jacks, ports, and connectors described...the device. ■ For information about installing or loading any software, such as drivers, required by the device, refer to the notebook: 1. To connect a standard external device to the documentation included with the device.
...into a grounded electrical outlet. 4. Turn on the notebook. 3. To disconnect a standard external device from the notebook, turn off the device, and then disconnect the device from the notebook. ✎ If your notebook does not recognize the device, restart the notebook. 6 Hardware Options and Upgrades External Devices The jacks, ports, and connectors described...the device. ■ For information about installing or loading any software, such as drivers, required by the device, refer to the notebook: 1. To connect a standard external device to the documentation included with the device.

Hardware Software Guide
Page 109
... devices such as a USB keyboard, mouse, drive, printer, scanner, or hub to the notebook or optional HP expansion product. Connecting a USB Device USB (Universal Serial Bus) is usually included with the device. 6-2 Hardware and Software Guide Hardware Options and Upgrades Connecting a Monitor or Projector To connect an external monitor or projector to the...
... devices such as a USB keyboard, mouse, drive, printer, scanner, or hub to the notebook or optional HP expansion product. Connecting a USB Device USB (Universal Serial Bus) is usually included with the device. 6-2 Hardware and Software Guide Hardware Options and Upgrades Connecting a Monitor or Projector To connect an external monitor or projector to the...
Hardware Software Guide
Page 110
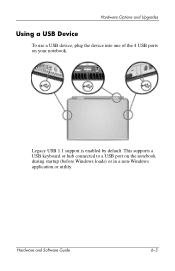
Legacy USB 1.1 support is enabled by default. This supports a USB keyboard or hub connected to a USB port on your notebook. Hardware and Software Guide 6-3 Hardware Options and Upgrades Using a USB Device To use a USB device, plug the device into one of the 4 USB ports on the notebook during startup (before Windows loads) or in a non-Windows application or utility.
Legacy USB 1.1 support is enabled by default. This supports a USB keyboard or hub connected to a USB port on your notebook. Hardware and Software Guide 6-3 Hardware Options and Upgrades Using a USB Device To use a USB device, plug the device into one of the 4 USB ports on the notebook during startup (before Windows loads) or in a non-Windows application or utility.

Hardware Software Guide
Page 111
...device-specific software, refer to the device documentation or to load device-specific drivers and other software before using some 1394 devices. The notebook 1394 port, illustrated below, supports IEEE 1394a devices. 6-4 Hardware and Software Guide You may need to the Web site of the device ...manufacturer or provider. Scanners, digital cameras, and digital camcorders often require a 1394 connection. Hardware Options and Upgrades Connecting a 1394 Device IEEE 1394 is a hardware interface that can be used to connect a high-speed multimedia or data storage device to ...
...device-specific software, refer to the device documentation or to load device-specific drivers and other software before using some 1394 devices. The notebook 1394 port, illustrated below, supports IEEE 1394a devices. 6-4 Hardware and Software Guide You may need to the Web site of the device ...manufacturer or provider. Scanners, digital cameras, and digital camcorders often require a 1394 connection. Hardware Options and Upgrades Connecting a 1394 Device IEEE 1394 is a hardware interface that can be used to connect a high-speed multimedia or data storage device to ...

Hardware Software Guide
Page 112
... software or any of the Personal Computer Memory Card International Association (PCMCIA). Hardware and Software Guide 6-5 The notebook PC Card slot supports both 32-bit (CardBus) and 16-bit PC Cards. Hardware Options and Upgrades Using a PC Card A PC Card is a credit card-sized accessory designed to conform to the standard specifications of the enablers provided...
... software or any of the Personal Computer Memory Card International Association (PCMCIA). Hardware and Software Guide 6-5 The notebook PC Card slot supports both 32-bit (CardBus) and 16-bit PC Cards. Hardware Options and Upgrades Using a PC Card A PC Card is a credit card-sized accessory designed to conform to the standard specifications of the enablers provided...
Hardware Software Guide
Page 113
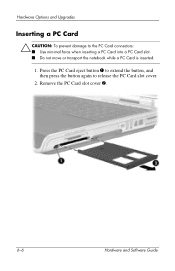
Remove the PC Card slot cover 2. 6-6 Hardware and Software Guide Press the PC Card eject button 1 to extend the button, and then press the button again to the PC Card connectors: ■ Use minimal force when inserting a PC Card into a PC Card slot. ■ Do not move or transport the notebook while a PC Card is inserted. 1. Hardware Options and Upgrades Inserting a PC Card Ä CAUTION: To prevent damage to release the PC Card slot cover. 2.
Remove the PC Card slot cover 2. 6-6 Hardware and Software Guide Press the PC Card eject button 1 to extend the button, and then press the button again to the PC Card connectors: ■ Use minimal force when inserting a PC Card into a PC Card slot. ■ Do not move or transport the notebook while a PC Card is inserted. 1. Hardware Options and Upgrades Inserting a PC Card Ä CAUTION: To prevent damage to release the PC Card slot cover. 2.
Hardware Software Guide
Page 114
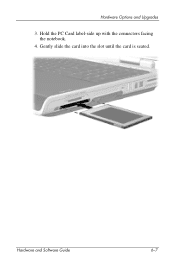
Hardware and Software Guide 6-7 Hardware Options and Upgrades 3. Hold the PC Card label-side up with the connectors facing the notebook. 4. Gently slide the card into the slot until the card is seated.
Hardware and Software Guide 6-7 Hardware Options and Upgrades 3. Hold the PC Card label-side up with the connectors facing the notebook. 4. Gently slide the card into the slot until the card is seated.
Hardware Software Guide
Page 115
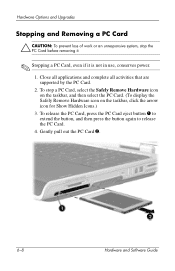
... are supported by the PC Card. 2. To stop the PC Card before removing it. ✎ Stopping a PC Card, even if it is not in use, conserves power. 1. Gently pull out the PC Card 2. 6-8 Hardware and Software Guide Hardware Options and Upgrades Stopping and Removing a PC Card Ä CAUTION:... To prevent loss of work or an unresponsive system, stop a PC Card, select the Safely Remove Hardware icon on the taskbar, ...
... are supported by the PC Card. 2. To stop the PC Card before removing it. ✎ Stopping a PC Card, even if it is not in use, conserves power. 1. Gently pull out the PC Card 2. 6-8 Hardware and Software Guide Hardware Options and Upgrades Stopping and Removing a PC Card Ä CAUTION:... To prevent loss of work or an unresponsive system, stop a PC Card, select the Safely Remove Hardware icon on the taskbar, ...
Hardware Software Guide
Page 116
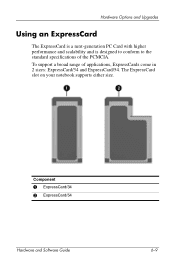
The ExpressCard slot on your notebook supports either size. To support a broad range of the PCMCIA. Hardware Options and Upgrades Using an ExpressCard The ExpressCard is a next-generation PC Card with higher performance and scalability and is designed to conform to the standard specifications of applications, ExpressCards come in 2 sizes: ExpressCard/34 and ExpressCard/54. Component 1 ExpressCard/34 2 ExpressCard/54 Hardware and Software Guide 6-9
The ExpressCard slot on your notebook supports either size. To support a broad range of the PCMCIA. Hardware Options and Upgrades Using an ExpressCard The ExpressCard is a next-generation PC Card with higher performance and scalability and is designed to conform to the standard specifications of applications, ExpressCards come in 2 sizes: ExpressCard/34 and ExpressCard/54. Component 1 ExpressCard/34 2 ExpressCard/54 Hardware and Software Guide 6-9
Hardware Software Guide
Page 117
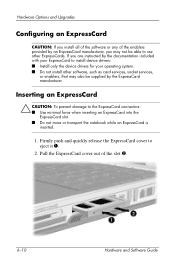
... ExpressCard connectors: ■ Use minimal force when inserting an ExpressCard into the ExpressCard slot. ■ Do not move or transport the notebook while an ExpressCard is inserted. 1. If you are instructed by the documentation included with your ExpressCard to install device drivers: ■ ...Install only the device drivers for your operating system. ■ Do not install other ExpressCards. Hardware Options and Upgrades Configuring an ExpressCard CAUTION: If you may also be able to use other software, such as card services, socket services, or enablers,...
... ExpressCard connectors: ■ Use minimal force when inserting an ExpressCard into the ExpressCard slot. ■ Do not move or transport the notebook while an ExpressCard is inserted. 1. If you are instructed by the documentation included with your ExpressCard to install device drivers: ■ ...Install only the device drivers for your operating system. ■ Do not install other ExpressCards. Hardware Options and Upgrades Configuring an ExpressCard CAUTION: If you may also be able to use other software, such as card services, socket services, or enablers,...
Hardware Software Guide
Page 118
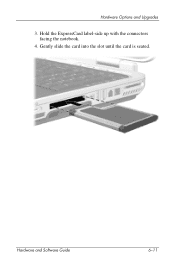
Hardware Options and Upgrades 3. Hold the ExpressCard label-side up with the connectors facing the notebook. 4. Hardware and Software Guide 6-11 Gently slide the card into the slot until the card is seated.
Hardware Options and Upgrades 3. Hold the ExpressCard label-side up with the connectors facing the notebook. 4. Hardware and Software Guide 6-11 Gently slide the card into the slot until the card is seated.
Hardware Software Guide
Page 119
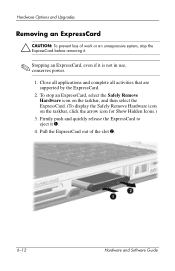
... that are supported by the ExpressCard. 2. Firmly push and quickly release the ExpressCard to eject it is not in use, conserves power. 1. Hardware Options and Upgrades Removing an ExpressCard Ä CAUTION: To prevent loss of the slot 2. 6-12 Hardware and Software Guide
... that are supported by the ExpressCard. 2. Firmly push and quickly release the ExpressCard to eject it is not in use, conserves power. 1. Hardware Options and Upgrades Removing an ExpressCard Ä CAUTION: To prevent loss of the slot 2. 6-12 Hardware and Software Guide
Hardware Software Guide
Page 120
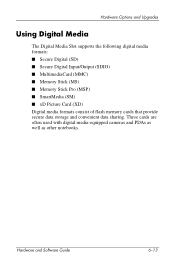
Hardware Options and Upgrades Using Digital Media The Digital Media Slot supports the following digital media formats: ■ Secure Digital (SD) ■ Secure Digital Input/Output (SDIO) ■ MultimediaCard (MMC) ■ Memory Stick (MS) ■ Memory Stick Pro (MSP) ■ SmartMedia (SM) ■ xD Picture Card (XD) Digital media formats consist of flash memory cards that provide secure data storage and convenient data sharing. These cards are often used with digital media-equipped cameras and PDAs as well as other notebooks. Hardware and Software Guide 6-13
Hardware Options and Upgrades Using Digital Media The Digital Media Slot supports the following digital media formats: ■ Secure Digital (SD) ■ Secure Digital Input/Output (SDIO) ■ MultimediaCard (MMC) ■ Memory Stick (MS) ■ Memory Stick Pro (MSP) ■ SmartMedia (SM) ■ xD Picture Card (XD) Digital media formats consist of flash memory cards that provide secure data storage and convenient data sharing. These cards are often used with digital media-equipped cameras and PDAs as well as other notebooks. Hardware and Software Guide 6-13
Hardware Software Guide
Page 121
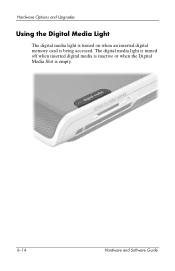
The digital media light is turned off when inserted digital media is inactive or when the Digital Media Slot is being accessed. Hardware Options and Upgrades Using the Digital Media Light The digital media light is turned on when an inserted digital memory card is empty. 6-14 Hardware and Software Guide
The digital media light is turned off when inserted digital media is inactive or when the Digital Media Slot is being accessed. Hardware Options and Upgrades Using the Digital Media Light The digital media light is turned on when an inserted digital memory card is empty. 6-14 Hardware and Software Guide
Hardware Software Guide
Page 122
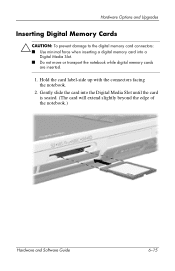
Hardware Options and Upgrades Inserting Digital Memory Cards Ä CAUTION: To prevent damage to the digital memory card connectors: ■ Use minimal force when inserting a digital memory card into the Digital Media Slot until the card is seated. (The card will extend slightly beyond the edge of the notebook.) Hardware and Software Guide 6-15 Hold the card label-side up with the connectors facing the notebook. 2. Gently slide the card into a Digital Media Slot. ■ Do not move or transport the notebook while digital memory cards are inserted. 1.
Hardware Options and Upgrades Inserting Digital Memory Cards Ä CAUTION: To prevent damage to the digital memory card connectors: ■ Use minimal force when inserting a digital memory card into the Digital Media Slot until the card is seated. (The card will extend slightly beyond the edge of the notebook.) Hardware and Software Guide 6-15 Hold the card label-side up with the connectors facing the notebook. 2. Gently slide the card into a Digital Media Slot. ■ Do not move or transport the notebook while digital memory cards are inserted. 1.
Hardware Software Guide
Page 123
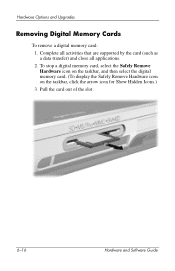
Complete all activities that are supported by the card (such as a data transfer) and close all applications. 2. Pull the card out of the slot. 6-16 Hardware and Software Guide To stop a digital memory card, select the Safely Remove Hardware icon on the taskbar, and then select the digital memory card. (To display the Safely Remove Hardware icon on the taskbar, click the arrow icon for Show Hidden Icons.) 3. Hardware Options and Upgrades Removing Digital Memory Cards To remove a digital memory card: 1.
Complete all activities that are supported by the card (such as a data transfer) and close all applications. 2. Pull the card out of the slot. 6-16 Hardware and Software Guide To stop a digital memory card, select the Safely Remove Hardware icon on the taskbar, and then select the digital memory card. (To display the Safely Remove Hardware icon on the taskbar, click the arrow icon for Show Hidden Icons.) 3. Hardware Options and Upgrades Removing Digital Memory Cards To remove a digital memory card: 1.
Hardware Software Guide
Page 124
...click the drive assigned to the card, and then select Eject. (The card is stopped but is not in this chapter. Hardware Options and Upgrades Disabling or Restarting Digital Memory Cards An inserted digital memory card uses power even when the card is not released from the Digital Media Slot....) To restart the card, remove and then reinsert it. Some notebook models are shipped with an approved optional memory module. Increasing Memory You can be replaced at any time. For instructions, see the "Inserting Digital...
...click the drive assigned to the card, and then select Eject. (The card is stopped but is not in this chapter. Hardware Options and Upgrades Disabling or Restarting Digital Memory Cards An inserted digital memory card uses power even when the card is not released from the Digital Media Slot....) To restart the card, remove and then reinsert it. Some notebook models are shipped with an approved optional memory module. Increasing Memory You can be replaced at any time. For instructions, see the "Inserting Digital...


