
Hardware Software Guide
Page 112
...Upgrades Using a PC Card A PC Card is a credit card-sized accessory designed to conform to the standard specifications of the enablers provided by the PC Card manufacturer. The notebook PC Card slot supports both 32-bit (CardBus) and 16-bit PC Cards. Hardware and Software Guide 6-5 Selecting a PC Card A Type I or Type II PC...; Do not install other PC Cards. PC Cards can be able to the notebook. Configuring a PC Card Ä CAUTION: If you are not supported. If you install all of the software or any of the Personal Computer Memory Card International Association (PCMCIA)....
...Upgrades Using a PC Card A PC Card is a credit card-sized accessory designed to conform to the standard specifications of the enablers provided by the PC Card manufacturer. The notebook PC Card slot supports both 32-bit (CardBus) and 16-bit PC Cards. Hardware and Software Guide 6-5 Selecting a PC Card A Type I or Type II PC...; Do not install other PC Cards. PC Cards can be able to the notebook. Configuring a PC Card Ä CAUTION: If you are not supported. If you install all of the software or any of the Personal Computer Memory Card International Association (PCMCIA)....
Hardware Software Guide
Page 120
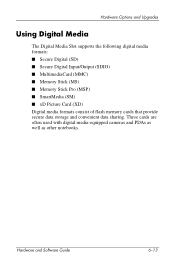
Hardware Options and Upgrades Using Digital Media The Digital Media Slot supports the following digital media formats: ■ Secure Digital (SD) ■ Secure Digital Input/Output (SDIO) ■ MultimediaCard (MMC) ■ Memory Stick (MS) ■ Memory Stick Pro (MSP) ■ SmartMedia (SM) ■ xD Picture Card (XD) Digital media formats consist of flash memory cards that provide secure data storage and convenient data sharing. Hardware and Software Guide 6-13 These cards are often used with digital media-equipped cameras and PDAs as well as other notebooks.
Hardware Options and Upgrades Using Digital Media The Digital Media Slot supports the following digital media formats: ■ Secure Digital (SD) ■ Secure Digital Input/Output (SDIO) ■ MultimediaCard (MMC) ■ Memory Stick (MS) ■ Memory Stick Pro (MSP) ■ SmartMedia (SM) ■ xD Picture Card (XD) Digital media formats consist of flash memory cards that provide secure data storage and convenient data sharing. Hardware and Software Guide 6-13 These cards are often used with digital media-equipped cameras and PDAs as well as other notebooks.
Hardware Software Guide
Page 121
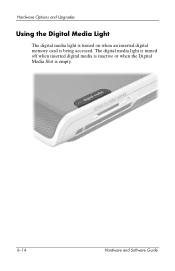
Hardware Options and Upgrades Using the Digital Media Light The digital media light is turned on when an inserted digital memory card is empty. 6-14 Hardware and Software Guide The digital media light is turned off when inserted digital media is inactive or when the Digital Media Slot is being accessed.
Hardware Options and Upgrades Using the Digital Media Light The digital media light is turned on when an inserted digital memory card is empty. 6-14 Hardware and Software Guide The digital media light is turned off when inserted digital media is inactive or when the Digital Media Slot is being accessed.
Hardware Software Guide
Page 122
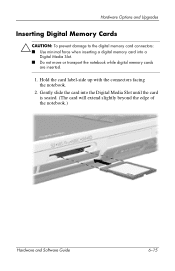
Gently slide the card into a Digital Media Slot. ■ Do not move or transport the notebook while digital memory cards are inserted. 1. Hold the card label-side up with the connectors facing the notebook. 2. Hardware Options and Upgrades Inserting Digital Memory Cards Ä CAUTION: To prevent damage to the digital memory card connectors: ■ Use minimal force when inserting a digital memory card into the Digital Media Slot until the card is seated. (The card will extend slightly beyond the edge of the notebook.) Hardware and Software Guide 6-15
Gently slide the card into a Digital Media Slot. ■ Do not move or transport the notebook while digital memory cards are inserted. 1. Hold the card label-side up with the connectors facing the notebook. 2. Hardware Options and Upgrades Inserting Digital Memory Cards Ä CAUTION: To prevent damage to the digital memory card connectors: ■ Use minimal force when inserting a digital memory card into the Digital Media Slot until the card is seated. (The card will extend slightly beyond the edge of the notebook.) Hardware and Software Guide 6-15
Hardware Software Guide
Page 123
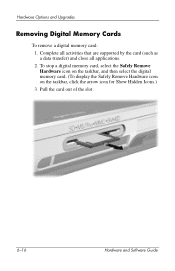
Pull the card out of the slot. 6-16 Hardware and Software Guide To stop a digital memory card, select the Safely Remove Hardware icon on the taskbar, and then select the digital memory card. (To display the Safely Remove Hardware icon on the taskbar, click the arrow icon for Show Hidden Icons.) 3. Hardware Options and Upgrades Removing Digital Memory Cards To remove a digital memory card: 1. Complete all activities that are supported by the card (such as a data transfer) and close all applications. 2.
Pull the card out of the slot. 6-16 Hardware and Software Guide To stop a digital memory card, select the Safely Remove Hardware icon on the taskbar, and then select the digital memory card. (To display the Safely Remove Hardware icon on the taskbar, click the arrow icon for Show Hidden Icons.) 3. Hardware Options and Upgrades Removing Digital Memory Cards To remove a digital memory card: 1. Complete all activities that are supported by the card (such as a data transfer) and close all applications. 2.
Hardware Software Guide
Page 124
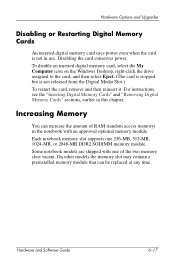
...Upgrades Disabling or Restarting Digital Memory Cards An inserted digital memory card uses power even when the card is not released from the Digital Media Slot.) To restart the card, remove and then reinsert it. Disabling the card conserves power. For instructions, see the "Inserting Digital Memory Cards" and "Removing Digital Memory... Cards" sections, earlier in the notebook with one 256-MB, 512-MB, 1024-MB, or 2048-MB DDR2 SODIMM memory module. Increasing Memory You can be replaced at any time. On...
...Upgrades Disabling or Restarting Digital Memory Cards An inserted digital memory card uses power even when the card is not released from the Digital Media Slot.) To restart the card, remove and then reinsert it. Disabling the card conserves power. For instructions, see the "Inserting Digital Memory Cards" and "Removing Digital Memory... Cards" sections, earlier in the notebook with one 256-MB, 512-MB, 1024-MB, or 2048-MB DDR2 SODIMM memory module. Increasing Memory You can be replaced at any time. On...
Hardware Software Guide
Page 125
Hardware Options and Upgrades Displaying Memory Information When RAM is increased, the operating system increases the hard drive space reserved for the larger hibernation file. ■ To display the amount of ...
Hardware Options and Upgrades Displaying Memory Information When RAM is increased, the operating system increases the hard drive space reserved for the larger hibernation file. ■ To display the amount of ...
Hardware Software Guide
Page 126
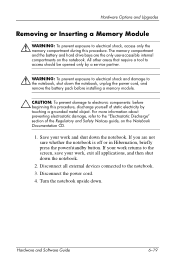
... electricity by a service partner. Å WARNING: To prevent exposure to electrical shock and damage to the notebook, shut down the notebook. If you are the only user-accessible internal compartments on the Notebook Documentation CD. 1. Hardware Options and Upgrades Removing or Inserting a Memory Module Å WARNING: To prevent exposure to electrical shock, access only the...
... electricity by a service partner. Å WARNING: To prevent exposure to electrical shock and damage to the notebook, shut down the notebook. If you are the only user-accessible internal compartments on the Notebook Documentation CD. 1. Hardware Options and Upgrades Removing or Inserting a Memory Module Å WARNING: To prevent exposure to electrical shock, access only the...
Hardware Software Guide
Page 127
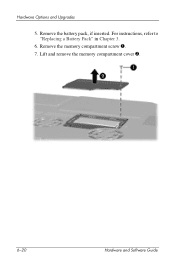
Remove the battery pack, if inserted. Remove the memory compartment screw 1. 7. For instructions, refer to "Replacing a Battery Pack" in Chapter 3. 6. Hardware Options and Upgrades 5. Lift and remove the memory compartment cover 2. 6-20 Hardware and Software Guide
Remove the battery pack, if inserted. Remove the memory compartment screw 1. 7. For instructions, refer to "Replacing a Battery Pack" in Chapter 3. 6. Hardware Options and Upgrades 5. Lift and remove the memory compartment cover 2. 6-20 Hardware and Software Guide
Hardware Software Guide
Page 128
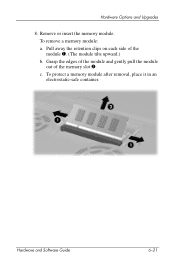
Hardware Options and Upgrades 8. Pull away the retention clips on each side of the memory slot 2. To remove a memory module: a. Grasp the edges of the module and gently pull the module out of the module 1. (The module tilts upward.) b. To protect a memory module after removal, place it in an electrostatic-safe container. c. Hardware and Software Guide 6-21 Remove or insert the memory module.
Hardware Options and Upgrades 8. Pull away the retention clips on each side of the memory slot 2. To remove a memory module: a. Grasp the edges of the module and gently pull the module out of the module 1. (The module tilts upward.) b. To protect a memory module after removal, place it in an electrostatic-safe container. c. Hardware and Software Guide 6-21 Remove or insert the memory module.
Hardware Software Guide
Page 129
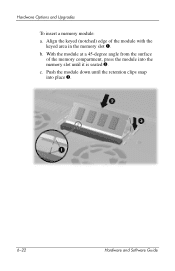
Push the module down until the retention clips snap into the memory slot until it is seated 2. Align the keyed (notched) edge of the memory compartment, press the module into place 3. 6-22 Hardware and Software Guide b. c. With the module at a 45-degree angle from the surface of the module with the keyed area in the memory slot 1. Hardware Options and Upgrades To insert a memory module: a.
Push the module down until the retention clips snap into the memory slot until it is seated 2. Align the keyed (notched) edge of the memory compartment, press the module into place 3. 6-22 Hardware and Software Guide b. c. With the module at a 45-degree angle from the surface of the module with the keyed area in the memory slot 1. Hardware Options and Upgrades To insert a memory module: a.
Hardware Software Guide
Page 130
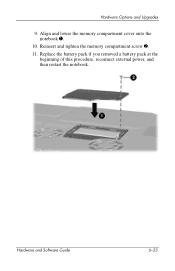
Reinsert and tighten the memory compartment screw 2. 11. Replace the battery pack if you removed a battery pack at the beginning of this procedure, reconnect external power, and then restart the notebook. Align and lower the memory compartment cover onto the notebook 1. 10. Hardware and Software Guide 6-23 Hardware Options and Upgrades 9.
Reinsert and tighten the memory compartment screw 2. 11. Replace the battery pack if you removed a battery pack at the beginning of this procedure, reconnect external power, and then restart the notebook. Align and lower the memory compartment cover onto the notebook 1. 10. Hardware and Software Guide 6-23 Hardware Options and Upgrades 9.

