
PC Basics Guide
Page 43
... the capacity and free space sizes. To improve the performance of your PC. Information displays for each drive on your PC, try: • Closing program windows; click Start, click Turn Off Computer, and then click Restart. • Increasing memory by adding or upgrading memory modules in the chassis. • Increasing available hard disk drive space...
... the capacity and free space sizes. To improve the performance of your PC. Information displays for each drive on your PC, try: • Closing program windows; click Start, click Turn Off Computer, and then click Restart. • Increasing memory by adding or upgrading memory modules in the chassis. • Increasing available hard disk drive space...
Upgrading and Servicing Guide
Page 3
... Side Panel 2 Replacing the Side Panel 2 Removing the Front Panel 2 Replacing the Front Panel 3 Locating Components Inside the PC 3 Removing and Replacing Drives 3 Removing a Drive 4 Replacing or Adding a Drive 5 Adding Memory 7 Removing a Memory Module 7 Installing a Memory Module 8 Removing or Installing an Add-In Card 8 Removing an Add-In Card 9 Installing an Add-In Card...
... Side Panel 2 Replacing the Side Panel 2 Removing the Front Panel 2 Replacing the Front Panel 3 Locating Components Inside the PC 3 Removing and Replacing Drives 3 Removing a Drive 4 Replacing or Adding a Drive 5 Adding Memory 7 Removing a Memory Module 7 Installing a Memory Module 8 Removing or Installing an Add-In Card 8 Removing an Add-In Card 9 Installing an Add-In Card...
Upgrading and Servicing Guide
Page 6
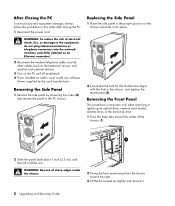
... in the chassis, and replace the thumbscrew (D). Removing the Front Panel This procedure is necessary only when removing or replacing an optical drive, memory card reader, diskette drive, or the hard disk drive. 1 Press the three tabs toward the right. 3 Lift the front panel up ...avoid injury and equipment damage, always follow this order after closing the PC. 1 Reconnect the power cord. WARNING: To reduce the risk of the chassis (1). 2 Slide the panel back about 1 inch (2.5 cm), and then lift it . 2 Upgrading and Servicing Guide WARNING: Beware of sharp edges inside the chassis. ...
... in the chassis, and replace the thumbscrew (D). Removing the Front Panel This procedure is necessary only when removing or replacing an optical drive, memory card reader, diskette drive, or the hard disk drive. 1 Press the three tabs toward the right. 3 Lift the front panel up ...avoid injury and equipment damage, always follow this order after closing the PC. 1 Reconnect the power cord. WARNING: To reduce the risk of the chassis (1). 2 Slide the panel back about 1 inch (2.5 cm), and then lift it . 2 Upgrading and Servicing Guide WARNING: Beware of sharp edges inside the chassis. ...
Upgrading and Servicing Guide
Page 7
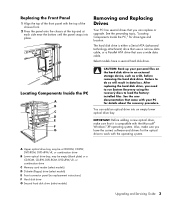
...B Lower optical drive bay, may be empty (blank plate) or a CD-ROM, CD-RW, DVD-ROM, DVD+RW/+R, or combination drive C Memory card reader (select models) D Diskette (floppy) drive (select models) E Front connector panel (no replacement instructions) F Hard disk drive G Second hard disk... drive (select models) Upgrading and Servicing Guide 3 Also, make sure that uses a wide data cable. See the preceding topic, "Locating Components Inside the PC," for the optical drive to an external storage device, such as a CD, before...
...B Lower optical drive bay, may be empty (blank plate) or a CD-ROM, CD-RW, DVD-ROM, DVD+RW/+R, or combination drive C Memory card reader (select models) D Diskette (floppy) drive (select models) E Front connector panel (no replacement instructions) F Hard disk drive G Second hard disk... drive (select models) Upgrading and Servicing Guide 3 Also, make sure that uses a wide data cable. See the preceding topic, "Locating Components Inside the PC," for the optical drive to an external storage device, such as a CD, before...
Upgrading and Servicing Guide
Page 8
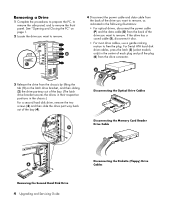
... Drive 1 Complete the procedures to prepare the PC, to remove the side panel, and to free the plug. Disconnecting the Optical Drive Cables Disconnecting the Memory Card Reader Drive Cable Removing the Second Hard Disk Drive 4 Upgrading and Servicing Guide Disconnecting the Diskette (Floppy) ...Drive Cables See "Opening and Closing the PC" on the latch drive bracket, and then sliding ...
... Drive 1 Complete the procedures to prepare the PC, to remove the side panel, and to free the plug. Disconnecting the Optical Drive Cables Disconnecting the Memory Card Reader Drive Cable Removing the Second Hard Disk Drive 4 Upgrading and Servicing Guide Disconnecting the Diskette (Floppy) ...Drive Cables See "Opening and Closing the PC" on the latch drive bracket, and then sliding ...
Upgrading and Servicing Guide
Page 10
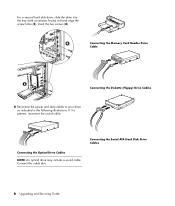
Connecting the Serial ATA Hard Disk Drive Cables 6 Upgrading and Servicing Guide Connecting the Optical Drive Cables NOTE: An optical drive may include a sound cable. Insert the two screws (4). Connect this cable also. For a second hard disk drive, slide the drive into the bay (with connectors facing out) and align the screw holes (3). Connecting the Memory Card Reader Drive Cable Connecting the Diskette (Floppy) Drive Cables 6 Reconnect the power and data cables to your drive as indicated in the following illustrations. If it is present, reconnect the sound cable.
Connecting the Serial ATA Hard Disk Drive Cables 6 Upgrading and Servicing Guide Connecting the Optical Drive Cables NOTE: An optical drive may include a sound cable. Insert the two screws (4). Connect this cable also. For a second hard disk drive, slide the drive into the bay (with connectors facing out) and align the screw holes (3). Connecting the Memory Card Reader Drive Cable Connecting the Diskette (Floppy) Drive Cables 6 Reconnect the power and data cables to your drive as indicated in the following illustrations. If it is present, reconnect the sound cable.

Upgrading and Servicing Guide
Page 11
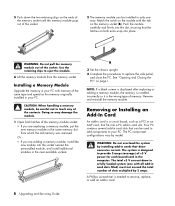
... type of the way, if necessary. Doing so may be careful not to touch any cabling out of memory module could damage the system. Upgrading and Servicing Guide 7 Adding Memory Your PC comes with random access memory (RAM), which temporarily stores data and instructions on which type and speed of the way into the bay...
... type of the way, if necessary. Doing so may be careful not to touch any cabling out of memory module could damage the system. Upgrading and Servicing Guide 7 Adding Memory Your PC comes with random access memory (RAM), which temporarily stores data and instructions on which type and speed of the way into the bay...
Upgrading and Servicing Guide
Page 12
... into place. Use the retaining clips to your PC. Installing a Memory Module Upgrade the memory in your PC. 5 Push down the two retaining clips on both latches of the memory module socket: • If you are replacing a memory module, put the new memory module in the same memory slot from the memory socket. Removing or Installing an Add-In Card...
... into place. Use the retaining clips to your PC. Installing a Memory Module Upgrade the memory in your PC. 5 Push down the two retaining clips on both latches of the memory module socket: • If you are replacing a memory module, put the new memory module in the same memory slot from the memory socket. Removing or Installing an Add-In Card...
Upgrading and Servicing Guide
Page 14
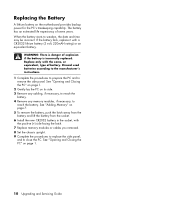
... same, or equivalent, type of battery. WARNING: There is danger of seven years. Replacing the Battery A lithium battery on page 1. 10 Upgrading and Servicing Guide Replace only with a CR2032 lithium battery (3 volt, 220mAH rating) or an equivalent battery. See "Opening and Closing the... the side panel, and to remove the side panel. See "Opening and Closing the PC" on the motherboard provides backup power for the PC's timekeeping capability. When the battery starts to reach the battery. See "Adding Memory" on its side. 3 Remove any cabling, if necessary, to reach the battery. ...
... same, or equivalent, type of battery. WARNING: There is danger of seven years. Replacing the Battery A lithium battery on page 1. 10 Upgrading and Servicing Guide Replace only with a CR2032 lithium battery (3 volt, 220mAH rating) or an equivalent battery. See "Opening and Closing the... the side panel, and to remove the side panel. See "Opening and Closing the PC" on the motherboard provides backup power for the PC's timekeeping capability. When the battery starts to reach the battery. See "Adding Memory" on its side. 3 Remove any cabling, if necessary, to reach the battery. ...


