
End User License Agreement
Page 1
...EULA. If the Software Product is used only for CONDITIONS OF THIS EULA. HP and its online documentation. Freeware. Copying. You may load the Software ON THE CONDITION THAT YOU Product into the local memory or storage device of the Freeware by third parties ("Freeware"), is licensed to... OF THIS EULA. You may make archival or back-up purposes. Use of the HP Product. DOWNLOADING, OR b. You do not have Software Product into Your Computer's AGREE TO ALL TERMS AND temporary memory (RAM) for back-up copies of the Software Product, provided the copy contains all...
...EULA. If the Software Product is used only for CONDITIONS OF THIS EULA. HP and its online documentation. Freeware. Copying. You may load the Software ON THE CONDITION THAT YOU Product into the local memory or storage device of the Freeware by third parties ("Freeware"), is licensed to... OF THIS EULA. You may make archival or back-up purposes. Use of the HP Product. DOWNLOADING, OR b. You do not have Software Product into Your Computer's AGREE TO ALL TERMS AND temporary memory (RAM) for back-up copies of the Software Product, provided the copy contains all...

Safety and Regulatory Information Desktops, Thin Clients, and Personal Workstations
Page 29
Table 2-2 Toxic and Hazardous Substances and Elements (continued) Part Name Lead (Pb) Mercury (Hg) Cadmium (Cd) Hexavalent Chromium (Cr(VI)) Memory X O O O I/O PCAs X O O O Power supply X O O O Keyboard X O O O Mouse X O O O Chassis/Other X O O O Fans X O O O Internal/External Media Reading X O O O Devices External Control Devices X O O O Cable X O O O Hard Disk Drive X O O O Display X X O O Polybrominated biphenyls (PBB) Polybrominated ...
Table 2-2 Toxic and Hazardous Substances and Elements (continued) Part Name Lead (Pb) Mercury (Hg) Cadmium (Cd) Hexavalent Chromium (Cr(VI)) Memory X O O O I/O PCAs X O O O Power supply X O O O Keyboard X O O O Mouse X O O O Chassis/Other X O O O Fans X O O O Internal/External Media Reading X O O O Devices External Control Devices X O O O Cable X O O O Hard Disk Drive X O O O Display X X O O Polybrominated biphenyls (PBB) Polybrominated ...
Upgrading and Servicing Guide
Page 3
... Side Panel 2 Replacing the Side Panel 2 Removing the Front Panel 2 Replacing the Front Panel 3 Locating Components Inside the PC 3 Removing and Replacing Drives 3 Removing a Drive 4 Replacing or Adding a Drive 5 Adding Memory 7 Removing a Memory Module 7 Installing a Memory Module 8 Removing or Installing an Add-In Card 8 Removing an Add-In Card 9 Installing an Add-In Card...
... Side Panel 2 Replacing the Side Panel 2 Removing the Front Panel 2 Replacing the Front Panel 3 Locating Components Inside the PC 3 Removing and Replacing Drives 3 Removing a Drive 4 Replacing or Adding a Drive 5 Adding Memory 7 Removing a Memory Module 7 Installing a Memory Module 8 Removing or Installing an Add-In Card 8 Removing an Add-In Card 9 Installing an Add-In Card...
Upgrading and Servicing Guide
Page 6
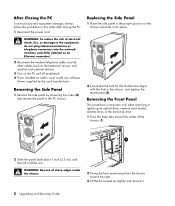
... 2 Reconnect the modem/telephone cable, and all other cables (such as the keyboard, mouse, and monitor) and external devices. 3 Turn on the PC and all peripherals. 4 If you installed an add-in card, install any software drivers supplied by loosening the screw (D) that the hole for the thumbscrew...cm), and then lift it . 2 Upgrading and Servicing Guide Removing the Front Panel This procedure is necessary only when removing or replacing an optical drive, memory card reader, diskette drive, or the hard disk drive. 1 Press the three tabs toward the right. 3 Lift the front panel up slightly and ...
... 2 Reconnect the modem/telephone cable, and all other cables (such as the keyboard, mouse, and monitor) and external devices. 3 Turn on the PC and all peripherals. 4 If you installed an add-in card, install any software drivers supplied by loosening the screw (D) that the hole for the thumbscrew...cm), and then lift it . 2 Upgrading and Servicing Guide Removing the Front Panel This procedure is necessary only when removing or replacing an optical drive, memory card reader, diskette drive, or the hard disk drive. 1 Press the three tabs toward the right. 3 Lift the front panel up slightly and ...
Upgrading and Servicing Guide
Page 7
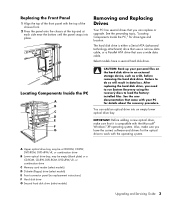
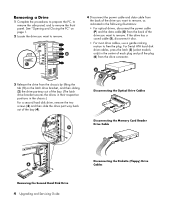
...IMPORTANT: Before adding a new optical drive, make sure you have a second hard disk drive. Locating Components Inside the PC A B C D E R L F G CAUTION: Back up your PC for details about the recovery procedure. After replacing the hard disk drive, you can add an optical drive into place. ... drive B Lower optical drive bay, may be empty (blank plate) or a CD-ROM, CD-RW, DVD-ROM, DVD+RW/+R, or combination drive C Memory card reader (select models) D Diskette (floppy) drive (select models) E Front connector panel (no replacement instructions) F Hard disk drive G Second hard disk...
...IMPORTANT: Before adding a new optical drive, make sure you have a second hard disk drive. Locating Components Inside the PC A B C D E R L F G CAUTION: Back up your PC for details about the recovery procedure. After replacing the hard disk drive, you can add an optical drive into place. ... drive B Lower optical drive bay, may be empty (blank plate) or a CD-ROM, CD-RW, DVD-ROM, DVD+RW/+R, or combination drive C Memory card reader (select models) D Diskette (floppy) drive (select models) E Front connector panel (no replacement instructions) F Hard disk drive G Second hard disk...
Upgrading and Servicing Guide
Page 8
...the chassis by lifting the tab (1) on page 1. 2 Locate the drive you want to remove. Disconnecting the Optical Drive Cables Disconnecting the Memory Card Reader Drive Cable Removing the Second Hard Disk Drive 4 Upgrading and Servicing Guide Disconnecting the Diskette (Floppy) Drive Cables Removing a Drive 1... Complete the procedures to prepare the PC, to remove the side panel, and to free the plug. If the drive has a sound cable (S), disconnect it also. • For ...
...the chassis by lifting the tab (1) on page 1. 2 Locate the drive you want to remove. Disconnecting the Optical Drive Cables Disconnecting the Memory Card Reader Drive Cable Removing the Second Hard Disk Drive 4 Upgrading and Servicing Guide Disconnecting the Diskette (Floppy) Drive Cables Removing a Drive 1... Complete the procedures to prepare the PC, to remove the side panel, and to free the plug. If the drive has a sound cable (S), disconnect it also. • For ...
Upgrading and Servicing Guide
Page 10
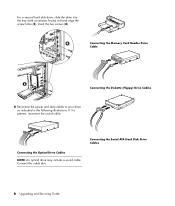
For a second hard disk drive, slide the drive into the bay (with connectors facing out) and align the screw holes (3). Connecting the Optical Drive Cables NOTE: An optical drive may include a sound cable. Connect this cable also. Connecting the Serial ATA Hard Disk Drive Cables 6 Upgrading and Servicing Guide Insert the two screws (4). If it is present, reconnect the sound cable. Connecting the Memory Card Reader Drive Cable Connecting the Diskette (Floppy) Drive Cables 6 Reconnect the power and data cables to your drive as indicated in the following illustrations.
For a second hard disk drive, slide the drive into the bay (with connectors facing out) and align the screw holes (3). Connecting the Optical Drive Cables NOTE: An optical drive may include a sound cable. Connect this cable also. Connecting the Serial ATA Hard Disk Drive Cables 6 Upgrading and Servicing Guide Insert the two screws (4). If it is present, reconnect the sound cable. Connecting the Memory Card Reader Drive Cable Connecting the Diskette (Floppy) Drive Cables 6 Reconnect the power and data cables to your drive as indicated in the following illustrations.

Upgrading and Servicing Guide
Page 11
...and Support Guide and click the Support link. Connect to second hard drive (select models only) C - Removing a Memory Module 1 Complete the procedures to prepare the PC and to the secondary hard disk drive. Doing so may be careful not to locate the hard disk drives and data...of the way, if necessary. If the data cable is not connected correctly, the PC will not be able to touch any cabling out of the contacts. Adding Memory Your PC comes with random access memory (RAM), which temporarily stores data and instructions on the motherboard. The motherboard contains sockets ...
...and Support Guide and click the Support link. Connect to second hard drive (select models only) C - Removing a Memory Module 1 Complete the procedures to prepare the PC and to the secondary hard disk drive. Doing so may be careful not to locate the hard disk drives and data...of the way, if necessary. If the data cable is not connected correctly, the PC will not be able to touch any cabling out of the contacts. Adding Memory Your PC comes with random access memory (RAM), which temporarily stores data and instructions on the motherboard. The motherboard contains sockets ...
Upgrading and Servicing Guide
Page 12
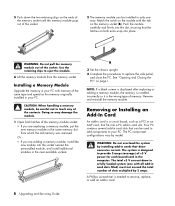
...card in the computer. Match the notch on the module with the tab on page 1. Use the retaining clips to your PC. Installing a Memory Module Upgrade the memory in your PC with memory of the same type and speed as a PCI or an AGP card, that can be installed in only one with ...be used to add components to eject the module. 6 Lift the memory module from which the old memory was removed. The PC component configurations vary by model. The system is a circuit board, such as the memory originally installed in your PC. Push the module carefully and firmly into place. Doing so may damage...
...card in the computer. Match the notch on the module with the tab on page 1. Use the retaining clips to your PC. Installing a Memory Module Upgrade the memory in your PC with memory of the same type and speed as a PCI or an AGP card, that can be installed in only one with ...be used to add components to eject the module. 6 Lift the memory module from which the old memory was removed. The PC component configurations vary by model. The system is a circuit board, such as the memory originally installed in your PC. Push the module carefully and firmly into place. Doing so may damage...
Upgrading and Servicing Guide
Page 14
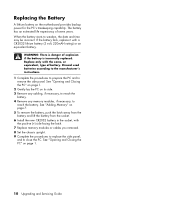
WARNING: There is danger of battery. See "Adding Memory" on its side. 3 Remove any cabling, if necessary, to reach the battery. 4 Remove any memory modules, if necessary, to close the PC. When the battery starts to remove the side panel. Discard used batteries according to the manufacturer's ...instructions. 1 Complete the procedures to prepare the PC and to weaken, the date and time may...
WARNING: There is danger of battery. See "Adding Memory" on its side. 3 Remove any cabling, if necessary, to reach the battery. 4 Remove any memory modules, if necessary, to close the PC. When the battery starts to remove the side panel. Discard used batteries according to the manufacturer's ...instructions. 1 Complete the procedures to prepare the PC and to weaken, the date and time may...
Getting Started Guide
Page 3
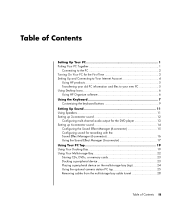
... Contents Setting Up Your PC 1 Putting Your PC Together 1 Connecting to the PC 2 Turning On Your PC for the First Time 3 Setting Up and Connecting to Your Internet Account 4 Using HP products 5 Transferring your old PC information and files to your new PC 5 Using Desktop Icons 6 Using HP Organize software 6 Using ... Manager (6-connector 16 Using the Sound Effect Manager (6-connector 17 Using Your PC Top 19 Using Your Docking Bay 19 Using Your Multistorage Bay 22 Storing CDs, DVDs, or memory cards 23 Docking a peripheral device 23 Placing a peripheral device on the multistorage...
... Contents Setting Up Your PC 1 Putting Your PC Together 1 Connecting to the PC 2 Turning On Your PC for the First Time 3 Setting Up and Connecting to Your Internet Account 4 Using HP products 5 Transferring your old PC information and files to your new PC 5 Using Desktop Icons 6 Using HP Organize software 6 Using ... Manager (6-connector 16 Using the Sound Effect Manager (6-connector 17 Using Your PC Top 19 Using Your Docking Bay 19 Using Your Multistorage Bay 22 Storing CDs, DVDs, or memory cards 23 Docking a peripheral device 23 Placing a peripheral device on the multistorage...
Getting Started Guide
Page 4
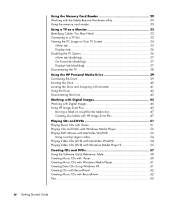
... Reader 29 Working with the Safely Remove Hardware utility 30 Using the memory card reader 30 Using a TV as a Monitor 33 Identifying Cables You May Need 33 Connecting to a TV Set 33 Viewing the PC Image on Your TV Screen 34 nView tab 35 Displays tab 36 Disabling the TV Option 36... the Drive 42 Disconnecting the Drive 43 Working with Digital Images 45 Working with Digital Images 45 Using HP Image Zone Plus 45 Burning a label on a LightScribe media disc 47 Creating disc labels with HP Image Zone Plus 47 Playing CDs and DVDs 51 Playing Music CDs with iTunes 51 Playing CDs...
... Reader 29 Working with the Safely Remove Hardware utility 30 Using the memory card reader 30 Using a TV as a Monitor 33 Identifying Cables You May Need 33 Connecting to a TV Set 33 Viewing the PC Image on Your TV Screen 34 nView tab 35 Displays tab 36 Disabling the TV Option 36... the Drive 42 Disconnecting the Drive 43 Working with Digital Images 45 Working with Digital Images 45 Using HP Image Zone Plus 45 Burning a label on a LightScribe media disc 47 Creating disc labels with HP Image Zone Plus 47 Playing CDs and DVDs 51 Playing Music CDs with iTunes 51 Playing CDs...
Getting Started Guide
Page 11
... in Microsoft Windows Help and Support Center; check the operating system, memory, and other requirements listed for the new software for moving your files onto your new PC See the built-in the PC box (select models only). Installing copied software may be illegal or ... it so it or installing a new antivirus program. You may infect your PC with your PC. Using HP products HP computers include preloaded software for HP peripherals. Preloaded software simplifies and speeds product setup for select HP All-In-One, camera, scanner, and printer peripheral products. Install the new...
... in Microsoft Windows Help and Support Center; check the operating system, memory, and other requirements listed for the new software for moving your files onto your new PC See the built-in the PC box (select models only). Installing copied software may be illegal or ... it so it or installing a new antivirus program. You may infect your PC with your PC. Using HP products HP computers include preloaded software for HP peripherals. Preloaded software simplifies and speeds product setup for select HP All-In-One, camera, scanner, and printer peripheral products. Install the new...
Getting Started Guide
Page 25
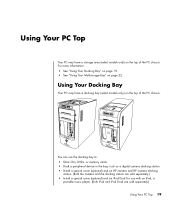
...See "Using Your Multistorage Bay" on page 22. Using Your Docking Bay Your PC may have a docking bay (select models only) on the top of the PC chassis. You can use the docking bay to: • Store CDs, DVDs, or memory cards. • Dock a peripheral device in the bay, such as a digital... camera docking station. • Install a special cover (optional) and an HP camera and HP camera docking station. (Both the camera...
...See "Using Your Multistorage Bay" on page 22. Using Your Docking Bay Your PC may have a docking bay (select models only) on the top of the PC chassis. You can use the docking bay to: • Store CDs, DVDs, or memory cards. • Dock a peripheral device in the bay, such as a digital... camera docking station. • Install a special cover (optional) and an HP camera and HP camera docking station. (Both the camera...
Getting Started Guide
Page 26
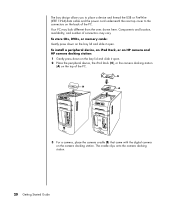
... and location, availability, and number of the PC. To store CDs, DVDs, or memory cards: Gently press down on the bay lid and slide it open . 2 Place the peripheral device, the iPod Dock (H), or the camera docking station (A) on the top of the PC. The cradle clips onto the camera docking station...cord underneath the rear top cover to the connectors on the back of connectors may look different from the ones shown here. Your PC may vary. To install a peripheral device, an iPod Dock, or an HP camera and HP camera docking station: 1 Gently press down on the camera docking station.
... and location, availability, and number of the PC. To store CDs, DVDs, or memory cards: Gently press down on the bay lid and slide it open . 2 Place the peripheral device, the iPod Dock (H), or the camera docking station (A) on the top of the PC. The cradle clips onto the camera docking station...cord underneath the rear top cover to the connectors on the back of connectors may look different from the ones shown here. Your PC may vary. To install a peripheral device, an iPod Dock, or an HP camera and HP camera docking station: 1 Gently press down on the camera docking station.
Getting Started Guide
Page 28
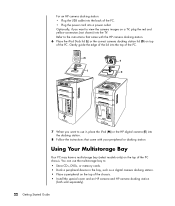
..., or memory cards. • Dock a peripheral device in the bay, such as a digital camera docking station. • Place a peripheral on a TV, plug the red and yellow connectors (not shown) into a power outlet. You can use it, place the iPod (M) or the HP digital camera (E) into the top of the PC. For an HP camera...
..., or memory cards. • Dock a peripheral device in the bay, such as a digital camera docking station. • Place a peripheral on a TV, plug the red and yellow connectors (not shown) into a power outlet. You can use it, place the iPod (M) or the HP digital camera (E) into the top of the PC. For an HP camera...
Getting Started Guide
Page 29
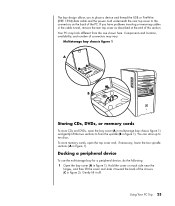
Hold the cover on the back of the PC. Multistorage bay chassis figure 1 A B Storing CDs, DVDs, or memory cards To store CDs and DVDs, open the top cover and, if ... this section. Components and location, availability, and number of the chassis (C in figure 2). Using Your PC Top 23 You can store up to the connectors on each side near the hinges, and then lift the... Gently lift it toward the back of connectors may look different from the one shown here. Your PC may vary. To store memory cards, open the bay cover (A in multistorage bay chassis figure 1) and gently lift the two ...
Hold the cover on the back of the PC. Multistorage bay chassis figure 1 A B Storing CDs, DVDs, or memory cards To store CDs and DVDs, open the top cover and, if ... this section. Components and location, availability, and number of the chassis (C in figure 2). Using Your PC Top 23 You can store up to the connectors on each side near the hinges, and then lift the... Gently lift it toward the back of connectors may look different from the one shown here. Your PC may vary. To store memory cards, open the bay cover (A in multistorage bay chassis figure 1) and gently lift the two ...
Getting Started Guide
Page 35
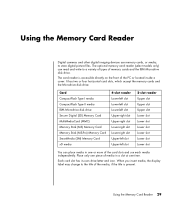
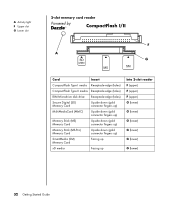
...drive. Card CompactFlash Type I media CompactFlash Type II media IBM Microdrive disk drive Secure Digital (SD) Memory Card MultiMediaCard (MMC) Memory Stick (MS) Memory Card Memory Stick (MS-Pro) Memory Card SmartMedia (SM) Memory Card xD media 4-slot reader Lower-left slot Lower-left slot Lower-left slot Upper-right slot Upper... present. When you insert media, the display label may change to the title of the PC or located inside a cover. Each card slot has its own drive letter and icon. The optional memory card reader (select models only) can place media in one or more of media in ...
...drive. Card CompactFlash Type I media CompactFlash Type II media IBM Microdrive disk drive Secure Digital (SD) Memory Card MultiMediaCard (MMC) Memory Stick (MS) Memory Card Memory Stick (MS-Pro) Memory Card SmartMedia (SM) Memory Card xD media 4-slot reader Lower-left slot Lower-left slot Lower-left slot Upper-right slot Upper... present. When you insert media, the display label may change to the title of the PC or located inside a cover. Each card slot has its own drive letter and icon. The optional memory card reader (select models only) can place media in one or more of media in ...

Getting Started Guide
Page 36
...two-slot reader, the Secure Digital (SD) card, the MultiMediaCard (MMC), and the Memory Stick (MS or MS-Pro) cards must restart the PC to see your PC; You can use the media contents. Using the memory card reader NOTE: CompactFlash and Microdrive are finished, right-click the drive icon, select...but not blinking, and then remove the media. A steady activity light indicates that the activity light is on the memory card reader lights, and the PC automatically detects the media. 2 The PC opens a window so you open the Safely Remove Hardware window by mistake, click Close. If you can copy ...
...two-slot reader, the Secure Digital (SD) card, the MultiMediaCard (MMC), and the Memory Stick (MS or MS-Pro) cards must restart the PC to see your PC; You can use the media contents. Using the memory card reader NOTE: CompactFlash and Microdrive are finished, right-click the drive icon, select...but not blinking, and then remove the media. A steady activity light indicates that the activity light is on the memory card reader lights, and the PC automatically detects the media. 2 The PC opens a window so you open the Safely Remove Hardware window by mistake, click Close. If you can copy ...
Getting Started Guide
Page 38
... Upside down (gold connector fingers up) MultiMediaCard (MMC) Upside down (gold connector fingers up) Memory Stick (MS) Memory Card Upside down (gold connector fingers up) Memory Stick (MS-Pro) Memory Card Upside down (gold connector fingers up) SmartMedia (SM) Memory Card Facing up xD media Facing up Into 2-slot reader F (upper) F (upper) F (upper) G (lower) G (lower...
... Upside down (gold connector fingers up) MultiMediaCard (MMC) Upside down (gold connector fingers up) Memory Stick (MS) Memory Card Upside down (gold connector fingers up) Memory Stick (MS-Pro) Memory Card Upside down (gold connector fingers up) SmartMedia (SM) Memory Card Facing up xD media Facing up Into 2-slot reader F (upper) F (upper) F (upper) G (lower) G (lower...


