
HP USB Digital Drive
Page 2
The Digital Drive can purchase one (in various storage capacities) from any computer that is a pocket-sized SD (Secure Digital) memory drive for storing and transferring files such as digital pictures, music, video, and data. User Guide 1 The HP USB Digital Drive 1 is running Microsoft Windows XP Home, Windows XP Pro, or Windows 2000. However, you will need an SD memory card to operate the Digital Drive. An SD memory card 2 may not be used with any HP authorized reseller. You can be included.
The Digital Drive can purchase one (in various storage capacities) from any computer that is a pocket-sized SD (Secure Digital) memory drive for storing and transferring files such as digital pictures, music, video, and data. User Guide 1 The HP USB Digital Drive 1 is running Microsoft Windows XP Home, Windows XP Pro, or Windows 2000. However, you will need an SD memory card to operate the Digital Drive. An SD memory card 2 may not be used with any HP authorized reseller. You can be included.

HP USB Digital Drive
Page 3
If the SD memory card does not slide in properly, gently pull it out and reinsert it. 2 User Guide Installing the SD Memory Card 1. Insert the SD memory card into the SD slot 2 with the notched corner positioned on the lower left as shown. Remove the cap 1 of the Digital Drive. 2.
If the SD memory card does not slide in properly, gently pull it out and reinsert it. 2 User Guide Installing the SD Memory Card 1. Insert the SD memory card into the SD slot 2 with the notched corner positioned on the lower left as shown. Remove the cap 1 of the Digital Drive. 2.
HP USB Digital Drive
Page 4
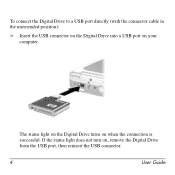
User Guide 3 Refer to a USB port on any computer either directly (with the USB connector cable in its unextended position) or by extension (with your computer for the USB port location. Connecting the Digital Drive to a USB Port The Digital Drive can be connected to the documentation included with the USB connector cable extended).
User Guide 3 Refer to a USB port on any computer either directly (with the USB connector cable in its unextended position) or by extension (with your computer for the USB port location. Connecting the Digital Drive to a USB Port The Digital Drive can be connected to the documentation included with the USB connector cable extended).
HP USB Digital Drive
Page 5
The status light on the Digital Drive turns on , remove the Digital Drive from the USB port, then reinsert the USB connector. 4 User Guide If the status light does not turn on when the connection is successful. To connect the Digital Drive to a USB port directly (with the connector cable in the unextended position): » Insert the USB connector on the Digital Drive into a USB port on your computer.
The status light on the Digital Drive turns on , remove the Digital Drive from the USB port, then reinsert the USB connector. 4 User Guide If the status light does not turn on when the connection is successful. To connect the Digital Drive to a USB port directly (with the connector cable in the unextended position): » Insert the USB connector on the Digital Drive into a USB port on your computer.

HP USB Digital Drive
Page 6
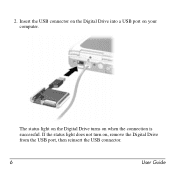
To connect the Digital Drive to a USB port by extension (with the USB cable in its track gently until it is fully extended. User Guide 5 Rotate the USB connector cable out of its extended position): 1.
To connect the Digital Drive to a USB port by extension (with the USB cable in its track gently until it is fully extended. User Guide 5 Rotate the USB connector cable out of its extended position): 1.
HP USB Digital Drive
Page 7
Insert the USB connector on the Digital Drive into a USB port on when the connection is successful. The status light on the Digital Drive turns on your computer. If the status light does not turn on, remove the Digital Drive from the USB port, then reinsert the USB connector. 6 User Guide 2.
Insert the USB connector on the Digital Drive into a USB port on when the connection is successful. The status light on the Digital Drive turns on your computer. If the status light does not turn on, remove the Digital Drive from the USB port, then reinsert the USB connector. 6 User Guide 2.
HP USB Digital Drive
Page 8
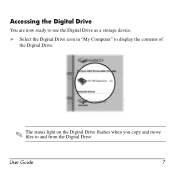
Accessing the Digital Drive You are now ready to use the Digital Drive as a storage device. » Select the Digital Drive icon in "My Computer" to display the contents of the Digital Drive. ✎ The status light on the Digital Drive flashes when you copy and move files to and from the Digital Drive. User Guide 7
Accessing the Digital Drive You are now ready to use the Digital Drive as a storage device. » Select the Digital Drive icon in "My Computer" to display the contents of the Digital Drive. ✎ The status light on the Digital Drive flashes when you copy and move files to and from the Digital Drive. User Guide 7

HP USB Digital Drive
Page 9
Disconnecting the Digital Drive ✎ Do not attempt to Remove Hardware" message appears on its track for safe storage. 8 User Guide A dialog box displays a list of connected devices. 2. Select the "Safely Remove Hardware" icon on the Digital Drive is in the extended position, return it on your taskbar. Gently unplug the Digital Drive from the USB port. ✎ If the USB connector cable is flashing. 1. Select the Digital Drive and wait until the "Safe to remove the Digital Drive when the status light on your screen. 3.
Disconnecting the Digital Drive ✎ Do not attempt to Remove Hardware" message appears on its track for safe storage. 8 User Guide A dialog box displays a list of connected devices. 2. Select the "Safely Remove Hardware" icon on the Digital Drive is in the extended position, return it on your taskbar. Gently unplug the Digital Drive from the USB port. ✎ If the USB connector cable is flashing. 1. Select the Digital Drive and wait until the "Safe to remove the Digital Drive when the status light on your screen. 3.
HP USB Digital Drive
Page 10
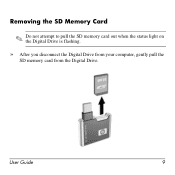
User Guide 9 Removing the SD Memory Card ✎ Do not attempt to pull the SD memory card out when the status light on the Digital Drive is flashing. » After you disconnect the Digital Drive from your computer, gently pull the SD memory card from the Digital Drive.
User Guide 9 Removing the SD Memory Card ✎ Do not attempt to pull the SD memory card out when the status light on the Digital Drive is flashing. » After you disconnect the Digital Drive from your computer, gently pull the SD memory card from the Digital Drive.
HP USB Digital Drive
Page 11
Accessing Technical Support Support services are using 10 User Guide HP responds to questions in a timely manner. When you call technical support, have the following items available: ■ The HP USB Digital Drive ■ Conditions under which the problem occurred ■ Error messages that have occurred &#...you are available on the Internet through HP technical support. You can either browse the postings as a guest, or register as a user and submit your country or region. To access HP technical support, visit the HP Web site at http://www.hp.com, and select your own questions....
Accessing Technical Support Support services are using 10 User Guide HP responds to questions in a timely manner. When you call technical support, have the following items available: ■ The HP USB Digital Drive ■ Conditions under which the problem occurred ■ Error messages that have occurred &#...you are available on the Internet through HP technical support. You can either browse the postings as a guest, or register as a user and submit your country or region. To access HP technical support, visit the HP Web site at http://www.hp.com, and select your own questions....
HP USB Digital Drive
Page 112
SD Logo is subject to change without notice. The information contained herein is a trademark. and/or other countries. HP shall not be liable for HP products and services are trademarks of Microsoft Corporation in the express warranty statements accompanying such products and services. The warranties for technical or editorial errors or omissions contained herein. © 2003 Hewlett-Packard Development Company, L.P. Microsoft and Windows are set forth in the U.S. User Guide HP USB Digital Drive First Edition July 2003
SD Logo is subject to change without notice. The information contained herein is a trademark. and/or other countries. HP shall not be liable for HP products and services are trademarks of Microsoft Corporation in the express warranty statements accompanying such products and services. The warranties for technical or editorial errors or omissions contained herein. © 2003 Hewlett-Packard Development Company, L.P. Microsoft and Windows are set forth in the U.S. User Guide HP USB Digital Drive First Edition July 2003

HP Pavilion dv4000 Notebook PC and Compaq Presario V4000 Notebook PC - Maintenance and Service Guide
Page 11
Product Description 1.3 Power Management The computer comes with power management features that extend battery operating time and conserve power. The computer supports the following power management features: ■ Standby ■ Hibernation ■ Setting customization by the user ■ Hotkeys for setting the level of performance ■ Battery calibration ■ Lid switch standby/resume ■ Power button ■ Advanced Configuration and Power Management (ACPM) compliance Maintenance and Service Guide 1-5
Product Description 1.3 Power Management The computer comes with power management features that extend battery operating time and conserve power. The computer supports the following power management features: ■ Standby ■ Hibernation ■ Setting customization by the user ■ Hotkeys for setting the level of performance ■ Battery calibration ■ Lid switch standby/resume ■ Power button ■ Advanced Configuration and Power Management (ACPM) compliance Maintenance and Service Guide 1-5

HP Pavilion dv4000 Notebook PC and Compaq Presario V4000 Notebook PC - Maintenance and Service Guide
Page 36
...Password options DriveLock passwords Smart Card Security Embedded Security Device security System IDs Table 2-2 Security Menu To Do This Enter, change a DriveLock user or master password. ✎ DriveLock Settings are accessible only when you enter Computer Setup by turning on authentication credential. ✎ Embedded... Security Menu Select Administrator password Power-on restart. Enable/disable power-on support for inclusion in the system. Enter user-defined identification values. 2-4 Maintenance and Service Guide Enable/Disable devices in MultiBoot. change , or delete an...
...Password options DriveLock passwords Smart Card Security Embedded Security Device security System IDs Table 2-2 Security Menu To Do This Enter, change a DriveLock user or master password. ✎ DriveLock Settings are accessible only when you enter Computer Setup by turning on authentication credential. ✎ Embedded... Security Menu Select Administrator password Power-on restart. Enable/disable power-on support for inclusion in the system. Enter user-defined identification values. 2-4 Maintenance and Service Guide Enable/Disable devices in MultiBoot. change , or delete an...

Hardware and Software Guide
Page 10
Hardware and Software Guide 1-1 If using QuickPlay (select models only), the functionality of components when used in Microsoft® Windows®. Refer to the HP QuickPlay User Guide for more information. 1 Component ID ✎ This chapter provides information on the functions and features of some components may differ.
Hardware and Software Guide 1-1 If using QuickPlay (select models only), the functionality of components when used in Microsoft® Windows®. Refer to the HP QuickPlay User Guide for more information. 1 Component ID ✎ This chapter provides information on the functions and features of some components may differ.
Hardware and Software Guide
Page 30
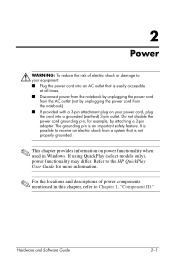
... unplugging the power cord from the AC outlet (not by attaching a 2-pin adapter. Refer to the HP QuickPlay User Guide for example, by unplugging the power cord from the notebook). ■ If provided with a 3-pin attachment plug on power functionality when used in this chapter, refer to receive an electric shock from a system that... the power cord into a grounded (earthed) 3-pin outlet. Do not disable the power cord grounding pin; It is an important safety feature. Hardware and Software Guide 2-1 2 Power Å WARNING: To reduce the risk of power components mentioned in Windows.
... unplugging the power cord from the AC outlet (not by attaching a 2-pin adapter. Refer to the HP QuickPlay User Guide for example, by unplugging the power cord from the notebook). ■ If provided with a 3-pin attachment plug on power functionality when used in this chapter, refer to receive an electric shock from a system that... the power cord into a grounded (earthed) 3-pin outlet. Do not disable the power cord grounding pin; It is an important safety feature. Hardware and Software Guide 2-1 2 Power Å WARNING: To reduce the risk of power components mentioned in Windows.

Hardware and Software Guide
Page 40
...■ Pressing the fn+f5 hotkey, called the sleep button in a Windows operating system, initiates standby. ■ Closing the notebook presses the display switch, which turns off the display. At the default settings for password when the computer resumes from standby. Setting... Other Power Preferences You can add a security feature that prompts you for your Microsoft® Windows® user password when the notebook resumes from standby. 3. Hardware and Software Guide 2-11 To set a password prompt: 1. For information about other passwords and security features, refer to Chapter...
...■ Pressing the fn+f5 hotkey, called the sleep button in a Windows operating system, initiates standby. ■ Closing the notebook presses the display switch, which turns off the display. At the default settings for password when the computer resumes from standby. Setting... Other Power Preferences You can add a security feature that prompts you for your Microsoft® Windows® user password when the notebook resumes from standby. 3. Hardware and Software Guide 2-11 To set a password prompt: 1. For information about other passwords and security features, refer to Chapter...

Hardware and Software Guide
Page 57
If using QuickPlay (select models only), functionality may differ. 3 Keyboard and TouchPad ✎ This chapter provides information on the functions of the keyboard and TouchPad when used in Windows. Refer to the HP QuickPlay User Guide for more information. Hardware and Software Guide 3-1
If using QuickPlay (select models only), functionality may differ. 3 Keyboard and TouchPad ✎ This chapter provides information on the functions of the keyboard and TouchPad when used in Windows. Refer to the HP QuickPlay User Guide for more information. Hardware and Software Guide 3-1

Hardware and Software Guide
Page 66
...fn+f5 hotkey, refer to "Setting Other Power Preferences" in Chapter 12, "Security." 3-10 Hardware and Software Guide For instructions, refer to enter your Windows user password or your work by displaying the operating system Log On window. For information about using standby and hibernation,...can set a Windows user password or a Windows administrator password. Then follow the instructions on the screen to the Help and Support Center. For more information about combining Windows passwords with HP passwords, refer to display the Log On window and lock the notebook. To access the ...
...fn+f5 hotkey, refer to "Setting Other Power Preferences" in Chapter 12, "Security." 3-10 Hardware and Software Guide For instructions, refer to enter your Windows user password or your work by displaying the operating system Log On window. For information about using standby and hibernation,...can set a Windows user password or a Windows administrator password. Then follow the instructions on the screen to the Help and Support Center. For more information about combining Windows passwords with HP passwords, refer to display the Log On window and lock the notebook. To access the ...

Hardware and Software Guide
Page 74
Component Volume down , volume up button Press to the HP QuickPlay User Guide for more information. Volume mute button Press to decrease volume. Audio Features Adjusting the Volume To adjust volume, use the volume buttons on . ✎ To ...restore volume, press the volume down button Description Press to mute volume. Volume up , or volume mute button. The mute light is turned on the notebook...
Component Volume down , volume up button Press to the HP QuickPlay User Guide for more information. Volume mute button Press to decrease volume. Audio Features Adjusting the Volume To adjust volume, use the volume buttons on . ✎ To ...restore volume, press the volume down button Description Press to mute volume. Volume up , or volume mute button. The mute light is turned on the notebook...

Hardware and Software Guide
Page 126
Hardware and Software Guide 11-7 The most common security levels are protecting the WLAN. In addition to enabling WPA-Personal or WEP security encryption on the router, you plan ... Cisco Compatible Extensions. Wireless (Select Models Only) Using Wireless Security Features When you do not enable security on your WLAN, an unauthorized wireless user can access your notebook data and use your Internet connection without your knowledge. A separate WLAN configuration utility is provided and must be installed if you may want to...
Hardware and Software Guide 11-7 The most common security levels are protecting the WLAN. In addition to enabling WPA-Personal or WEP security encryption on the router, you plan ... Cisco Compatible Extensions. Wireless (Select Models Only) Using Wireless Security Features When you do not enable security on your WLAN, an unauthorized wireless user can access your notebook data and use your Internet connection without your knowledge. A separate WLAN configuration utility is provided and must be installed if you may want to...


