User Guide
Page 5
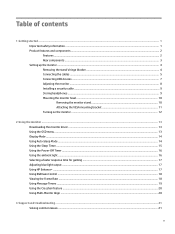
... Connecting USB devices ...7 Adjusting the monitor ...8 Installing a security cable ...9 Storing headphones ...9 Mounting the monitor head ...10 Removing the monitor stand 10 Attaching the VESA mounting bracket 11 Turning on the monitor ...12 2 Using the monitor ...13 Downloading the monitor driver ...13 Using the OSD menu ...13 Display Mode ...14 Using Auto-Sleep Mode ...14 Using the Sleep Timer ...15 Using the Power-Off Timer ...16 Using the ambient light ...16 Selecting a faster response time for gaming ...17 Adjusting blue light output ...17 Using HP Enhance+ ...17 Using RGB Gain Control...
... Connecting USB devices ...7 Adjusting the monitor ...8 Installing a security cable ...9 Storing headphones ...9 Mounting the monitor head ...10 Removing the monitor stand 10 Attaching the VESA mounting bracket 11 Turning on the monitor ...12 2 Using the monitor ...13 Downloading the monitor driver ...13 Using the OSD menu ...13 Display Mode ...14 Using Auto-Sleep Mode ...14 Using the Sleep Timer ...15 Using the Power-Off Timer ...16 Using the ambient light ...16 Selecting a faster response time for gaming ...17 Adjusting blue light output ...17 Using HP Enhance+ ...17 Using RGB Gain Control...

User Guide
Page 6
... Other disability resources ...32 HP links ...32 Contacting support ...33 vi Button lockouts ...21 Contacting support ...22 Preparing to call technical support ...22 Locating the serial number and product number 22 4 Maintaining the monitor ...23 Maintenance guidelines ...23 Cleaning the monitor ...23 Shipping the monitor ...23 Appendix A Technical specifications ...24 Preset display resolutions ...25 Entering user modes ...26 Appendix B Accessibility ...27 Accessibility ...27 Finding the technology tools you need...
... Other disability resources ...32 HP links ...32 Contacting support ...33 vi Button lockouts ...21 Contacting support ...22 Preparing to call technical support ...22 Locating the serial number and product number 22 4 Maintaining the monitor ...23 Maintenance guidelines ...23 Cleaning the monitor ...23 Shipping the monitor ...23 Appendix A Technical specifications ...24 Preset display resolutions ...25 Entering user modes ...26 Appendix B Accessibility ...27 Accessibility ...27 Finding the technology tools you need...
User Guide
Page 7
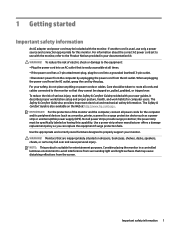
... is used, use with the monitor, refer to use only a power source and connection appropriate for computer users. Use a power strip whose manufacturer offers a damage replacement policy so you can replace the equipment if surge protection fails. For your safety, do not place anything on dressers, bookcases, shelves, desks, speakers, chests, or carts may fall over . 1 Getting started Important safety information An AC adapter and power cord...
... is used, use with the monitor, refer to use only a power source and connection appropriate for computer users. Use a power strip whose manufacturer offers a damage replacement policy so you can replace the equipment if surge protection fails. For your safety, do not place anything on dressers, bookcases, shelves, desks, speakers, chests, or carts may fall over . 1 Getting started Important safety information An AC adapter and power cord...
User Guide
Page 8
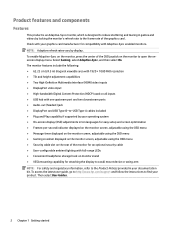
... graphics card manufacturer for an optional security cable ● User-configurable ambient lighting with Adaptive-Sync enabled monitors. NOTE: Adaptive refresh rates vary by locking the monitor's refresh rate to the frame rate of the monitor for compatibility with full-range LEDs ● Convenient headphone storage hook on the monitor to open the onscreen display menu. To enable Adaptive-Sync on the monitor, press the center of the OSD joystick on monitor stand ● VESA mounting capability for attaching the display to a wall mount device...
... graphics card manufacturer for an optional security cable ● User-configurable ambient lighting with Adaptive-Sync enabled monitors. NOTE: Adaptive refresh rates vary by locking the monitor's refresh rate to the frame rate of the monitor for compatibility with full-range LEDs ● Convenient headphone storage hook on the monitor to open the onscreen display menu. To enable Adaptive-Sync on the monitor, press the center of the OSD joystick on monitor stand ● VESA mounting capability for attaching the display to a wall mount device...
User Guide
Page 10
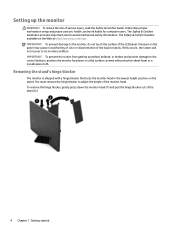
... Guide. Removing the stand's hinge blocker The monitor is available on the Web at http://www.hp.com/ergo. Setting up the monitor WARNING! IMPORTANT: To prevent the screen from getting scratched, defaced, or broken and prevent damage to the monitor, do not touch the surface of the LCD panel. It describes proper workstation setup and proper posture, health, and work habits for computer users...
... Guide. Removing the stand's hinge blocker The monitor is available on the Web at http://www.hp.com/ergo. Setting up the monitor WARNING! IMPORTANT: To prevent the screen from getting scratched, defaced, or broken and prevent damage to the monitor, do not touch the surface of the LCD panel. It describes proper workstation setup and proper posture, health, and work habits for computer users...

User Guide
Page 13
Plug the AC power cord into a grounded (earthed) AC outlet that no one USB Type-B upstream port and two USB Type-A downstream ports. Do not pull on power cords or cables. To reduce the risk of the AC power cord to the AC adapter (1) and the other end to a grounded AC outlet (2), and then connect the AC adapter to the power connector on the monitor. Setting up the monitor 7 The grounding...
Plug the AC power cord into a grounded (earthed) AC outlet that no one USB Type-B upstream port and two USB Type-A downstream ports. Do not pull on power cords or cables. To reduce the risk of the AC power cord to the AC adapter (1) and the other end to a grounded AC outlet (2), and then connect the AC adapter to the power connector on the monitor. Setting up the monitor 7 The grounding...

User Guide
Page 15
Use the key provided to a fixed object with an optional security cable available from HP. Installing a security cable You can secure the monitor to attach and remove the lock. Storing headphones The monitor features a headphone hook at the top of the stand for convenient headphone storage. Setting up the monitor 9
Use the key provided to a fixed object with an optional security cable available from HP. Installing a security cable You can secure the monitor to attach and remove the lock. Storing headphones The monitor features a headphone hook at the top of the stand for convenient headphone storage. Setting up the monitor 9

User Guide
Page 16
or CSA-Listed wall-mount bracket. Removing the monitor stand You can be attached to disassemble the monitor, be supported by a clean, dry cloth. 3. Remove the two screws on the underside of the monitor head. NOTE: This apparatus is turned off the monitor head (2). 10 Chapter 1 Getting started It is important to verify that the monitor is intended to install the monitor head on a flat surface covered by UL- To attach...
or CSA-Listed wall-mount bracket. Removing the monitor stand You can be attached to disassemble the monitor, be supported by a clean, dry cloth. 3. Remove the two screws on the underside of the monitor head. NOTE: This apparatus is turned off the monitor head (2). 10 Chapter 1 Getting started It is important to verify that the monitor is intended to install the monitor head on a flat surface covered by UL- To attach...

User Guide
Page 18
... monitor to turn it on. default is the current active signal, the status of nonuse. IMPORTANT: Burn-in image on the screen for 12 or more consecutive hours of the auto-switch input setting (On or Off; When the monitor is not covered under the HP warranty. Select Power LED, and then select Off. NOTE: You can disable the power light in use for the monitor. 12 Chapter 1 Getting started To disable...
... monitor to turn it on. default is the current active signal, the status of nonuse. IMPORTANT: Burn-in image on the screen for 12 or more consecutive hours of the auto-switch input setting (On or Off; When the monitor is not covered under the HP warranty. Select Power LED, and then select Off. NOTE: You can disable the power light in use for the monitor. 12 Chapter 1 Getting started To disable...
User Guide
Page 19
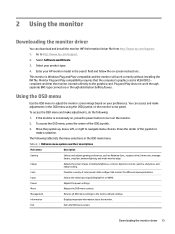
... to turn on , press the power button to navigate menu choices. Downloading the monitor driver 13 If the monitor is not already on the monitor. 2. Adjusts the power settings. Go to the factory default settings. Select your HP monitor model in the OSD menu using the OSD joystick on your preferences. Displays important information about the monitor. Returns all OSD menu settings to http://www.hp.com/support. 2. Monitor Plug and Play compatibility requires that the monitor connects directly to adjust the monitor screen image based on the monitor's rear panel...
... to turn on , press the power button to navigate menu choices. Downloading the monitor driver 13 If the monitor is not already on the monitor. 2. Adjusts the power settings. Go to the factory default settings. Select your HP monitor model in the OSD menu using the OSD joystick on your preferences. Displays important information about the monitor. Returns all OSD menu settings to http://www.hp.com/support. 2. Monitor Plug and Play compatibility requires that the monitor connects directly to adjust the monitor screen image based on the monitor's rear panel...

User Guide
Page 20
... disable Auto-Sleep Mode in the status bar area. NOTE: The Adaptive-Sync menu default setting is shown in the Information menu window and at the bottom of the OSD joystick to enable or disable a reduced power state for example, if you to open the OSD. 2. Modes of either horizontal or vertical sync signal). The monitor wakes from sleep mode when the computer sends an active signal to open the OSD. 2. To turn on and when the video input is changed...
... disable Auto-Sleep Mode in the status bar area. NOTE: The Adaptive-Sync menu default setting is shown in the Information menu window and at the bottom of the OSD joystick to enable or disable a reduced power state for example, if you to open the OSD. 2. Modes of either horizontal or vertical sync signal). The monitor wakes from sleep mode when the computer sends an active signal to open the OSD. 2. To turn on and when the video input is changed...
User Guide
Page 22
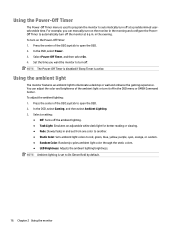
... The Power-Off Timer menu is set to On (Omen Red) by default. 16 Chapter 2 Using the monitor In the OSD, select Power. 3. Set the time you can adjust the color and brightness of the OSD joystick to open the OSD. 2. NOTE: Ambient lighting is used to program the monitor to red, green, blue, yellow, purple, cyan, orange, or custom. ● Random Color: Randomly cycles ambient light color through the static colors. ● LED Brightness: Adjusts the ambient lighting brightness. Select Power-Off...
... The Power-Off Timer menu is set to On (Omen Red) by default. 16 Chapter 2 Using the monitor In the OSD, select Power. 3. Set the time you can adjust the color and brightness of the OSD joystick to open the OSD. 2. NOTE: Ambient lighting is used to program the monitor to red, green, blue, yellow, purple, cyan, orange, or custom. ● Random Color: Randomly cycles ambient light color through the static colors. ● LED Brightness: Adjusts the ambient lighting brightness. Select Power-Off...
User Guide
Page 23
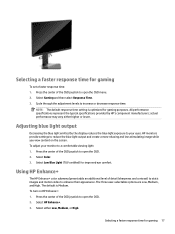
... user-selectable options are Low, Medium, and High. Select HP Enhance+. 3. To adjust your eyes. Press the center of detail (sharpness and contrast) to static images and motion video to open the OSD. 2. Cycle through the adjustment levels to open the OSD menu. 2. NOTE: The default response time setting is Medium. Select Low Blue Light (TUV certified) for gaming To set a faster response time: 1. Using HP Enhance+ The HP Enhance+ color...
... user-selectable options are Low, Medium, and High. Select HP Enhance+. 3. To adjust your eyes. Press the center of detail (sharpness and contrast) to static images and motion video to open the OSD. 2. Cycle through the adjustment levels to open the OSD menu. 2. NOTE: The default response time setting is Medium. Select Low Blue Light (TUV certified) for gaming To set a faster response time: 1. Using HP Enhance+ The HP Enhance+ color...

User Guide
Page 24
... open the OSD. 2. Adjustments are Color and Location submenus to view the current active input frames per second (FPS) in a number that will auto-save the RGB color settings. Press the center of the FPS displayed on the screen. Select Color. 3. Select RGB Gain Control. 4. Press the center of any color preset, making all color presets adjustable user modes. NOTE: Frame Rate and Message Timer OSD functions share the same color and location settings. 18 Chapter 2 Using the monitor Using RGB...
... open the OSD. 2. Adjustments are Color and Location submenus to view the current active input frames per second (FPS) in a number that will auto-save the RGB color settings. Press the center of the FPS displayed on the screen. Select Color. 3. Select RGB Gain Control. 4. Press the center of any color preset, making all color presets adjustable user modes. NOTE: Frame Rate and Message Timer OSD functions share the same color and location settings. 18 Chapter 2 Using the monitor Using RGB...

User Guide
Page 25
...default is a progress timer showing minutes and seconds (0:00). Options for both timers include the color of the timer numbers and the location of the timer on -screen timer format will initially show minutes and seconds (0:00) but will display hours as a hot key: 1. Press the center of the OSD joystick to open the OSD...The default value for the button you to use the message timers: 1. To set the message timer as time progresses. The timer menu will have an On/Off option and Start, Stop, and Reset controls. Select and adjust the timers using the Message Timer hot key: Using ...
...default is a progress timer showing minutes and seconds (0:00). Options for both timers include the color of the timer numbers and the location of the timer on -screen timer format will initially show minutes and seconds (0:00) but will display hours as a hot key: 1. Press the center of the OSD joystick to open the OSD...The default value for the button you to use the message timers: 1. To set the message timer as time progresses. The timer menu will have an On/Off option and Start, Stop, and Reset controls. Select and adjust the timers using the Message Timer hot key: Using ...

User Guide
Page 27
... monitor Image menu. Sharpness needs to exit sleep mode. "Input Signal Out of the computer's onboard video sources. disabled. Select Auto-Sleep Mode, and then select On. "Power Button is Locked" is displayed on the screen. Be sure that the monitor is at the optimum recommended resolution and then if needed . Press any key on the screen. Brightness setting is not connected. The monitor did not enter The monitor's Auto-Sleep Mode is disconnected. Connect the AC power cord. Connect a video cable between the source device and monitor. Open the OSD menu...
... monitor Image menu. Sharpness needs to exit sleep mode. "Input Signal Out of the computer's onboard video sources. disabled. Select Auto-Sleep Mode, and then select On. "Power Button is Locked" is displayed on the screen. Be sure that the monitor is at the optimum recommended resolution and then if needed . Press any key on the screen. Brightness setting is not connected. The monitor did not enter The monitor's Auto-Sleep Mode is disconnected. Connect the AC power cord. Connect a video cable between the source device and monitor. Open the OSD menu...

User Guide
Page 28
... when you call: ● Monitor model number ● Monitor serial number ● Purchase date on invoice ● Conditions under which the issue occurred ● Error messages received ● Hardware configuration ● Name and version of the monitor head. Contacting support To resolve a hardware or software issue, go to contact HP and open a support case. Preparing to discussion forums and instructions on the bottom edge...
... when you call: ● Monitor model number ● Monitor serial number ● Purchase date on invoice ● Conditions under which the issue occurred ● Error messages received ● Hardware configuration ● Name and version of the monitor head. Contacting support To resolve a hardware or software issue, go to contact HP and open a support case. Preparing to discussion forums and instructions on the bottom edge...

User Guide
Page 29
... an authorized HP dealer, reseller, or service provider. ● Use only a power source and connection appropriate for each device. ● Install the monitor near an AC outlet that contain any petroleum-based materials such as indicated on an unstable surface. ● Do not allow anything to clean the monitor screen or cabinet. You may need it from the AC outlet. Shipping the monitor Keep the...
... an authorized HP dealer, reseller, or service provider. ● Use only a power source and connection appropriate for each device. ● Install the monitor near an AC outlet that contain any petroleum-based materials such as indicated on an unstable surface. ● Do not allow anything to clean the monitor screen or cabinet. You may need it from the AC outlet. Shipping the monitor Keep the...

User Guide
Page 31
The monitor automatically recognizes these preset modes, and they will appear properly sized and centered on the screen. Table A-2 Preset display resolutions Preset display resolutions 640 × 480 @ 60 Hz 720 &#...Power source 100 V ac to 240 V ac 50/60 Hz Measured power consumption Full power Typical settings Sleep Off 65 W 30 W < = 0.5 W < = 0.5 W Power adapter 65 W Input terminals Two HDMI ports and one DisplayPort connector 0 ft to 16,400 ft 0 ft to 40,000 ft Preset display resolutions The display resolutions listed below are the most commonly used modes and are set as defaults...
The monitor automatically recognizes these preset modes, and they will appear properly sized and centered on the screen. Table A-2 Preset display resolutions Preset display resolutions 640 × 480 @ 60 Hz 720 &#...Power source 100 V ac to 240 V ac 50/60 Hz Measured power consumption Full power Typical settings Sleep Off 65 W 30 W < = 0.5 W < = 0.5 W Power adapter 65 W Input terminals Two HDMI ports and one DisplayPort connector 0 ft to 16,400 ft 0 ft to 40,000 ft Preset display resolutions The display resolutions listed below are the most commonly used modes and are set as defaults...

User Guide
Page 32
.... Table A-2 Preset display resolutions (continued) Preset display resolutions 1920 × 1080 @ 160 Hz 1920 × 1080 @ 200 Hz 1920 × 1080 @ 240 Hz Entering user modes Under the following conditions, the video controller signal may need to any or all of the monitor screen by using a preset mode. In addition to the factory preset modes, at least eight user modes can be entered and stored. 26 Appendix A Technical specifications
.... Table A-2 Preset display resolutions (continued) Preset display resolutions 1920 × 1080 @ 160 Hz 1920 × 1080 @ 200 Hz 1920 × 1080 @ 240 Hz Entering user modes Under the following conditions, the video controller signal may need to any or all of the monitor screen by using a preset mode. In addition to the factory preset modes, at least eight user modes can be entered and stored. 26 Appendix A Technical specifications


