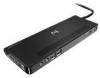
HP xb4 Notebook Media Docking Station - Maintenance and Service Guide
Page 7
... panel sizes up to 43 cm (17 inches) wide ■ Bottom-mounter sub-woofer speakers ■ Wireless keyboard, mouse, receiver (select models only) ■ Hard drive bay and power connector ■ Infrared pass-through support ■ Lights (power, good dock, mute) ■... ❏ Composite video jack ❏ S/PDIF (Sony/Philips Digital Interface) audio jack ❏ External VGA monitor port ❏ RJ-45/Ethernet port ❏ Hard drive power connector Expansion port features ■ USB 2.0 ■ Gigabit Ethernet ■ Consumer infrared (for optional remote control only) ■...
HP xb4 Notebook Media Docking Station - Maintenance and Service Guide
Page 18
Maintenance and Service Guide 1-13 Move the expansion cable to either side of the docking station, depending on where the expansion port on your computer is located. ✎ The location of the expansion port on your computer varies by computer series and model. ✎ It is important to position the cable correctly, so that the cable can move freely. Product description 3.
HP xb4 Notebook Media Docking Station - Maintenance and Service Guide
Page 20
Maintenance and Service Guide 1-15 Product description 6. If the computer is docked, the internal computer speakers are disabled and the docking station speakers are activated. The power status light on the front of the docking station turns on. ✎ After the computer is off, press the power button on the docked computer or the power button on the docking station. ✎ The power button location on the docked computer varies by computer series and model.
HP xb4 Notebook Media Docking Station - Maintenance and Service Guide
Page 24
3 Illustrated parts catalog Serial number location When ordering parts or requesting information, provide the docking station serial number and model number located on the bottom of the docking station. Maintenance and Service Guide 3-1
HP xb4 Notebook Media Docking Station - Maintenance and Service Guide
Page 28
...item and the only spare part that you use to each product. Component Product name Serial number (s/n) Part number/ product number (p/n) Model description Warranty period Description This is the product name affixed to the front of the warranty period for this computer. 4-2 Maintenance and... Service Guide This is an alphanumeric identifier that is the number you need when contacting HP for replacement parts or for your computer. This is unique to locate documents, drivers, and support for service-related questions. This...
HP xb4 Notebook Media Docking Station - Maintenance and Service Guide
Page 41
...connectors, service considerations 4-1 D docking station part number 3-2, 3-3 drive bay, hard drive 1-7 E expansion cable 1-5 expansion port features 1-2 external monitor port pin assignments 6-3 F features 1-2 front components 1-3 G general use problems 2-2 good dock connection light 1-5 H hard drive...light good dock connection 1-5 power connector 1 1-5 power connector 2 1-5 power status 1-3 M microphone jack pin assignments 6-1 model name 4-2 monitor port 1-5 monitor port pin assignments 6-3 N network jack 1-5 network jack pin assignments 6-4 P panel, upper 1-3 part number docking station 3-2,...
HP xb4 Notebook Media Docking Station - User Guide
Page 17
ENWW Antenna House XSL Formatter (Evaluation) http://www.antennahouse.com/ Setting up the docking station 13 NOTE: It is important to either side of the docking station, depending on where the expansion port on your computer is located. Press and hold the buttons on the sides of the expansion port on your computer varies by computer series and model. Move the expansion cable to position the cable correctly, so that the cable can move freely. 4. NOTE: The location of the expansion cable connector (1). 3.
HP xb4 Notebook Media Docking Station - User Guide
Page 19
ENWW Antenna House XSL Formatter (Evaluation) http://www.antennahouse.com/ Setting up the docking station 15 The power status light on the front of the docking station turns on the docked computer varies by computer series and model. NOTE: After the computer is off, press the power button on the docked computer. 6. If the computer is docked, the internal computer speakers are disabled and the docking station speakers are activated. NOTE: The power button location on .
HP xb4 Notebook Media Docking Station - User Guide
Page 27
Connecting a wireless mouse and keyboard If you are connecting a wireless mouse and keyboard to the docking station, use this procedure to establish a wireless mouse and keyboard connection (select models only). 1. To establish a wireless mouse connection: ENWW Antenna House XSL Formatter (Evaluation) http://www.antennahouse.com/ Connecting a wireless mouse and keyboard 23 Locate an open USB port (1) on the docking station and insert the wireless receiver (2).
HP xb4 Notebook Media Docking Station - User Guide
Page 36
3 Undocking the computer 1. Press and hold the buttons (1) on the computer varies by computer series and model. 32 Chapter 3 Undocking the computer Antenna House XSL Formatter (Evaluation) http://www.antennahouse.com/ ENWW NOTE: The location of the expansion port on the sides of the expansion cable connector, and then disconnect the cable from the computer (2).
HP xb4 Notebook Media Docking Station - User Guide
Page 41
... ● Hardware configuration of the computer ● Hardware and software you cannot solve a problem using ● The manufacturer and model of the system files ● Operating system version number and registration number To display the operating system version number and registration number,... click Start, click Help and Support, and then click System Information. (On some models, the registration number may be identified in this chapter, contact technical support. ENWW Antenna House XSL Formatter (Evaluation) http://www....
HP QuickDock 2.0 Docking Station - User Guide
Page 10
... turns on your computer varies by computer series and model. NOTE: The location of the expansion cable. CAUTION: To prevent damage to the expansion port, be called "expansion port 3" in the computer user guide. 2. NOTE: The expansion port may also be sure that you correctly align the ...expansion cable to the expansion port on the computer (2), matching the icon on the computer expansion port with the icon on the ...
HP QuickDock 2.0 Docking Station - User Guide
Page 11
Setting up the QuickDock 7 NOTE: The power button on the QuickDock has the same function as the power button on the computer, even if the computer display is off, follow either of the QuickDock turns on the QuickDock. If the computer is closed. or - ● Press the power button on . The power light on the front of these steps to turn it on: ● Press the power button on the computer varies by computer series and model. - 3. NOTE: The power button location on the computer.
HP QuickDock 2.0 Docking Station - User Guide
Page 20
NOTE: The location of the expansion cable (1), and then remove the cable from the QuickDock: ▲ Press and hold the buttons on the sides of the expansion port on the computer varies by computer series and model. 16 Chapter 3 Disconnecting the computer 3 Disconnecting the computer To disconnect the computer from the computer (2).
HP QuickDock 2.0 Docking Station - User Guide
Page 23
...call or e-mail: ● The computer and QuickDock model types ● Serial numbers for the computer and QuickDock ● Dates the computers and QuickDock were purchased ● Conditions under which the problem ...using the troubleshooting tips in this chapter, you are using ● The manufacturer and model of the printer or other accessories connected to start a chat session with a support specialist...click Help and Support, and then click Contact support to the computer and QuickDock ● Configuration settings, including contents of your computer, access Help and Support by clicking...