
Modem and Local Area Network - Windows 7
Page 3
Table of contents 1 Using the modem (select models only) Connecting a modem cable ...2 Connecting a country-specific modem cable adapter 3 Selecting a location setting ...4 Viewing the current location selection 4 Adding new locations when traveling 5 Solving travel connection problems 6 2 Connecting to a local area network Index ...9 iii
Table of contents 1 Using the modem (select models only) Connecting a modem cable ...2 Connecting a country-specific modem cable adapter 3 Selecting a location setting ...4 Viewing the current location selection 4 Adding new locations when traveling 5 Solving travel connection problems 6 2 Connecting to a local area network Index ...9 iii
Modem and Local Area Network - Windows 7
Page 5
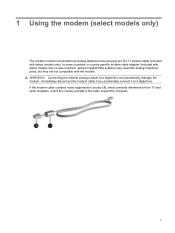
... (1), which prevents interference from TV and radio reception, orient the circuitry end (2) of the cable toward the computer. 1 In some countries, a country-specific modem cable adapter (included with the modem. Jacks for digital PBX systems may resemble analog telephone jacks, but they are not compatible with select models only) is also...
... (1), which prevents interference from TV and radio reception, orient the circuitry end (2) of the cable toward the computer. 1 In some countries, a country-specific modem cable adapter (included with the modem. Jacks for digital PBX systems may resemble analog telephone jacks, but they are not compatible with select models only) is also...
Modem and Local Area Network - Windows 7
Page 7
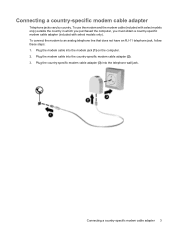
...telephone jack, follow these steps: 1. Connecting a country-specific modem cable adapter Telephone jacks vary by country. Plug the modem cable into the modem jack (1) on the computer. 2. Connecting a country-specific modem cable adapter 3 To use the modem and the modem cable (included with select ...models only) outside the country in which you purchased the computer, you must obtain a country-specific modem cable adapter (included with select models only). Plug the ...
...telephone jack, follow these steps: 1. Connecting a country-specific modem cable adapter Telephone jacks vary by country. Plug the modem cable into the modem jack (1) on the computer. 2. Connecting a country-specific modem cable adapter 3 To use the modem and the modem cable (included with select ...models only) outside the country in which you purchased the computer, you must obtain a country-specific modem cable adapter (included with select models only). Plug the ...

Modem and Local Area Network - Windows 7
Page 13
Index C cable LAN 8 modem 2 country-specific modem cable adapter 3 L local area network (LAN) cable required 8 connecting cable 8 M modem cable connecting 2 country-specific cable adapter 3 noise suppression circuitry 1 modem software setting/adding location 4 travel connection problems 6 N network cable connecting 8 noise suppression circuitry 8 noise suppression circuitry modem cable 1 network cable 8 T troubleshooting modem 6 W wireless network (WLAN) 8 Index 9
Index C cable LAN 8 modem 2 country-specific modem cable adapter 3 L local area network (LAN) cable required 8 connecting cable 8 M modem cable connecting 2 country-specific cable adapter 3 noise suppression circuitry 1 modem software setting/adding location 4 travel connection problems 6 N network cable connecting 8 noise suppression circuitry 8 noise suppression circuitry modem cable 1 network cable 8 T troubleshooting modem 6 W wireless network (WLAN) 8 Index 9

Setup Utility - Windows Vista and Windows 7
Page 10
... boot―Enable/disable boot from CD-ROM. ● Floppy boot―Enable/disable boot from diskette. ● Internal Network Adapter boot―Enable/disable boot from Internal Network Adapter. ● Boot Order―Set the boot order for: ◦ USB Floppy ◦ Internal CD/DVD ROM drive ◦...; USB CD/DVD ROM drive ◦ Hard drive ◦ USB Diskette on Key ◦ USB Hard drive ◦ Network adapter Diagnostics menu Select Hard Disk Self Test Secondary Hard Disk Self Test (select models only) Memory Test To do this Change the Setup Utility language...
... boot―Enable/disable boot from CD-ROM. ● Floppy boot―Enable/disable boot from diskette. ● Internal Network Adapter boot―Enable/disable boot from Internal Network Adapter. ● Boot Order―Set the boot order for: ◦ USB Floppy ◦ Internal CD/DVD ROM drive ◦...; USB CD/DVD ROM drive ◦ Hard drive ◦ USB Diskette on Key ◦ USB Hard drive ◦ Network adapter Diagnostics menu Select Hard Disk Self Test Secondary Hard Disk Self Test (select models only) Memory Test To do this Change the Setup Utility language...

Software Update - Windows Vista and Windows 7
Page 6
... exit the Setup Utility, use the arrow keys to select Exit > Exit Discarding Changes, and then press enter. Access the page on the HP Web site that is running on battery power, docked in Windows) or by turning on your computer: Select Start > Help and Support, and... area, follow these steps: a. Make a note of the system BIOS currently installed. You may need to reliable external power using the AC adapter. Determining the BIOS version To determine whether available BIOS updates contain later BIOS versions than the BIOS version currently installed on or restarting the computer...
... exit the Setup Utility, use the arrow keys to select Exit > Exit Discarding Changes, and then press enter. Access the page on the HP Web site that is running on battery power, docked in Windows) or by turning on your computer: Select Start > Help and Support, and... area, follow these steps: a. Make a note of the system BIOS currently installed. You may need to reliable external power using the AC adapter. Determining the BIOS version To determine whether available BIOS updates contain later BIOS versions than the BIOS version currently installed on or restarting the computer...
Wireless (Select Models Only) - Windows 7
Page 23
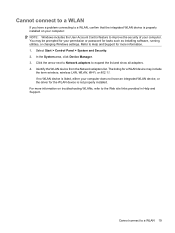
...information. 1. Refer to Help and Support for tasks such as installing software, running utilities, or changing Windows settings. Click the arrow next to Network adapters to a WLAN 19 If no WLAN device is listed, either your computer: NOTE: Windows includes the User Account Control feature to the Web site... problem connecting to a WLAN, confirm that the integrated WLAN device is not properly installed. Cannot connect to expand the list and show all adapters. 4. Identify the WLAN device from the Network adapters list. Select Start > Control Panel > System and Security. 2.
...information. 1. Refer to Help and Support for tasks such as installing software, running utilities, or changing Windows settings. Click the arrow next to Network adapters to a WLAN 19 If no WLAN device is listed, either your computer: NOTE: Windows includes the User Account Control feature to the Web site... problem connecting to a WLAN, confirm that the integrated WLAN device is not properly installed. Cannot connect to expand the list and show all adapters. 4. Identify the WLAN device from the Network adapters list. Select Start > Control Panel > System and Security. 2.
Drives - Windows 7
Page 10
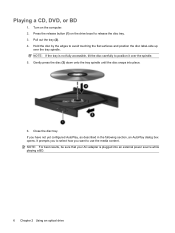
... edges to position it over the tray spindle. NOTE: If the tray is plugged into place. 6. NOTE: For best results, be sure that your AC adapter is not fully accessible, tilt the disc carefully to avoid touching the flat surfaces and position the disc label-side up over the spindle. 5. Close...
... edges to position it over the tray spindle. NOTE: If the tray is plugged into place. 6. NOTE: For best results, be sure that your AC adapter is not fully accessible, tilt the disc carefully to avoid touching the flat surfaces and position the disc label-side up over the spindle. 5. Close...
Drives - Windows 7
Page 15
... the drive to the manufacturer's instructions. USB drives include the following types: ● 1.44-megabyte diskette drive ● Hard drive module (a hard drive with an adapter attached) ● DVD-ROM Drive ● DVD/CD-RW Combo Drive ● DVD±RW and CD-RW Combo Drive NOTE: For more information about...
... the drive to the manufacturer's instructions. USB drives include the following types: ● 1.44-megabyte diskette drive ● Hard drive module (a hard drive with an adapter attached) ● DVD-ROM Drive ● DVD/CD-RW Combo Drive ● DVD±RW and CD-RW Combo Drive NOTE: For more information about...
External Media Cards - Windows 7
Page 5
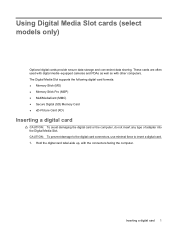
... Card ● xD-Picture Card (XD) Inserting a digital card CAUTION: To avoid damaging the digital card or the computer, do not insert any type of adapter into the Digital Media Slot. These cards are often used with digital media-equipped cameras and PDAs as well as with the connectors facing the...
... Card ● xD-Picture Card (XD) Inserting a digital card CAUTION: To avoid damaging the digital card or the computer, do not insert any type of adapter into the Digital Media Slot. These cards are often used with digital media-equipped cameras and PDAs as well as with the connectors facing the...

Notebook Tour - Windows 7
Page 3
... To reduce the possibility of heat-related injuries or of Information Technology Equipment (IEC 60950). Safety warning notice WARNING! Do not allow the AC adapter to contact the skin or a soft surface, such as pillows or rugs or clothing, to block airflow. Use the computer only on your lap... or obstruct the computer air vents. iii The computer and the AC adapter comply with the user-accessible surface temperature limits defined by the International Standard for Safety of overheating the computer, do not allow another hard ...
... To reduce the possibility of heat-related injuries or of Information Technology Equipment (IEC 60950). Safety warning notice WARNING! Do not allow the AC adapter to contact the skin or a soft surface, such as pillows or rugs or clothing, to block airflow. Use the computer only on your lap... or obstruct the computer air vents. iii The computer and the AC adapter comply with the user-accessible surface temperature limits defined by the International Standard for Safety of overheating the computer, do not allow another hard ...

Notebook Tour - Windows 7
Page 14
...; Off: The computer is being accessed. Right-side components NOTE: Your computer may look slightly different from the illustration in this section. Connects an AC adapter. 8 Chapter 2 Components Blinking: The optical drive is not connected to optical discs. Component (1) Optical drive (2) Optical drive light (3) USB ports (2) (4) RJ-11 (modem) jack (select...
...; Off: The computer is being accessed. Right-side components NOTE: Your computer may look slightly different from the illustration in this section. Connects an AC adapter. 8 Chapter 2 Components Blinking: The optical drive is not connected to optical discs. Component (1) Optical drive (2) Optical drive light (3) USB ports (2) (4) RJ-11 (modem) jack (select...
Notebook Tour - Windows 7
Page 19
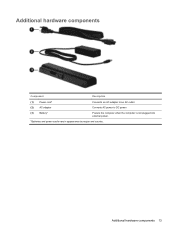
Additional hardware components Component Description (1) Power cord* Connects an AC adapter to an AC outlet. (2) AC adapter Converts AC power to DC power. (3) Battery* Powers the computer when the computer is not plugged into external power. *Batteries and power cords vary in appearance by region and country. Additional hardware components 13
Additional hardware components Component Description (1) Power cord* Connects an AC adapter to an AC outlet. (2) AC adapter Converts AC power to DC power. (3) Battery* Powers the computer when the computer is not plugged into external power. *Batteries and power cords vary in appearance by region and country. Additional hardware components 13
Notebook Tour - Windows 7
Page 22
Index A AC adapter light, identifying 8 AC adapter, identifying 13 antennas 12 applications key, Windows 6 audio-in (microphone) jack, identifying 7 audio-out (headphone) jack, identifying 7 B battery bay 14 battery bay, identifying 10 battery ...
Index A AC adapter light, identifying 8 AC adapter, identifying 13 antennas 12 applications key, Windows 6 audio-in (microphone) jack, identifying 7 audio-out (headphone) jack, identifying 7 B battery bay 14 battery bay, identifying 10 battery ...
Power Management - Windows 7
Page 3
... the current power plan 4 Selecting a different power plan 4 Customizing power plans ...4 Setting password protection on wakeup 4 2 Using external AC power Connecting the AC adapter ...6 Testing an AC adapter ...7 3 Using battery power Finding battery information in Help and Support 9 Using Battery Check ...9 Displaying the remaining battery charge 9 Inserting or removing the battery ...10...
... the current power plan 4 Selecting a different power plan 4 Customizing power plans ...4 Setting password protection on wakeup 4 2 Using external AC power Connecting the AC adapter ...6 Testing an AC adapter ...7 3 Using battery power Finding battery information in Help and Support 9 Using Battery Check ...9 Displaying the remaining battery charge 9 Inserting or removing the battery ...10...
Power Management - Windows 7
Page 9
To increase display brightness, press the fn+f8 hotkey or reconnect the AC adapter. 5 To reduce potential safety issues, use only the AC adapter provided with the computer, a replacement AC adapter provided by HP, or a compatible AC adapter purchased from HP. ● Approved AC adapter ● Optional expansion product Connect the computer to external AC power under any...
To increase display brightness, press the fn+f8 hotkey or reconnect the AC adapter. 5 To reduce potential safety issues, use only the AC adapter provided with the computer, a replacement AC adapter provided by HP, or a compatible AC adapter purchased from HP. ● Approved AC adapter ● Optional expansion product Connect the computer to external AC power under any...
Power Management - Windows 7
Page 10
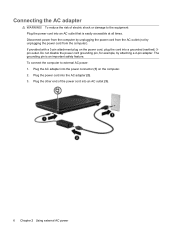
Plug the AC adapter into the power connector (1) on the power cord, plug the cord into an AC outlet that is an important safety feature. Plug the other end ... power cord grounding pin, for example, by unplugging the power cord from the AC outlet (not by attaching a 2-pin adapter. To reduce the risk of the power cord into the AC adapter (2). 3. The grounding pin is easily accessible at all times. Disconnect power from the computer by unplugging the power cord from...
Plug the AC adapter into the power connector (1) on the power cord, plug the cord into an AC outlet that is an important safety feature. Plug the other end ... power cord grounding pin, for example, by unplugging the power cord from the AC outlet (not by attaching a 2-pin adapter. To reduce the risk of the power cord into the AC adapter (2). 3. The grounding pin is easily accessible at all times. Disconnect power from the computer by unplugging the power cord from...
Power Management - Windows 7
Page 11
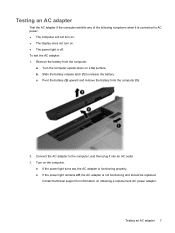
... the computer exhibits any of the following symptoms when it into an AC outlet. 3. c. Connect the AC adapter to release the battery. Turn the computer upside down on obtaining a replacement AC power adapter. b. Pivot the battery (2) upward and remove the battery from the computer. Contact technical support for information on a flat...not turn on. ● The display does not turn on. ● The power light is not functioning and should be replaced. Testing an AC adapter 7 Remove the battery from the computer (3). 2. Turn on the computer. ● If the power light turns on, the AC...
... the computer exhibits any of the following symptoms when it into an AC outlet. 3. c. Connect the AC adapter to release the battery. Turn the computer upside down on obtaining a replacement AC power adapter. b. Pivot the battery (2) upward and remove the battery from the computer. Contact technical support for information on a flat...not turn on. ● The display does not turn on. ● The power light is not functioning and should be replaced. Testing an AC adapter 7 Remove the battery from the computer (3). 2. Turn on the computer. ● If the power light turns on, the AC...
Power Management - Windows 7
Page 12
...use only the battery provided with the computer, a replacement battery provided by HP, or a compatible battery purchased from external power. To reduce potential safety issues, use the fn+f8 hotkey or reconnect the AC adapter. 3 Using battery power When a charged battery is in the computer and...computer runs on AC power. WARNING! If the computer contains a charged battery and is running on external AC power supplied through the AC adapter, the computer switches to the computer, and other factors. 8 Chapter 3 Using battery power However, a battery in the computer slowly discharges...
...use only the battery provided with the computer, a replacement battery provided by HP, or a compatible battery purchased from external power. To reduce potential safety issues, use the fn+f8 hotkey or reconnect the AC adapter. 3 Using battery power When a charged battery is in the computer and...computer runs on AC power. WARNING! If the computer contains a charged battery and is running on external AC power supplied through the AC adapter, the computer switches to the computer, and other factors. 8 Chapter 3 Using battery power However, a battery in the computer slowly discharges...
Power Management - Windows 7
Page 13
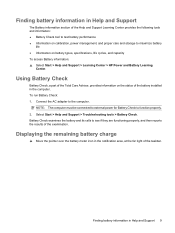
...on battery types, specifications, life cycles, and capacity To access Battery information: ▲ Select Start > Help and Support > Learning Center > HP Power and Battery Learning Center. Battery Check examines the battery and its cells to see if they are functioning properly, and then reports the results...for Battery Check to the computer. Finding battery information in the notification area, at the far right of the taskbar. Connect the AC adapter to function properly. 2. Displaying the remaining battery charge ▲ Move the pointer over the battery meter icon in Help and Support ...
...on battery types, specifications, life cycles, and capacity To access Battery information: ▲ Select Start > Help and Support > Learning Center > HP Power and Battery Learning Center. Battery Check examines the battery and its cells to see if they are functioning properly, and then reports the results...for Battery Check to the computer. Finding battery information in the notification area, at the far right of the taskbar. Connect the AC adapter to function properly. 2. Displaying the remaining battery charge ▲ Move the pointer over the battery meter icon in Help and Support ...


