
End User License Agreement
Page 1
...of this EULA: a. You may load the Software ON THE CONDITION THAT YOU Product into the local memory or storage device of Rights. HP grants you the following rights provided you comply with your HP product ("HP Product"), that it is used only for use on those computers. c. DOWNLOADING, OR b. You ... do not have Software Product into Your Computer's AGREE TO ALL TERMS AND temporary memory (RAM) for CONDITIONS OF THIS EULA. You may install and use the Software Product on or made available by HP for use on more than one computer, you may make archival or back-up ...
...of this EULA: a. You may load the Software ON THE CONDITION THAT YOU Product into the local memory or storage device of Rights. HP grants you the following rights provided you comply with your HP product ("HP Product"), that it is used only for use on those computers. c. DOWNLOADING, OR b. You ... do not have Software Product into Your Computer's AGREE TO ALL TERMS AND temporary memory (RAM) for CONDITIONS OF THIS EULA. You may install and use the Software Product on or made available by HP for use on more than one computer, you may make archival or back-up ...
Setup Utility - Windows Vista and XP
Page 9
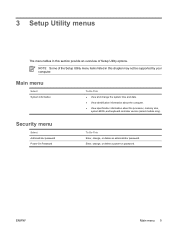
... Do This ● View and change the system time and date. ● View identification information about the computer. ● View specification information about the processor, memory size, system BIOS, and keyboard controller version (select models only). 3 Setup Utility menus The menu tables in this section provide an overview of the Setup...
... Do This ● View and change the system time and date. ● View identification information about the computer. ● View specification information about the processor, memory size, system BIOS, and keyboard controller version (select models only). 3 Setup Utility menus The menu tables in this section provide an overview of the Setup...

Setup Utility - Windows Vista and XP
Page 10
... Internal Network Adapter. ● Boot Order―Set the boot order for the f10 and f12 functions of the Setup Utility in intervals of video memory. Enable/disable enhanced SATA mode. Set the following boot options: ● f10 and f12 Delay (sec.)―Set the delay for : ● USB Floppy ●...-test on the hard drive. System Configuration menu Select Language Support Enhanced SATA support (select models only) Boot Options Button Sound (select models only) Video memory up to (select models only) To Do This Change the Setup Utility language.
... Internal Network Adapter. ● Boot Order―Set the boot order for the f10 and f12 functions of the Setup Utility in intervals of video memory. Enable/disable enhanced SATA mode. Set the following boot options: ● f10 and f12 Delay (sec.)―Set the delay for : ● USB Floppy ●...-test on the hard drive. System Configuration menu Select Language Support Enhanced SATA support (select models only) Boot Options Button Sound (select models only) Video memory up to (select models only) To Do This Change the Setup Utility language.
Setup Utility - Windows Vista and XP
Page 11
... information 3 Main menu 5 navigating and selecting 2 restoring default settings 3 Security menu 5 starting 1 System Configuration menu 6 using 2 using advanced features 4 System Configuration menu 6 system information 5 V video memory 6 L language support 6 M Main menu 5 N navigating in the Setup Utility 2 P passwords 5 power-on password 5 ENWW Index 7
... information 3 Main menu 5 navigating and selecting 2 restoring default settings 3 Security menu 5 starting 1 System Configuration menu 6 using 2 using advanced features 4 System Configuration menu 6 system information 5 V video memory 6 L language support 6 M Main menu 5 N navigating in the Setup Utility 2 P passwords 5 power-on password 5 ENWW Index 7

Setup Utility - Windows XP
Page 11
... Do This ● View and change the system time and date. ● View identification information about the computer. ● View specification information about the processor, memory size, system BIOS, and keyboard controller version (select models only). ENWW Main menu 7
... Do This ● View and change the system time and date. ● View identification information about the computer. ● View specification information about the processor, memory size, system BIOS, and keyboard controller version (select models only). ENWW Main menu 7

Routine Care
Page 11
... other suitable protective packaging and label the package "FRAGILE." ● If the computer has a wireless device or a cell phone device installed, such as PC Cards, Secure Digital (SD) Memory Cards, ExpressCards, and so on . For best results, follow the traveling and shipping tips described here. ● To prepare the computer for work...
... other suitable protective packaging and label the package "FRAGILE." ● If the computer has a wireless device or a cell phone device installed, such as PC Cards, Secure Digital (SD) Memory Cards, ExpressCards, and so on . For best results, follow the traveling and shipping tips described here. ● To prepare the computer for work...
Notebook PC User Guide - Windows Vista
Page 5
... settings 58 Observing the copyright warning 58 6 External Devices Using a USB device ...59 Connecting a USB device 59 Stopping a USB device ...60 Required USB software ...60 7 Memory Modules Adding or replacing memory modules 61 Index ...64 ENWW v
... settings 58 Observing the copyright warning 58 6 External Devices Using a USB device ...59 Connecting a USB device 59 Stopping a USB device ...60 Required USB software ...60 7 Memory Modules Adding or replacing memory modules 61 Index ...64 ENWW v

Notebook PC User Guide - Windows Vista
Page 16
.... CAUTION To prevent overheating, do not obstruct vents. One other vent is normal for the internal fan to block airflow. Contains the memory module slots. Use the computer only on a hard, flat surface. Do not allow another hard surface, such as an adjoining optional ... as pillows or thick rugs or clothing, to cycle on the rear of the computer. 10 Chapter 1 Notebook Tour ENWW Bottom components Component (1) Battery bay (2) Battery pack release latch (3) Memory module compartment (4) Hard drive bay (5) Vents (2)† Description Holds the primary battery pack.* Releases the battery...
.... CAUTION To prevent overheating, do not obstruct vents. One other vent is normal for the internal fan to block airflow. Contains the memory module slots. Use the computer only on a hard, flat surface. Do not allow another hard surface, such as an adjoining optional ... as pillows or thick rugs or clothing, to cycle on the rear of the computer. 10 Chapter 1 Notebook Tour ENWW Bottom components Component (1) Battery bay (2) Battery pack release latch (3) Memory module compartment (4) Hard drive bay (5) Vents (2)† Description Holds the primary battery pack.* Releases the battery...

Notebook PC User Guide - Windows Vista
Page 19
...network (WLAN). You may need when you troubleshoot system problems or travel internationally with the computer. The service tag label is affixed inside the memory door. Labels The labels affixed to the computer provide information you may need this information when traveling internationally. Have this information available when you ... on select models, and the approval markings of some of Authenticity-Contains the Windows Product Key. Wireless certification labels are affixed inside the memory door. ● Wireless certification labels-Provide information about the computer.
...network (WLAN). You may need when you troubleshoot system problems or travel internationally with the computer. The service tag label is affixed inside the memory door. Labels The labels affixed to the computer provide information you may need this information when traveling internationally. Have this information available when you ... on select models, and the approval markings of some of Authenticity-Contains the Windows Product Key. Wireless certification labels are affixed inside the memory door. ● Wireless certification labels-Provide information about the computer.

Notebook PC User Guide - Windows Vista
Page 30
...; Press the power button. ● Close the display. ● Click Start, and then click the Power button. ● Click Start, click the arrow next to memory, letting you exit Sleep faster than exiting Hibernation. Your work is set at the factory: Sleep and Hibernation. Initiating and exiting Sleep The system is...
...; Press the power button. ● Close the display. ● Click Start, and then click the Power button. ● Click Start, click the arrow next to memory, letting you exit Sleep faster than exiting Hibernation. Your work is set at the factory: Sleep and Hibernation. Initiating and exiting Sleep The system is...

Notebook PC User Guide - Windows Vista
Page 67
...from the computer. 8. CAUTION Electrostatic discharge (ESD) can be upgraded by adding a memory module to the vacant expansion memory module slot or by touching a grounded metal object. To add or replace a memory module: 1. Save your work and close all open programs. NOTE If the computer... unplug the power cord and remove all external devices connected to the Lock button, and then click Shut Down. 3. Loosen the memory module compartment cover screw (1). Close the display. 4. Disconnect all battery packs before shutdown is possible. 2. Turn the computer upside down. ...
...from the computer. 8. CAUTION Electrostatic discharge (ESD) can be upgraded by adding a memory module to the vacant expansion memory module slot or by touching a grounded metal object. To add or replace a memory module: 1. Save your work and close all open programs. NOTE If the computer... unplug the power cord and remove all external devices connected to the Lock button, and then click Shut Down. 3. Loosen the memory module compartment cover screw (1). Close the display. 4. Disconnect all battery packs before shutdown is possible. 2. Turn the computer upside down. ...

Notebook PC User Guide - Windows Vista
Page 68
... (2) into the memory module slot until it in the memory module slot. b. With the memory module at a 45-degree angle from the computer. 10. To insert a memory module: a. Grasp the edge of the memory module (2) and gently pull the module out of the memory module . (The memory module tilts up....) b. Pull away the retention clips (1) on each side of the memory module slot. (To protect a memory module after removal, place it...
... (2) into the memory module slot until it in the memory module slot. b. With the memory module at a 45-degree angle from the computer. 10. To insert a memory module: a. Grasp the edge of the memory module (2) and gently pull the module out of the memory module . (The memory module tilts up....) b. Pull away the retention clips (1) on each side of the memory module slot. (To protect a memory module after removal, place it...
Notebook PC User Guide - Windows Vista
Page 69
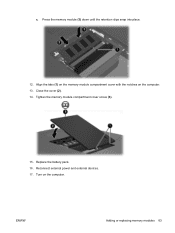
Replace the battery pack. 16. Tighten the memory module compartment cover screw (3). 15. Reconnect external power and external devices. 17. c. Align the tabs (1) on the memory module compartment cover with the notches on the computer. Close the cover (2). 14. Turn on the computer. 13. ENWW Adding or replacing memory modules 63 Press the memory module (3) down until the retention clips snap into place. 12.
Replace the battery pack. 16. Tighten the memory module compartment cover screw (3). 15. Reconnect external power and external devices. 17. c. Align the tabs (1) on the memory module compartment cover with the notches on the computer. Close the cover (2). 14. Turn on the computer. 13. ENWW Adding or replacing memory modules 63 Press the memory module (3) down until the retention clips snap into place. 12.
Notebook PC User Guide - Windows Vista
Page 70
... 51, 52 volume up 51, 52 wireless 4 C cable USB 59 calibrating battery 30 caps lock light 5 Certificate of Authenticity label 13 charging batteries 29 compartments, memory module 10 components bottom 10 display 6 front 6 left-side 9 rear 7 right-side 8 top 2 connection, external power 34 connector, power 8 conservation, power 33 copyright warning 58...
... 51, 52 volume up 51, 52 wireless 4 C cable USB 59 calibrating battery 30 caps lock light 5 Certificate of Authenticity label 13 charging batteries 29 compartments, memory module 10 components bottom 10 display 6 front 6 left-side 9 rear 7 right-side 8 top 2 connection, external power 34 connector, power 8 conservation, power 33 copyright warning 58...
Notebook PC User Guide - Windows Vista
Page 71
... 41 lock, security cable 9 low battery level 30 M media activity hotkeys 50 media controls, hotkeys 18, 21 memory adding or replacing memory modules 61 memory module compartment 10 memory module compartment cover removing 62 replacing 63 memory modules adding 61 replacing 61 microphone (audio-in) jack 8 microphones, supported 51 Microsoft Certificate of Authenticity label 13...
... 41 lock, security cable 9 low battery level 30 M media activity hotkeys 50 media controls, hotkeys 18, 21 memory adding or replacing memory modules 61 memory module compartment 10 memory module compartment cover removing 62 replacing 63 memory modules adding 61 replacing 61 microphone (audio-in) jack 8 microphones, supported 51 Microsoft Certificate of Authenticity label 13...

Notebook PC User Guide - Windows Vista
Page 72
... slot 9 serial number, computer 13 service tag 13 shutdown 35 shutting down 35 Sleep exiting 24 initiating 24 writing to CD or DVD 45 slots memory module 10 security cable 9 software multimedia 55 USB devices 60 speakers 6, 51 specifications operating environment 14 rated input power 14 storing battery 33 system information...
... slot 9 serial number, computer 13 service tag 13 shutdown 35 shutting down 35 Sleep exiting 24 initiating 24 writing to CD or DVD 45 slots memory module 10 security cable 9 software multimedia 55 USB devices 60 speakers 6, 51 specifications operating environment 14 rated input power 14 storing battery 33 system information...


