

Getting Started
Page 17
... be reminded to complete the setup at a later time. To turn on the computer. For help with getting started using your computer, see the Windows 7 desktop, the initial setup is complete. NOTE: Do not connect or add other devices to Use Your Computer 13
... be reminded to complete the setup at a later time. To turn on the computer. For help with getting started using your computer, see the Windows 7 desktop, the initial setup is complete. NOTE: Do not connect or add other devices to Use Your Computer 13
Getting Started
Page 19
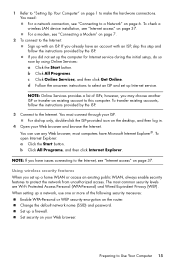
..., always enable security features to select an ISP and set up Internet service. When setting up only, double-click the ISP-provided icon on the desktop, and then log in. 4 Open your Web browser and browse the Internet. 1 Refer to "Setting Up Your Computer" on page 1 to Use Your Computer 15...
..., always enable security features to select an ISP and set up Internet service. When setting up only, double-click the ISP-provided icon on the desktop, and then log in. 4 Open your Web browser and browse the Internet. 1 Refer to "Setting Up Your Computer" on page 1 to Use Your Computer 15...
Getting Started
Page 30
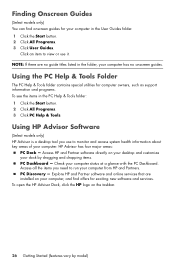
... key areas of your computer status at a glance with the PC Dashboard. Check your computer. Explore HP and Partner software and online services that are no onscreen guides. Access HP and Partner software directly on your desktop and customize your dock by model) PC Discovery - Using the PC Help & Tools Folder The PC...
... key areas of your computer status at a glance with the PC Dashboard. Check your computer. Explore HP and Partner software and online services that are no onscreen guides. Access HP and Partner software directly on your desktop and customize your dock by model) PC Discovery - Using the PC Help & Tools Folder The PC...
Getting Started
Page 56
... disc, any data you created or installed after purchase. Therefore, ensure you have not done so, select Back up your files, and you see the desktop. 10 Turn off the computer. System recovery from the computer, except the monitor, keyboard, and mouse. 3 Turn on the computer. 4 Click the Start button, click...
... disc, any data you created or installed after purchase. Therefore, ensure you have not done so, select Back up your files, and you see the desktop. 10 Turn off the computer. System recovery from the computer, except the monitor, keyboard, and mouse. 3 Turn on the computer. 4 Click the Start button, click...
Getting Started
Page 57
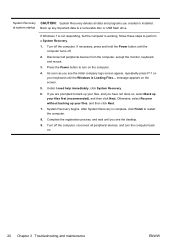
... registration process, and wait until the computer turns off the computer, reconnect all peripheral devices from the recovery discs you created as you see the desktop. 8 Turn off . 4 Disconnect all peripheral devices, and turn on page 51. message appears on page 54.
... registration process, and wait until the computer turns off the computer, reconnect all peripheral devices from the recovery discs you created as you see the desktop. 8 Turn off . 4 Disconnect all peripheral devices, and turn on page 51. message appears on page 54.
Getting Started Guide
Page 25
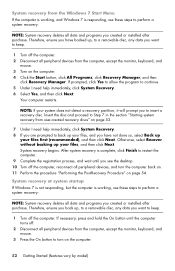
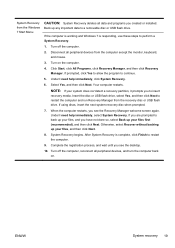
.... 2. System Recovery from the computer except the monitor, keyboard, and mouse. 3. Back up your system does not detect a recovery partition, it prompts you see the desktop. 10. Under I need help immediately, click System Recovery. 6. Turn off the computer, reconnect all data and programs you see the Recovery Manager welcome screen again.
.... 2. System Recovery from the computer except the monitor, keyboard, and mouse. 3. Back up your system does not detect a recovery partition, it prompts you see the desktop. 10. Under I need help immediately, click System Recovery. 6. Turn off the computer, reconnect all data and programs you see the Recovery Manager welcome screen again.
Getting Started Guide
Page 26
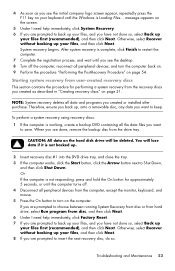
... button until the computer turns off the computer. As soon as you have not done so, select Back up your files, and you see the desktop. 9. message appears on . 20 Chapter 3 Troubleshooting and maintenance ENWW After System Recovery is working, follow these steps to perform a System Recovery. 1. Under I need help immediately...
... button until the computer turns off the computer. As soon as you have not done so, select Back up your files, and you see the desktop. 9. message appears on . 20 Chapter 3 Troubleshooting and maintenance ENWW After System Recovery is working, follow these steps to perform a System Recovery. 1. Under I need help immediately...
Getting Started Guide
Page 30
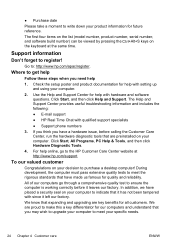
...information and includes the following: ● E-mail support ● HP Real Time Chat with hardware and software questions. During development, the computer must pass extensive quality tests to meet your decision to purchase a desktop computer! Use the Help and Support Center for quality and reliability.... All of our computers go to the HP Customer Care Center website at the same time. ● Purchase date Please take ...
...information and includes the following: ● E-mail support ● HP Real Time Chat with hardware and software questions. During development, the computer must pass extensive quality tests to meet your decision to purchase a desktop computer! Use the Help and Support Center for quality and reliability.... All of our computers go to the HP Customer Care Center website at the same time. ● Purchase date Please take ...
Getting Started Guide
Page 31
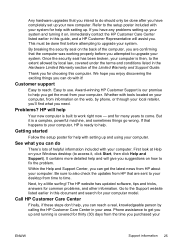
...to work right now - Whether with setting up your new computer. HP will help . See what you need. The HP website has updated software, tips and tricks, answers for help and will assist you suggestions on your Windows desktop (to the Support website listed earlier in the Hardware Limited Warranty ...section of the computer, you are sent to your desktop from your computer. If that happens to your computer, HP is ready to help Your new computer is our promise to help with tools located on your computer, from...
...to work right now - Whether with setting up your new computer. HP will help . See what you need. The HP website has updated software, tips and tricks, answers for help and will assist you suggestions on your Windows desktop (to the Support website listed earlier in the Hardware Limited Warranty ...section of the computer, you are sent to your desktop from your computer. If that happens to your computer, HP is ready to help Your new computer is our promise to help with tools located on your computer, from...
Quick Setup Guide
Page 13
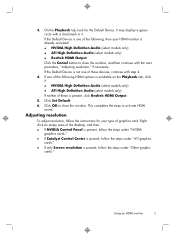
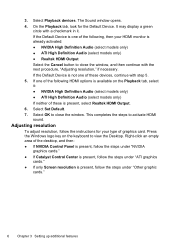
... circle with a checkmark in it : ● NVIDIA High Definition Audio (select models only) ● ATI High Definition Audio (select models only) If neither of the desktop, and then: ● If NVIDIA Control Panel is present, follow the steps under "NVIDIA graphics cards." ● If Catalyst Control Center is present, follow the...
... circle with a checkmark in it : ● NVIDIA High Definition Audio (select models only) ● ATI High Definition Audio (select models only) If neither of the desktop, and then: ● If NVIDIA Control Panel is present, follow the steps under "NVIDIA graphics cards." ● If Catalyst Control Center is present, follow the...
Quick Setup Guide
Page 14
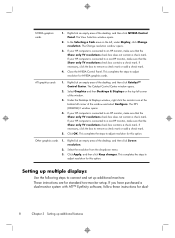
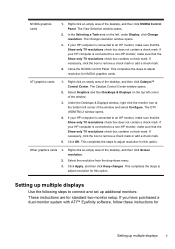
... the Show only TV resolutions check box contains a check mark. Select Graphics and then Desktops & Displays on the left, under Display, click Change resolution. If your HP computer is connected to a non-HP monitor, make sure that the Show only TV resolutions check box contains a check mark....8482; Control Center. ATI graphics cards 1. Under the Desktops & Displays window, right click the monitor icon at the bottom left corner of the desktop, and then click NVIDIA Control Panel. If your HP computer is connected to an HP monitor, make sure that the Show only TV resolutions...
... the Show only TV resolutions check box contains a check mark. Select Graphics and then Desktops & Displays on the left, under Display, click Change resolution. If your HP computer is connected to a non-HP monitor, make sure that the Show only TV resolutions check box contains a check mark....8482; Control Center. ATI graphics cards 1. Under the Desktops & Displays window, right click the monitor icon at the bottom left corner of the desktop, and then click NVIDIA Control Panel. If your HP computer is connected to an HP monitor, make sure that the Show only TV resolutions...
Quick Setup Guide
Page 15
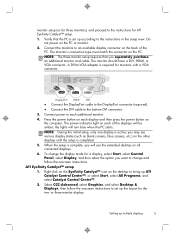
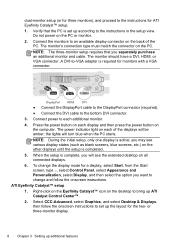
...Catalyst™ icon on the other displays until the setup is required for monitors with a VGA connector. Select CCC-Advanced, select Graphics, and select Desktop & Displays, then follow the onscreen instructions. or three-monitor display. The monitor's connection type must match the connector on all connected displays. 6. ... Display, and then select the option you will see various display states (such as blank screens, blue screens, etc.) on the desktop to set up multiple displays 9 Connect power to the instructions in the setup view. Verify that you may see the extended...
...Catalyst™ icon on the other displays until the setup is required for monitors with a VGA connector. Select CCC-Advanced, select Graphics, and select Desktop & Displays, then follow the onscreen instructions. or three-monitor display. The monitor's connection type must match the connector on all connected displays. 6. ... Display, and then select the option you will see various display states (such as blank screens, blue screens, etc.) on the desktop to set up multiple displays 9 Connect power to the instructions in the setup view. Verify that you may see the extended...

Troubleshooting & Maintenance Guide
Page 15
Disconnect all peripheral devices from the computer, except the monitor, keyboard, and mouse. 3. When the computer restarts, you see the desktop. 10. Complete the registration process, and wait until you see the Recovery Manager welcome screen again. Press the Power button to turn the computer back ...
Disconnect all peripheral devices from the computer, except the monitor, keyboard, and mouse. 3. When the computer restarts, you see the desktop. 10. Complete the registration process, and wait until you see the Recovery Manager welcome screen again. Press the Power button to turn the computer back ...

Troubleshooting & Maintenance Guide
Page 16
... turn on page 13. Turn off . 4. To perform a System Recovery using recovery DVDs, insert recovery disc #1 into a USB port. 3. To create recovery media, see the desktop. 9. Skip to restart the computer. Use the arrow keys to select the USB device and press Enter to save, and then remove the backup media...
... turn on page 13. Turn off . 4. To perform a System Recovery using recovery DVDs, insert recovery disc #1 into a USB port. 3. To create recovery media, see the desktop. 9. Skip to restart the computer. Use the arrow keys to select the USB device and press Enter to save, and then remove the backup media...
Quick Setup Guide - Windows 8
Page 11
...: Your HDMI monitor must repeat these procedures to activate sound and adjust resolution for a monitor, and using the internal speakers, HP recommends connecting a matching HP subwoofer to the Sub connector on the back panel. NOTE: If you ever need to adjust the resolution setting for you to...if you want to hear sound during the initial setup of the computer. Select HP TouchSmart PC models also include four Beats-optimized internal speakers and a Beats toggle button on the keyboard to view the Desktop. 2. Your computer comes ready for the monitor (see the following steps). ...
...: Your HDMI monitor must repeat these procedures to activate sound and adjust resolution for a monitor, and using the internal speakers, HP recommends connecting a matching HP subwoofer to the Sub connector on the back panel. NOTE: If you ever need to adjust the resolution setting for you to...if you want to hear sound during the initial setup of the computer. Select HP TouchSmart PC models also include four Beats-optimized internal speakers and a Beats toggle button on the keyboard to view the Desktop. 2. Your computer comes ready for the monitor (see the following steps). ...
Quick Setup Guide - Windows 8
Page 12
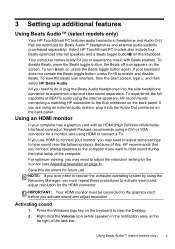
...; ATI High Definition Audio (select models only) If neither of these devices, continue with step 5. 5. This completes the steps to view the Desktop. Press the Windows logo key on the Playback tab, select it . Select Set Default. 7. Adjusting resolution To adjust resolution, follow the steps under...of these is present, follow the instructions for the Default Device. The Sound window opens. 4. If the Default Device is one of the desktop, and then: ● If NVIDIA Control Panel is present, follow the steps under "NVIDIA graphics cards." ● If Catalyst Control Center ...
...; ATI High Definition Audio (select models only) If neither of these devices, continue with step 5. 5. This completes the steps to view the Desktop. Press the Windows logo key on the Playback tab, select it . Select Set Default. 7. Adjusting resolution To adjust resolution, follow the steps under...of these is present, follow the instructions for the Default Device. The Sound window opens. 4. If the Default Device is one of the desktop, and then: ● If NVIDIA Control Panel is present, follow the steps under "NVIDIA graphics cards." ● If Catalyst Control Center ...
Quick Setup Guide - Windows 8
Page 13
Right-click an empty area of the desktop, and then click Catalyst™ Control Center. In the Selecting a Task area on the top left , under Display, click Change resolution. If your HP computer is connected to a non-HP monitor, make sure that the Show only TV resolutions check box contains a ... window, right click the monitor icon at the bottom left corner of the desktop, and then click Screen resolution. 2. Click Apply, and then click Keep changes. If your HP computer is connected to an HP monitor, make sure that the Show only TV resolutions check box does not contain a ...
Right-click an empty area of the desktop, and then click Catalyst™ Control Center. In the Selecting a Task area on the top left , under Display, click Change resolution. If your HP computer is connected to a non-HP monitor, make sure that the Show only TV resolutions check box contains a ... window, right click the monitor icon at the bottom left corner of the desktop, and then click Screen resolution. 2. Click Apply, and then click Keep changes. If your HP computer is connected to an HP monitor, make sure that the Show only TV resolutions check box does not contain a ...
Quick Setup Guide - Windows 8
Page 14
...the power button on the PC. The power indicator light on the PC or monitor. 2. Select CCC-Advanced, select Graphics, and select Desktop & Displays, then follow the onscreen instructions to change and follow the onscreen instructions. or three-monitor display. 8 Chapter 3 Setting up according... type c, select Control Panel, select Appearance and Personalization, select Display, and then select the option you may see the extended desktop on the desktop to an available display connector on the other displays until the setup is completed. 5. Verify that you will turn blue when ...
...the power button on the PC. The power indicator light on the PC or monitor. 2. Select CCC-Advanced, select Graphics, and select Desktop & Displays, then follow the onscreen instructions to change and follow the onscreen instructions. or three-monitor display. 8 Chapter 3 Setting up according... type c, select Control Panel, select Appearance and Personalization, select Display, and then select the option you may see the extended desktop on the desktop to an available display connector on the other displays until the setup is completed. 5. Verify that you will turn blue when ...

