

English Manual
Page 1
Patent Pending Model No. Write the serial number in the space above for future reference. Save this equipment. USER'S MANUAL Visit our website at www.healthrider.com new products, prizes, fitness tips, and much more! CUSTOMER HOT LINE: 1-800-999-3756 Mon.-Fri., 6 a.m.- 6 p.m. MST CAUTION Read all precautions and instructions in ...
Patent Pending Model No. Write the serial number in the space above for future reference. Save this equipment. USER'S MANUAL Visit our website at www.healthrider.com new products, prizes, fitness tips, and much more! CUSTOMER HOT LINE: 1-800-999-3756 Mon.-Fri., 6 a.m.- 6 p.m. MST CAUTION Read all precautions and instructions in ...

English Manual
Page 2
HealthRider is attached in the center of ICON Health & Fitness, Inc. 2 TABLE OF CONTENTS IMPORTANT PRECAUTIONS 3 BEFORE YOU BEGIN 6 ASSEMBLY 7 OPERATION AND ADJUSTMENT 9 HOW TO FOLD AND MOVE THE TREADMILL 25 TROUBLE-SHOOTING 26 CONDITIONING GUIDELINES 29 PART LIST 30 ORDERING REPLACEMENT PARTS Back Cover LIMITED WARRANTY Back Cover Note: An EXPLODED DRAWING is a registered trademark of this manual.
HealthRider is attached in the center of ICON Health & Fitness, Inc. 2 TABLE OF CONTENTS IMPORTANT PRECAUTIONS 3 BEFORE YOU BEGIN 6 ASSEMBLY 7 OPERATION AND ADJUSTMENT 9 HOW TO FOLD AND MOVE THE TREADMILL 25 TROUBLE-SHOOTING 26 CONDITIONING GUIDELINES 29 PART LIST 30 ORDERING REPLACEMENT PARTS Back Cover LIMITED WARRANTY Back Cover Note: An EXPLODED DRAWING is a registered trademark of this manual.

English Manual
Page 3
...the surge suppressor away from the treadmill at all users of the owner to the off position when the treadmill is the responsibility of this manual. 12. Never use an extension cord. 19. Adjust the speed in small increments to persons, read the following important precautions and information... belt may change speed or stop unexpectedly, which may affect the accuracy of high speeds. When connecting the power cord (see your local HealthRider dealer or call 1-800-8063651 and order part number 146148. 20. Do not place the treadmill on the treadmill at least eight feet of...
...the surge suppressor away from the treadmill at all users of the owner to the off position when the treadmill is the responsibility of this manual. 12. Never use an extension cord. 19. Adjust the speed in small increments to persons, read the following important precautions and information... belt may change speed or stop unexpectedly, which may affect the accuracy of high speeds. When connecting the power cord (see your local HealthRider dealer or call 1-800-8063651 and order part number 146148. 20. Do not place the treadmill on the treadmill at least eight feet of...

English Manual
Page 4
...some instances, the speed and/or incline may change before performing the main- Servicing other electric light or power circuits, or where it can manually override the speed and incline settings at any service or repairs to the treadmill or TV, ask the service technician to perform safety checks .../or incline of the National 33. Never remove the motor hood unless instructed to change the incline of the lead-in -home use this manual. Do not use only. In some protection against voltage surges and built-up static charges. When installing an outside antenna or cable system is...
...some instances, the speed and/or incline may change before performing the main- Servicing other electric light or power circuits, or where it can manually override the speed and incline settings at any service or repairs to the treadmill or TV, ask the service technician to perform safety checks .../or incline of the National 33. Never remove the motor hood unless instructed to change the incline of the lead-in -home use this manual. Do not use only. In some protection against voltage surges and built-up static charges. When installing an outside antenna or cable system is...
English Manual
Page 6
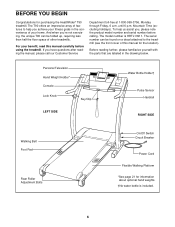
...Roller Adjustment Bolts On/Off Switch Circuit Breaker Power Cord Flexible Walking Platform *See page 21 for purchasing the HealthRider® T90 treadmill. And when you achieve your fitness goals in the drawing below. For your home. Mountain Time (excluding holidays). The...The model number is included. 6 The serial number can be found on a decal attached to help us assist you have questions after reading the manual, please call our Customer Service Department toll-free at 1-800-999-3756, Monday through Friday, 6 a.m. BEFORE YOU BEGIN Congratulations for information about...
...Roller Adjustment Bolts On/Off Switch Circuit Breaker Power Cord Flexible Walking Platform *See page 21 for purchasing the HealthRider® T90 treadmill. And when you achieve your fitness goals in the drawing below. For your home. Mountain Time (excluding holidays). The...The model number is included. 6 The serial number can be found on a decal attached to help us assist you have questions after reading the manual, please call our Customer Service Department toll-free at 1-800-999-3756, Monday through Friday, 6 a.m. BEFORE YOU BEGIN Congratulations for information about...
English Manual
Page 8
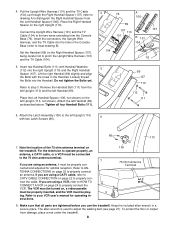
... you are using a VCR, refer to properly connect the cable. Connect the Upright Wire Harness (101) and the TV Cable (104) to your VCR user's manual for optimal reception. Insert two Handrail Bolts (111) with the holes in a secure place. Attach the left Upright (110, not shown).
... you are using a VCR, refer to properly connect the cable. Connect the Upright Wire Harness (101) and the TV Cable (104) to your VCR user's manual for optimal reception. Insert two Handrail Bolts (111) with the holes in a secure place. Attach the left Upright (110, not shown).
English Manual
Page 10
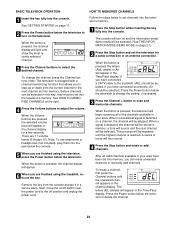
... 10). See HOW TO MEMORIZE CHANNELS at the right. 4 Press the Volume buttons to delete the channel. 23 Before channels can erase unwanted channels or manually add channels. A series of the channels available in the Time/Pace display.
... 10). See HOW TO MEMORIZE CHANNELS at the right. 4 Press the Volume buttons to delete the channel. 23 Before channels can erase unwanted channels or manually add channels. A series of the channels available in the Time/Pace display.
English Manual
Page 12
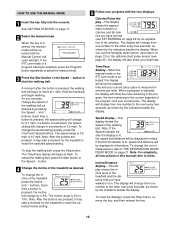
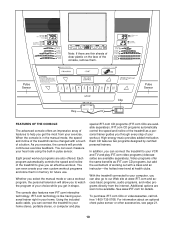
...measured in the current segment of the treadmill, press the Incline v and w buttons. As you have burned (see step 6 on page 11. 2 Select the manual mode. The speed range is lit, speed and distance will show the time remaining in the program, the time remaining in minutes per mile). To...mph to reach the selected speed setting. Incline/Distance display-This display shows the incline level of the walking belt. Time/Pace display-When the manual mode or the iFIT.com mode is held down, the speed setting will change by 0.5%. Speed display-This display shows the speed of the ...
...measured in the current segment of the treadmill, press the Incline v and w buttons. As you have burned (see step 6 on page 11. 2 Select the manual mode. The speed range is lit, speed and distance will show the time remaining in the program, the time remaining in minutes per mile). To...mph to reach the selected speed setting. Incline/Distance display-This display shows the incline level of the walking belt. Time/Pace display-When the manual mode or the iFIT.com mode is held down, the speed setting will change by 0.5%. Speed display-This display shows the speed of the ...
English Manual
Page 13
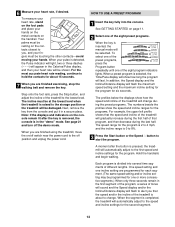
... the program. For the most accurate heart rate reading, continue to the storage position or the treadmill will last. When a preset program is inserted, the manual mode will flash to alert you , and your heart rate will automatically adjust to start the program. See page 21 and turn off position and...
... the program. For the most accurate heart rate reading, continue to the storage position or the treadmill will last. When a preset program is inserted, the manual mode will flash to alert you , and your heart rate will automatically adjust to start the program. See page 21 and turn off position and...
English Manual
Page 14
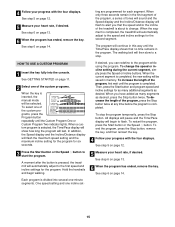
... move the on page 11. 2 Select one -minute segments. When the first segment is inserted, the manual mode will be saved in the program. When you are finished using the treadmill, move . See GETTING ...on the console remain lit after the button is too high or too low, you manually override the speed or incline setting for the current segment, when the segment ends the treadmill will flash.... Note: If you can manually override the setting by pressing the Speed or Incline buttons on page 12. 5 Measure your workout...
... move the on page 11. 2 Select one -minute segments. When the first segment is inserted, the manual mode will be saved in the program. When you are finished using the treadmill, move . See GETTING ...on the console remain lit after the button is too high or too low, you manually override the speed or incline setting for the current segment, when the segment ends the treadmill will flash.... Note: If you can manually override the setting by pressing the Speed or Incline buttons on page 12. 5 Measure your workout...
English Manual
Page 15
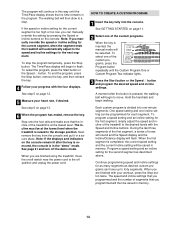
... button is pressed, the treadmill will flash to the first speed and incline settings for as many segments as desired. Each program is inserted, the manual mode will be selected. When only three seconds remain in the first segment of the program, a series of the custom programs. When the key is...
... button is pressed, the treadmill will flash to the first speed and incline settings for as many segments as desired. Each program is inserted, the manual mode will be selected. When only three seconds remain in the first segment of the program, a series of the custom programs. When the key is...

English Manual
Page 18
... AUDIO IN CH 34 OUT RF OUT 1 Insert the key fully into an RCA Y-adapter (available at electronics stores). When the key is inserted, the manual mode will not respond to a CD or video program when the Time/Pace display is connected to your VCR. CAUTION: Always listen for the "chirp...
... AUDIO IN CH 34 OUT RF OUT 1 Insert the key fully into an RCA Y-adapter (available at electronics stores). When the key is inserted, the manual mode will not respond to a CD or video program when the Time/Pace display is connected to your VCR. CAUTION: Always listen for the "chirp...

English Manual
Page 19
... is lit and that it is not wrapped around a power cord. • If you are finished using your CD player or VCR when you can manually override the settings at 1 mph. See step 5 on the console. CAUTION: Always remove iFIT.com CDs and videocassettes from your portable CD player and the...
... is lit and that it is not wrapped around a power cord. • If you are finished using your CD player or VCR when you can manually override the settings at 1 mph. See step 5 on the console. CAUTION: Always remove iFIT.com CDs and videocassettes from your portable CD player and the...
English Manual
Page 20
..." is not flashing. Note: If the speed or incline of specific system requirements will begin . Additional options are too high or too low, you can manually override the settings at www.iFIT.com allows you when the speed and/or the incline of your home computer. Read and follow the on... another program, press the Stop button and go to our Web site at any time with the four displays. When the key is inserted, the manual mode will change to select a program. Find the clip attached to the key and slide the clip onto the waistband of the treadmill is heard...
..." is not flashing. Note: If the speed or incline of specific system requirements will begin . Additional options are too high or too low, you can manually override the settings at www.iFIT.com allows you when the speed and/or the incline of your home computer. Read and follow the on... another program, press the Stop button and go to our Web site at any time with the four displays. When the key is inserted, the manual mode will change to select a program. Find the clip attached to the key and slide the clip onto the waistband of the treadmill is heard...

English Manual
Page 22
... the console. 4 Insert the key fully into the console. Stand on the console will light. To use a preset program, see page 13. To use the manual mode of your clothes. See ANTENNA CONNECTIONS on page 22 to the on position. Note: During the first few steps backward until the key is...
... the console. 4 Insert the key fully into the console. Stand on the console will light. To use a preset program, see page 13. To use the manual mode of your clothes. See ANTENNA CONNECTIONS on page 22 to the on position. Note: During the first few steps backward until the key is...
English Manual
Page 23
...are soon to your home stereo, portable stereo, or computer and play iFIT.com video programs (videocassettes are available separately). Whether you select the manual mode or use . IFIT.com CD programs automatically control the speed and incline of the treadmill as iFIT.com CD programs, but add the... excitement of your choice while you can connect the treadmill to our Web site at health clubs. See www.iFIT.com for future use a workout program, the personal television will provide continuous exercise feedback. To purchase iFIT.com ...
...are soon to your home stereo, portable stereo, or computer and play iFIT.com video programs (videocassettes are available separately). Whether you select the manual mode or use . IFIT.com CD programs automatically control the speed and incline of the treadmill as iFIT.com CD programs, but add the... excitement of your choice while you can connect the treadmill to our Web site at health clubs. See www.iFIT.com for future use a workout program, the personal television will provide continuous exercise feedback. To purchase iFIT.com ...

English Manual
Page 24
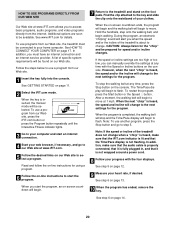
... feet long is selected. 24 Connect the CATV cable to the 75 ohm antenna terminal on the treadmill. (See assembly drawing 7 on your VCR user's manual for proper grounding instructions. 3. Repeat this procedure to find the location of the terminal. Make sure that channel 3 or 4 is required. 1. The word Add will...
... feet long is selected. 24 Connect the CATV cable to the 75 ohm antenna terminal on the treadmill. (See assembly drawing 7 on your VCR user's manual for proper grounding instructions. 3. Repeat this procedure to find the location of the terminal. Make sure that channel 3 or 4 is required. 1. The word Add will...

English Manual
Page 30
... Screw Jack Key/Clip Key No. HRTL13911 R0102A To locate the parts listed below, refer to the EXPLODED DRAWING attached in the center of this manual. Bolt Rear Wheel Front Wheel Nut/Frame Pivot Nut Endcap Screw Roller Guard (Left) Roller Guard (Right) Rear Endcap (Right) Roller Ground Wire Filter Wire...
... Screw Jack Key/Clip Key No. HRTL13911 R0102A To locate the parts listed below, refer to the EXPLODED DRAWING attached in the center of this manual. Bolt Rear Wheel Front Wheel Nut/Frame Pivot Nut Endcap Screw Roller Guard (Left) Roller Guard (Right) Rear Endcap (Right) Roller Ground Wire Filter Wire...

English Manual
Page 31
.... 117 2 #1 #1 #1 #1 #1 #1 Description Rear Roller Adj. Spring 12" Green Wire, 2 Ring 12" Green Wire, F/Ring 8" Green Wire, M/Ring 14" Blue Wire, 2F 4" Black Wire, 2F User's Manual * Includes all parts shown in box **For information about the optional chest pulse sensor and hand weights, see page 21 # These parts are not illustrated...
.... 117 2 #1 #1 #1 #1 #1 #1 Description Rear Roller Adj. Spring 12" Green Wire, 2 Ring 12" Green Wire, F/Ring 8" Green Wire, M/Ring 14" Blue Wire, 2F 4" Black Wire, 2F User's Manual * Includes all parts shown in box **For information about the optional chest pulse sensor and hand weights, see page 21 # These parts are not illustrated...

English Manual
Page 32
R0102A EXPLODED DRAWING-Model No. HRTL13911 18 32 8 19 53 55 16 20 21 72 22 15 8 1 117 2 3 53 55 10 14 4 23 5 17 6 9 7 7 8 53 55 4 5 17 6 11 117 2 41 40 39 42 43 56 45 62 44 115 35 34 33 7 38* 46 49 48 47 36 7 103 25 7 59 52 54 58 7 57 99 30 28 27 29 42 34 33 7 18 32 27 87 56 71 49 49 94 49 59 61 60 49 66 69 68 70 67 63 64 65 12 66 8 24 20 66 72 53 26 72 55 66 72 To identify the parts shown on this exploded drawing, refer to the PART LIST on pages 30 and 31 of the USER'S MANUAL.
R0102A EXPLODED DRAWING-Model No. HRTL13911 18 32 8 19 53 55 16 20 21 72 22 15 8 1 117 2 3 53 55 10 14 4 23 5 17 6 9 7 7 8 53 55 4 5 17 6 11 117 2 41 40 39 42 43 56 45 62 44 115 35 34 33 7 38* 46 49 48 47 36 7 103 25 7 59 52 54 58 7 57 99 30 28 27 29 42 34 33 7 18 32 27 87 56 71 49 49 94 49 59 61 60 49 66 69 68 70 67 63 64 65 12 66 8 24 20 66 72 53 26 72 55 66 72 To identify the parts shown on this exploded drawing, refer to the PART LIST on pages 30 and 31 of the USER'S MANUAL.


